Nintendo DSi XL Teardown
Duration: 45 minutes
Steps: 21 Steps
Guess what? The Nintendo DSi XL is here, ready for its big reveal! We’re diving in to check out the inner workings of this mighty handheld. Stick around and enjoy a detailed teardown, plus a cool video slideshow showing it all!
Step 1

– Meet the Nintendo DSi XL: the latest and greatest in Nintendo’s handheld lineup.
– What’s new? Glad you asked:
– Both screens are now a whopping 93% larger than the ones on the DS Lite. That’s a lot more game to love.
– Plus, there’s a full-size stylus for top-notch precision on those big screens.
Step 2

– What’s in the box?
– Well, if you were wondering, here’s the scoop: you’ve got your Nintendo DSi XL, ready to roll. Along with that, you’ll find the Operation Manual (the classic guide to getting started), Quick Start Guides to help you hit the ground running, an AC Adapter to keep the power flowing, and a Full Size Stylus for those precise, expert touches. Everything you need to get up and going, right here.
Step 3


– The DSi XL measures 161 x 91.4 x 21.2 mm and tips the scales at 314 g—that’s 45% heavier than the 217 g DSi. A bigger size, a bit more weight, but still a solid handheld.
– Here’s a side-by-side shot of the DSi (left) and DSi XL (right)—see the size difference for yourself.
– The DSi XL features dual 4.2-inch LCD screens, giving you a larger, more immersive display experience.
– Check out the back of the DSi XL—surprise! It’s made in China, just like many other electronics.
Step 4

– The full-sized stylus clocks in at 10 x 130 mm—definitely a step up from its compact 5 x 90 mm sibling. It might feel a bit different at first, but most folks end up liking the more relaxed grip.
Step 5
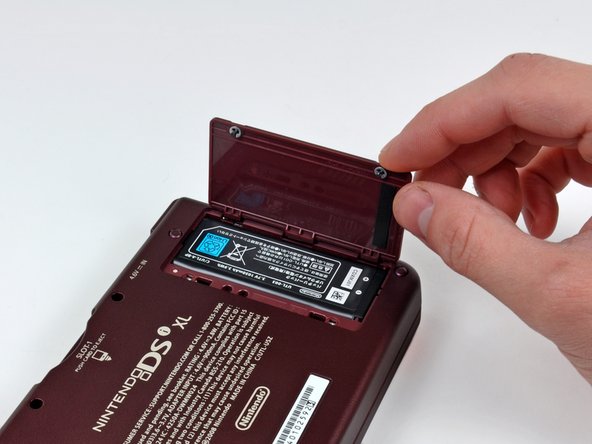

Both screws stay snug within the battery door, so no need to worry about losing them during the process.
– Unscrew the two Phillips screws holding the battery door to the bottom of your DSi XL.
– Pop off the battery door and gently lift out the battery from its cozy little spot.
Step 6

– Nintendo gave the DSi a nice upgrade in battery size, bumping it up from 840 mAh in the DSi (on the right) to 1050 mAh in the DSi XL (on the left).
– In case you’re not into math, that’s a solid 25% more juice!
– But hey, with all that extra battery power, the XL does get a little heavier. The XL’s battery weighs in at 23 g, while the DSi battery is a lighter 19 g.
Step 7

Remember where each screw goes – they come in different sizes, so keeping track is key!
– There are just seven Phillips screws standing between you and the DSi XL’s inner workings—grab your screwdriver and let’s get those out of the way!
Step 8

Heads up! There’s an orange ribbon still linking both halves together. Go slow and gentle when prying—nobody likes a busted connector.
– With a little gentle wiggling, the lower case pops off smoothly—no sweat!
Step 9

The lower case should now easily come off the upper case of the DSi XL.
– Gently pry the connectors straight up using the flat end of your trusty spudger – the SD board cable and volume control cable connectors are first on the list to tackle!
– It’s great to see Nintendo designed the DSi XL with fewer long ribbon cables like its predecessor, making this process a bit smoother.
– Get a good grip on the SD board cable connector – it’s time to set it free.
– Next, use your spudger to carefully release the volume control cable connector – you’re making great progress!
Tools Used

Step 10


– Gently lift the Wi-Fi board by its edge closest to the center of the DSi, and it should pop off the logic board with ease.
– Grab the flat end of a spudger and carefully pry both antenna cable connectors from their spots on the Wi-Fi board and logic board.
Tools Used
Step 11


To pop open those flat ribbon cable sockets, just use your fingernail to gently flip up the tiny locking flap. Easy does it—no prying tools needed!
– Removing the main board is easier than you think:
– Start by unscrewing the five Phillips screws.
– Next, disconnect the six connectors on the front side, then flip the board over and disconnect the last one hiding on the back.
Step 12

The DSi XL screen assembly cleverly combines the digitizer, LCD, and backlight into one easy-to-handle unit, making replacement straightforward and hassle-free.
– The lower display is snugly held in place by the pressure of the board above it. No screws, just good old-fashioned pressure!
– Once you’ve loosened it from the light adhesive around the edges, gently lift the lower display out of the DSi XL. Easy does it!
Step 13


The D-Pad and I/O buttons are neatly placed right on the face of the battery/control board, making them easy to reach and ready for action.
– Take out the seven Phillips screws holding the battery and control board to the upper case.
Step 14


– Pop off the four red plastic covers—these little guys are hiding the Phillips screws you need to get to.
– Once those Phillips screws are out, the top display is ready for action.
– Slide the top outer case toward the top edge of your DSi XL, then gently work a spudger around to unclip it from the inner case.
Tools Used
Step 15


– Gently pry the outward-facing camera out of its spot on the top outer case using a spudger. Next, unscrew the single Phillips screw holding the inward-facing camera’s bracket to the top inner case. Carefully slide the camera’s ribbon cable through the hollow right hinge, taking care not to tear it or the display ribbon cable. Keep in mind, the DSi XL has two digital cameras—one inside the hinge aimed at your face, and the other on the outside, pointing away from the top outer case. If you need help, you can always schedule a repair.
Tools Used
Step 16

– You’ll find the Wireless LAN antenna board chilling in the upper right corner of the top outer case.
– To take it out, just lift it up—easy as that!
Step 17

– Gently lift up the speakers, then carefully guide the display ribbon cable through the empty space in the right hinge.
– Next, remove the upper LCD assembly from the inner case. You’ve got this!
Step 18

– Check out the DSi XL’s double jumbo screens.
– Each one is a roomy 4.2 inches across the diagonal—plenty of space for your thumbs to roam.
– Even though they’re bigger, both screens keep the classic 256 x 192 pixel resolution.
– Touchscreen controller model: NB-F7B AB1 018
Step 19


The electronic right trigger button hangs out on the SD board, so you’ll find them together on this adventure.
– Unscrew the seven Phillips screws holding down the left trigger, right trigger, and stylus holder to the bottom of the outer case.
– Carefully lift out the SD board and the stylus holder.
– Heads up: putting the triggers back together is a real puzzle. Only take them apart if you’re feeling bold!
Step 20


– The Samsung and Fujitsu chips are basically twins when compared to the DSi:
– TI (TXN) 72071B0: This little guy handles power management and charging duties. It used to be a Mitsumi chip in the smaller DSi.
– PAIC3005B: We’re pretty sure this one’s the Primary Antenna Interface Controller, mainly because it’s hanging out near the antenna.
– Primary Nintendo ARM CPU, made in the final week of 2009. The markings here are just like the ones on the DSi. So, definitely no Tegra chip rumors here!
– Samsung 1st gen MoviNAND KMAPF0000M: 256 MB of NAND Flash with an MMC controller. The MMC controller is the real MVP here, letting the CPU handle the heavy lifting of dealing with flash memory.
– 82DBS08164D-70L: Fujitsu Ltd’s 128-bit FCRAM chip, designed for fast-cycle operations.
Step 21


– Compare the layouts of the DSi XL and DSi side by side to spot the differences. Remember, you’ve got this—step by step, you’re making it happen! If you need a hand at any point, you can always schedule a repair. Keep going, you’re doing great!
Success!