Nintendo DSi Teardown
Duration: 45 minutes
Steps: 17 Steps
We’ve just got our hands on the new Nintendo DSi. Ready to get it opened up and back in action? Follow these steps to carefully take it apart and replace any faulty parts. If you need help along the way, you can always schedule a repair to get professional assistance. Let’s dive in and make this device as good as new!
Step 1


– Great news! Your package has arrived. Inside, you’ll find the Nintendo DSi and some handy accessories. Let’s go through what’s included: the console itself, the operation manual, quick start guide, AC adapter, an extra stylus, and a special invitation from Mario’s hat to join Club Nintendo. Ready to get started? If you need help along the way, you can always schedule a repair.
Step 2

– Check out those vibrant colors! They’re looking good, right?
– The manual’s definitely bigger than the DSi in almost every way, except for thickness. Oh, and did we mention the pages are in color? That’s probably why the DSi comes with such a hefty price tag compared to its predecessor.
Step 3


– Let’s compare the Nintendo DS Lite (on the left) and the Nintendo DSi (on the right). The DSi sports a fresh matte-black finish—almost dark gray—that feels a bit rougher to the touch, giving you a better grip and extra scratch resistance. It’s a tad slimmer by 3 mm, but it stretches out a bit, gaining 4 mm in length and 1 mm in width. Plus, the DSi flaunts larger 3.25″ LCD screens, a full quarter-inch bigger than the old 3″ panels. Ready to get started? If you need help, you can always schedule a repair.
Step 4
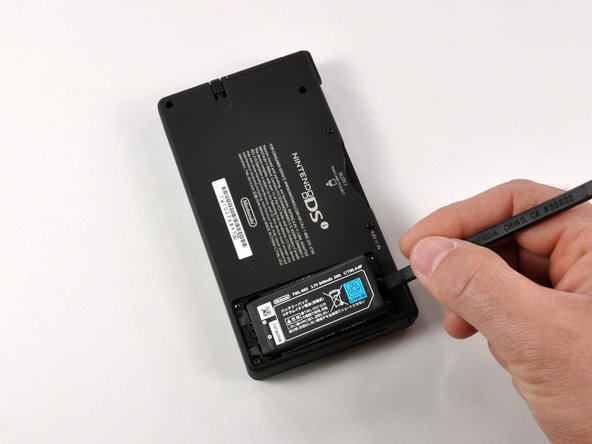

– Two Phillips screws are standing between you and the battery. Grab your trusty screwdriver, and those screws won’t be a problem for long.
– A quick flick with the spudger (or just a gentle nail poke) will easily pop the battery out of its cozy spot.
Tools Used

Step 5

– There are seven screws holding the lower case of the DSi in place. Three of these are easy to spot right away—no need to remove any plugs or covers. Two more screws hide behind some near-top plugs that you’ll need to gently remove first. Finally, taking out the battery compartment uncovers two additional screws that need to be taken out. Remember, if you get stuck or want some extra help, you can always schedule a repair to get professional assistance.
Step 6

– And just like that, the case pops right open.
– You’ll spot an orange connector holding the cases together. Be extra careful when opening the DSi to avoid any damage to this connector—it’s a bit delicate!
Step 7

– Here’s a quick comparison: on the left, the DS Lite, and on the right, the DSi. You’ll notice some clear differences. The DSi packs a smaller 840mAh rechargeable battery, while the DS Lite has a 1000mAh battery. The size difference matches the capacity change, and fun fact—original Nintendo DS models came with an 850mAh battery. Keep this in mind as you work through your repair, and if you need help, you can always schedule a repair.
Step 8

– Popping out the battery PCB is a breeze:
– Unplug three connectors—just a quick flick and you’re good.
– Remove five Phillips screws and set them aside (maybe somewhere safe so they don’t escape).
Step 9


– The Wi-Fi board is held down by a big connector. Just wedge your spudger in and give it a gentle twist to pop it free from the main board.
– Then, a quick flick of the spudger will disconnect the Wi-Fi board’s connector wire. Easy peasy!
Tools Used
Step 10


– Getting the main board out is almost as chill as removing the battery PCB:
– Pop out four Phillips screws—easy does it.
– Unplug a total of six connectors before you lift out the board: five you’ll spot right away, and one sneaky connector hiding on the flip side.
Step 11

– Great job on completing the first round of disassembly! Now, let’s keep the momentum going and move on to the next steps to get your device fully apart. Remember, if you hit any snags or need a hand, you can always schedule a repair with Salvation Repair for expert help. Keep it up!
Step 12


– Start by peeling back those four black plastic covers to get to the screws hiding beneath.
– Once you’ve popped those covers off, unscrew the four Phillips screws to gain access to the top display.
Step 13


– Check out the upper half with the outer case off—lots to see here.
– Spot the Wireless LAN antenna board chilling in the upper right corner of the chassis.
– The top display and camera ribbon cables are elegantly looped and tucked through the hinge between the case halves. We’re adding this to our wish list for robots to tackle someday.
– That slim orange wire in the second photo? That’s the mic. On the fun side, a new feature lets you tweak the pitch and speed of your music—perfect for aspiring DJs.
Step 14

– The DSi comes equipped with two VGA CMOS digital cameras (0.3 megapixels). One is tucked inside the internal hinge, facing you, and the other sits in the outer shell, ready to capture the world around you.
Step 15


– Secure the battery compartment and the stylus tray/SD/SDHC expansion slot to the case by tightening the eight Phillips screws. The DSi features an integrated SD/SDHC slot—perfect for playing AAC audio files, storing photos, or downloading software. Looking to get more out of your device? If you need assistance, you can always schedule a repair.
Step 16


– Check out the logic board in all its high-tech glory.
– Let’s spotlight the coolest chips from left to right:
– First up: Samsung’s first-gen MoviNAND KMAPF0000M. This chip serves up 256 MB of NAND Flash with an onboard MMC controller, which means your CPU gets to kick back instead of managing all that memory talk.
– Next is the 82DBS08164D-70L—a snappy 128-bit FCRAM (fast-cycle RAM) chip from Fujitsu Ltd.
– And finally, the star of the show: Nintendo’s custom ARM CPU, fresh out of the fab in September 2008.
Step 17


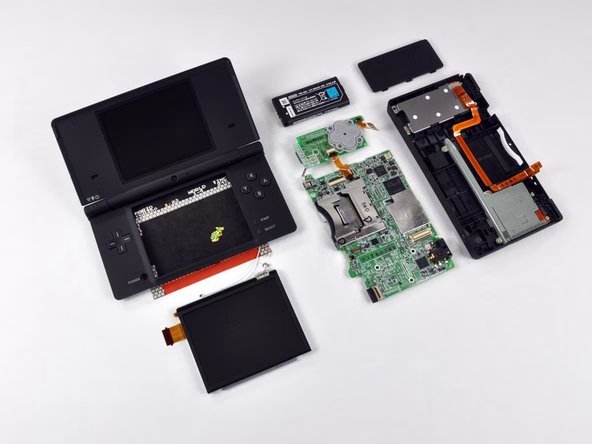
– Nintendo DSi… REST IN PIECES! Let’s see what’s inside!
– Here are some cool chips worth checking out:
– Samsung’s first-gen MoviNAND KMAPF0000M: This 256 MB NAND Flash comes with a built-in MMC controller, so the CPU can relax and let the controller handle the tricky flash memory stuff.
– 82DBS08164D-70L: This is a 128-bit FCRAM (fast-cycle RAM) chip from Fujitsu Ltd—speedy memory for your device.
– Custom ARM CPU by Nintendo. Ours rolled off the line in September 2008.
Success!
