Samsung Galaxy S4 vibration motor Replacement Guide
Duration: 45 minutes
Steps: 10 Steps
Heads up! Make sure to double-check your device’s model before diving into the repairs. We wouldn’t want you to start a dance with the wrong partner!
Follow this hip guide to swap out a bum vibration motor on your Samsung Galaxy S4 Active. Let’s bring the buzz back to your device!
Step 1


– Use a plastic opening tool, or your trusty fingernail, to gently pry at the small notch located just to the left of the rear camera, near the power button. It’s like unlocking a treasure chest!
– Grab the corner of the rear case nearest to the notch and gently lift it off the phone. Voila! The back is off, and you’re one step closer to being a repair hero!
Step 2

– Grab a plastic opening tool or your trusty fingernail and gently nudge that microSD card a little deeper into its cozy slot until you hear a satisfying click.
– Once you hear that click, let go of the card and watch it pop out like magic!
– Now, go ahead and remove the microSD card with ease.
Step 3

– Take a plastic opening tool or your trusty finger, and gently slide it into the notch of the battery compartment. Give the battery a little lift to pop it out like a pro!
Step 4

– Nudge the SIM card deeper into its slot with a plastic opening tool or your fingernail, until you hear a satisfying click.
– Once you hear that click, let go and watch the SIM card magically pop out like a toast from a toaster!
– Go ahead and remove the SIM card.
Step 5

– Grab your trusty spudger and gently pop off the four shiny metallic pads nestled in each corner of your device. They’re just waiting to be freed!
– Next up, take a Phillips #00 screwdriver and let’s tackle those 12 screws that are holding the midframe tight. Remove them and set them aside; you’re doing great!
Tools Used


Step 6

– Grab your plastic opening tool and let’s have a little pry-party around the edge of the midframe! Just work it all the way around to free it from the front case’s embrace.
Step 7


– Grab the flat end of your trusty plastic opening tool to pop off the USB board connector like a pro.
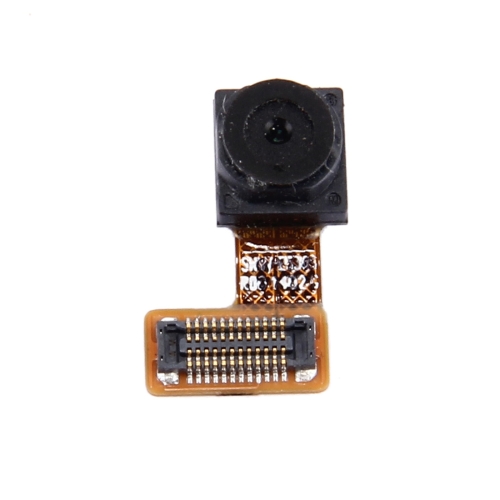
– Unplug the front-facing camera cable connector with a gentle tug.
– Give the earpiece speaker assembly cable connector a quick disconnect.
– Detach the headphone jack assembly cable connector with ease.
– Unhook the display/digitizer cable connector without breaking a sweat.
– Finally, disconnect the antenna cable connector and you’re all set!
Step 8

– Unscrew the lone 2.4 mm Phillips #00 screw holding the motherboard assembly. Rock on with your repair skills!