Samsung Galaxy S4 Active Display Assembly Replacement Guide – DIY Tutorial
Duration: 45 minutes
Steps: 10 Steps
Heads up, tech whiz! Make sure you’ve got your tools ready and your workspace clear. It’s about to get techy in here!
The display assembly is like a party pack—it includes the LCD, digitizer, and frame. You might have to move some party favors from your old display to the new one. Keep an eye out! Used assemblies could be playing hide and seek with one or more of those sneaky elastic grommets shown in the fresh assemblies.
Step 1


– Use a plastic opening tool, or give it a go with your fingernail, to pry into the little notch just left of the rear camera, right by the power button.
– Get a grip on the rear case at the corner near the notch and gently lift it off the phone.
Step 2

– Grab a plastic opening tool or just your trusty fingernail and give that microSD card a gentle nudge deeper into its cozy slot until you hear a satisfying click.
– Once you hear that click, let go of the card and watch it spring out like it’s ready for a little adventure.
– Now, go ahead and remove that microSD card with a smile!
Step 3

– Grab a plastic opening tool or just use your finger to pop into the notch of the battery compartment. Give it a gentle lift and voilà, the battery comes right out!
Step 4

– Grab a plastic opening tool or use your magical fingernail to gently press the SIM card deeper into its slot until you hear a satisfying click.
– Once you hear that click, let go and watch the SIM card leap out of its slot like a toast from a toaster.
– Now, just remove the SIM card and voila!
Step 5

– Grab your spudger and playfully pry off the four shiny metal pads hiding in each corner. It’s like a treasure hunt!
– Time to unscrew some secrets! With your trusty Phillips #00 screwdriver, twist out the 12 screws that are holding the midframe in place. Let’s free that frame!
Tools Used


Step 6

– Grab your plastic opening tool and let’s give the midframe a little nudge all around its edge to pop it off from the front case. It’s like opening a treasure chest, so let’s pry away with style!
Step 7


– Pop off the USB board connector with the flat end of a plastic opening tool. Easy does it!
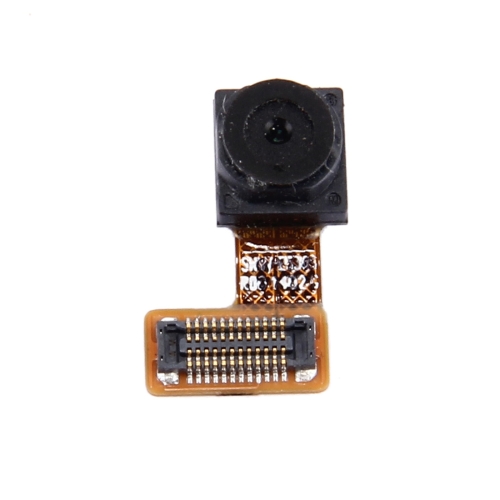
– Unhook the front-facing camera cable connector. Just a gentle tug!
– Detach the earpiece speaker assembly cable connector. You’re doing great!
– Disconnect the headphone jack assembly cable connector. Almost there!
– Unplug the display/digitizer cable connector. Nice and easy!
– Remove the antenna cable connector. Look at you go!
Step 8

– Unscrew the single 2.4 mm Phillips #00 screw from the motherboard assembly. Let’s get that board free!
Step 9

– Alright, let’s whisk away that motherboard!
Step 10


– Unplug the daughterboard connector with a gentle tug, just like unplugging a fridge for a snack break.
– Carefully peel away the daughterboard as if it’s a sticker from your favorite band, and lift it out of the device.