How to Replace Samsung Galaxy S Plus Front Panel Assembly DIY Guide
Duration: 45 minutes
Steps: 6 Steps
Heads up, tech whiz! Make sure you’ve got your tools ready and your workspace clear because we’re diving into some gadget surgery! Remember, if you hit a snag, help is just a click away at schedule a repair. Let’s make this device feel brand new!
Follow this snazzy guide to swap out the front panel assembly on your Samsung Galaxy S Plus (i9001). You’ll be handling the digitizer, speaker, and that oh-so-important OK button. Gear up for a smooth fix and get ready to bring your phone back to its glory!
Step 1


– Grab your Phillips screwdriver and show those 7 screws on the back who’s boss! Unscrew each one to move forward.
Step 2


– Gently pop off the back using a soft plastic prying tool to liberate the rear cover
– Take care not to harm the rear cover while detaching it.
Step 3

– Grab your tweezers and gently peel off the Power Key FPCB from its cozy spot stuck onto the bracket with double-sided tape. Let’s make sure to clean up any tape leftovers on the bracket to keep things neat and tidy!
Step 4

– Unplug the LCD Connector, Receiver Connector, Sub-touch Key Connector, and Antenna cable from the Main PBA. Oh, and leave the camera connector be—it’s chillin’ just fine!
Step 5

– Gently ease the Main PBA out of its bracket after detaching the connectors, and watch out—don’t let that Power Key FPCB snag on anything!
Step 6


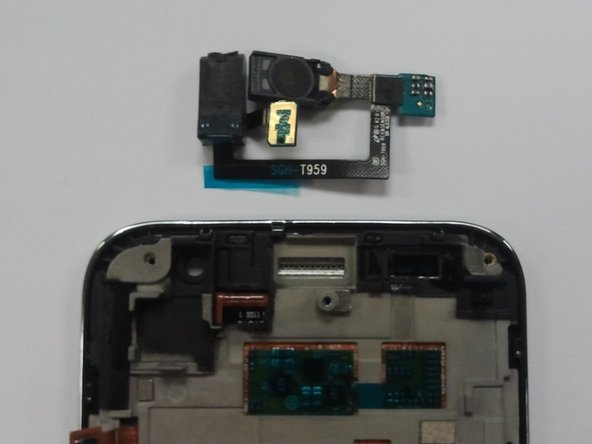
– Unhook the antenna cable from the main Antenna PCB located on the sub-touch key module of your Screen Digitizer Frame that’s seen better days.
– Gently ease the Receiver module out of its bracket. Take extra care not to damage the FPC.
– Fit both the Receiver module and the antenna cable into your shiny new Screen Digitizer Frame, then joyfully reverse the disassembly steps!