iPod Nano 6th Generation 2011 Teardown
Duration: 45 minutes
Steps: 15 Steps
October 4th, 2011. Time to talk iPhone! Yesterday’s press release dropped some cool new details about the upcoming iPhone 4S (check back on October 14th for the teardown) and the next-gen iPod Nano. While we eagerly wait for this year’s new iPhone, let’s take a closer look at the latest iPod Nano. Fun fact: this new Nano isn’t much different from the previous version. In fact, it’s almost identical. Check out the details below. For the latest updates, follow us on Twitter.
Step 1

– The tiny powerhouse from Apple is back, and it’s packed with cool features that make it a joy to use.
– A 1.54-inch multi-touch display to keep you in control, right at your fingertips.
– With a crisp 240 x 240 pixel resolution, every detail looks sharp and clear.
– Built-in accelerometer to track your moves and keep up with your pace.
– Stock Nike+ compatibility to keep you motivated with all your fitness needs.
– A rechargeable lithium-ion battery, offering up to 24 hours of music playback so you can keep the tunes going all day.
– Choose from 8 GB or 16 GB of internal storage, giving you plenty of room for all your apps and music.
Step 2


– Not much has changed in terms of packaging. The Nano is still wrapped up in its own little cube of luxury.
– Take a quick look at the model number, and you’ll notice it still carries the A1366 label, just like its predecessor.
– A little detective work reveals that any variation in part numbers is just due to the Nano’s color changes. This one, MC689, is the blue version; MC688 is silver, and so on…
Step 3

– “Bill, look at how adorable they are! Should we get one?” – “Well, Mary, those little guys will grow up eventually—and they come with quite a bit of responsibility.”
– Just like most dynamic duos, the 6th and 7th Generation look pretty similar but have their own unique personalities.
– Can you tell them apart? Here’s a hint: The 7th Generation Nano doesn’t come in red…
Step 4

– Roll out the red carpet, it’s iPod Nano family time! From left to right, meet the crew:
– Nano 1st Generation
– Nano 2nd Generation
– Nano 3rd Generation
– Nano 4th Generation
– Nano 5th Generation
– Nano 6th Generation
– Nano 7th Generation
Step 5


– No screws? Have no fear! *trumpet sound* Our trusty heat gun is here to save the day!
– BLAMO! WHAMMO! Take that you malicious front glass! Your days of providing high quality entertainment to the citizens of Earth are numbered! Surrender now or taste defeat at the hands of our sidekick, Plastic Opening tool!
Tools Used

Step 6


– Screws? No worries, we’re ready to go! Grab your Phillips screwdriver and feel the power of its torque as you loosen the screws holding the Nano’s components.
– The EMI shield protecting the Nano’s logic board comes off with ease—just gently lift it away to reveal the inner workings.
Step 7

– Disconnecting a few extra connectors is part of removing the display, so stay patient and keep track of your screws and parts.
– Your Nano display has reached its last day—don’t worry, we’ll get it back in shape. We’ll be gentle and careful during the process, and before you know it, it’ll be as good as new.
Step 8


– Move it forward, then backward, then forward again, and repeat. Just like that, step by step.
– The 1.54″ LCD screen still comes with multi-touch support. We’re honestly still scratching our heads wondering why you’d need two fingers for this device, but hey, it’s still here!
– The display? It’s exactly the same – 240×240 pixels, still stuck tight to the front glass like a loyal friend.
Step 9


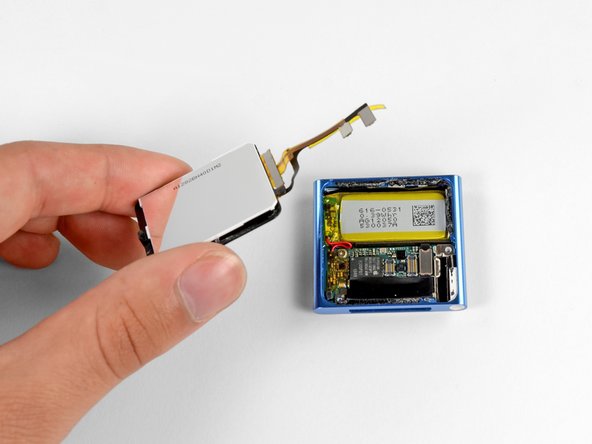
– Just a couple more screws and a stubborn connector stand in the way.
– With some gentle maneuvering, the battery and logic board slide out—still attached, since they’re soldered together.
– Time to break out the legendary 54 Bit Driver Kit and trusty Plastic Opening Tools—let’s keep moving!
Step 10


Previously, Toshiba was the go-to for Nano memory. Just a little bit of history for you while we dive into this!
– Let’s take a look at the main chips involved here: starting with the Apple 339S0104 YGC7 1046 K4X51323PI YRJ180A2 ARM N3ODPQ1 1049, then the 337S3907 1031 A 04 640102, followed by the SanDisk 05010 008G 1222DCQ1Z6, next up is the Apple 338S0783-B1 11068HDR, then D4JU 041, and finally the Apple 339S0853 C0YV1042 TWN. This list covers the core integrated circuits you’ll be working with—no secrets here! If you need a hand with any of these steps, you can always schedule a repair.
Step 11


– Next, remove a few more screws and carefully take off the clip from the outer case.
– Alright, little Nano, now’s your chance to cling to our pockets, belts, and pants. We’ve got this!
Step 12


– First, let’s gently pry away the headphone jack ribbon cable assembly from the inner case. There’s a bit of a sticky situation with what feels like an entire bottle of glue holding things back, but no worries, we’ve got this.
– Now that the assembly is free, the volume buttons are ready to come out. Easy peasy!
– The glue’s out of the way, and we’re almost done with the plastic opening tool. Just a few more steps, and you’ll be on your way.
Step 13


– Ribbon cable: officially liberated! Take a moment to marvel at your handiwork.
– All three button sensors—sleep, volume up, and volume down—are hanging out together on the same headphone jack ribbon cable. Swapping out just one of them by itself? Not exactly a walk in the park.
Step 14

– With our trusty spudger and precision tweezers in hand, we carefully remove the stubborn glue that’s still hanging out inside the nano’s case.
Step 15


– iPod Nano 7th Generation Repairability Score: 5 out of 10 (10 is easiest to repair)
– Good: Once the display is removed, the rest of the disassembly is pretty smooth sailing.
– Good: The ribbon cable connectors make it a breeze to disconnect the display and headphone jack from the logic board.
– Neutral: The headphone jack and volume buttons share the same ribbon cable, so you’ll need to replace them together.
– Bad: The display is really stuck on there – you’ll need a heat gun to melt the adhesive holding it in place.
– Bad: The battery is soldered to the logic board, which makes swapping out a single part a little trickier.
Tools Used
Success!

