iPhone XR Battery Replacement Guide: Step-by-Step DIY Repair
Duration: 45 minutes
Steps: 42 Steps
Heads up!
iPhone batteries aren’t forever—they gradually lose their zest for life. Typically, after about 500 charge cycles (that’s around 18-24 months for the average user), they can only hold about 80% of their original mojo. When your battery starts getting a bit tired, your iPhone might slow down too. Follow this fabulous guide to swap out your old battery and boost your iPhone back to its full glory. If your battery has swelled up, remember to handle it with extra care. Heads up: Post-repair, your iPhone might fuss about the ‘genuineness’ of the new battery with a pop-up message, even if you’re using legit Apple parts. If your phone’s working fine, just shrug it off. Also, the ‘battery health’ feature won’t be available after you DIY the battery swap—Apple likes to keep that under wraps. To get the best out of your new battery, give it a full charge to 100%, let it linger on the charger for a couple more hours, then run it down completely before giving it another uninterrupted charge to 100%.
Step 1


– Alright, let’s power down your iPhone before we dive in.
– Next up, remove those two 6.7 mm-long pentalobe screws chilling at the bottom edge of the iPhone.
– Heads up! There’s a sneaky black rubber gasket under each screw head. To keep your phone safe from dust and splashes, check these gaskets or swap out the screws when putting things back together.
Before diving in, let’s take it down a notch and bring your iPhone battery below 25%. Why? Well, a peppy lithium-ion battery can turn into a firecracker and go kaboom if it gets poked by accident!
Cracking open your iPhone will definitely mess with its ability to fight off water. Be a champ and have some new seals on hand before you dive deeper, or keep it dry if you plan to put it back together without a seal switcheroo.
Step 2


Careful, champ! Shoving the opening pick too deep is like poking a sleeping bear—it’s risky business! Just follow this step to mark your pick, keeping your gadget safe and sound.
– Grab your opening pick and measure a cool 3 mm from the tip. Mark that spot with a permanent marker to keep it snazzy and precise!
Step 3


Pop on those snazzy safety glasses to shield your peepers from any stray glass during the fix. It’s all about seeing the process through, safely and in style!
Got a spider-webbed screen? No worries! Slap some tape on that bad boy to keep the cracks from spreading and protect your fingers during your repair adventure.
– Stick a bunch of clear packing tape across your iPhone’s screen, covering it completely. It’s like giving your phone a little clear coat!
– Having trouble getting that suction cup to stay put? No worries! Just grab some sturdy tape like duct tape, make yourself a nifty handle, and use that to lift the screen.
Step 4


The upcoming trio of steps showcase the Anti-Clamp, our cool tool designed to simplify the opening process. If the Anti-Clamp isn’t in your toolkit, hop down three steps for another slick method.
– Tug the blue handle back to free the Anti-Clamp’s arms.
– Extend the arms across either the left or right side of your iPhone.
– Align the suction cups near the lower edge of the iPhone—one on the front and one on the back.
– Press the cups together to secure suction on the targeted area.
Step 5


– Yank the blue handle towards you to snap those arms into place.
– Give the handle a good twist clockwise—keep going for a full 360 whirl or until those suction cups look like they’re getting a stretch!
– Keep your eyes peeled on those suction cups; they should stick together like best buds. If they start playing tug-of-war, just ease up on the tension and line ’em up again.
Step 6


– Warm up an iOpener and sneak it through the arms of the Anti-Clamp like a ninja.
– Fold the iOpener to cozy up on the bottom edge of your iPhone.
– Chill for a minute to let the adhesive loosen up and tease out an opening gap.
– Wedge an opening pick between the screen and the plastic bezel—remember, not the screen itself.
– Hop over the next three steps.
Tools Used


Step 8


– Pop a single suction cup near the bottom edge of your phone, steer clear of the glass curves, and let’s get lifting!
Tools Used

Step 9


– Give that suction cup a hearty tug with steady, strong pressure to make a little opening between the front panel and the rear case. It’s like opening a jar of pickles!
– Now, sneak an opening pick right under the screen. Remember, go for the gap between the screen and the plastic bezel, not the screen itself. It’s like slipping a note under your neighbor’s door!
Step 10


– Glide the opening pick around the lower left corner and up the left side of the iPhone, cutting through the sticky adhesive that’s keeping the display cozy and snug.
Step 11

Heads up! There are sneaky cables hiding along the right edge of your iPhone. Avoid prodding the marked spots with your pick, or you might upset those delicate cables!
Step 12


– Pop your pick back in at the bottom edge of your iPhone, and shimmy it up the right side to keep loosening that sticky adhesive.
Step 13


The top edge of the display is snugly held in place with a combo of glue and snazzy clips.
– Wriggle the opening pick around the top corner of the display, giving the display a gentle tug towards the Lightning port direction.
– Scooch that pick to the other corner and tackle any stubborn adhesive that’s still holding on to the display.

Step 15


Hold up! Don’t detach the display completely just yet. There are a few sneaky ribbon cables still linking it to the iPhone’s logic board, so let’s keep things connected for a bit longer.
– Crack open your iPhone by flipping the display open from the left side, as if you’re opening a secret diary.
– Prop up the display with something sturdy to keep it stable while you tinker around inside.
– When putting it all back together, gently place the display back down, making sure the clips at the top edge are aligned. Press down carefully at the top before you snap the rest of the display back into place. If it feels like a wrestling match, double-check those clips around the edges to make sure they haven’t gone rogue and bent out of shape.
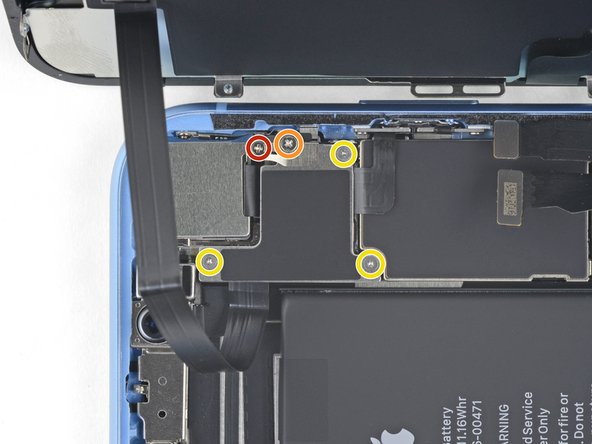
Step 16


As you dive into this repair, keep a close eye on each screw—make sure every tiny dancer ends up back in its original disco to prevent any iPhone drama. Let’s keep things smooth and screw-up free!
– Unscrew the three 1.2 mm Y000 screws that hold the battery connector cover bracket in place.
– Take off the bracket.
– When putting things back together, it’s a smart move to turn on your iPhone and check that everything’s working before you seal up the display. Remember to shut it down completely before moving on with the repair.
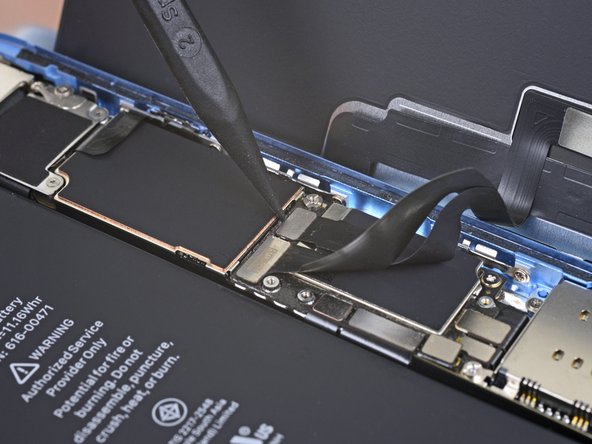
Step 17


– Grab your spudger and gently pop the battery connector out of its cozy home. Just lift it straight up!
– Give that connector a tiny bend away from the logic board. This little tweak keeps it from sneaking back and powering up your device while you’re in gadget surgery.
Tools Used

Step 18


– Whip out your trusty screwdriver and remove the two tiny 1.2 mm Y000 screws that are hanging onto the display connector bracket.
– Now, slide that bracket off like a pro!
Step 19

– Grab your trusty spudger and gently coax the digitizer cable free with a little prying action.
– When snapping these connectors back into place, line them up carefully and press down on one end until you hear a satisfying click, then give the other side the same love. Remember, middle pressing is a no-no—it could bend the pins and lead to heartbreak (and by heartbreak, we mean broken connectors).
– If your screen is playing hard to get and not responding to your touch, take a breather, disconnect the battery, and give that connector another go—make sure it clicks all the way in and check for sneaky dust or debris.
Tools Used


Step 21

– Unscrew the fabulous five that are keeping the logic board connector bracket tied down to the rear case.
– Lift off that bracket like a champ!


Step 24

– Unscrew the seven screws holding down the bracket beneath the Taptic engine and speaker. You got this!
Step 25


– Gently hoist the bracket from the side closest to the battery. Remember, it’s still hitched up with a tiny flex cable, so no yanking it out completely!
Step 26


– While keeping the bracket out of the way, gently use a spudger’s point to lift and disconnect the sneaky flex cable hiding underneath.
Tools Used
Step 27

– Yoohoo! Time to pop off that bracket!
Step 28


– Whisk away that piece of black tape and the tiny rubber rectangle that’s keeping secrets over the Taptic Engine connector cover.
Step 29

– Unscrew the fabulous five holding down the lower speaker!
Step 30


– Whisk away that tiny bracket chilling on the top right corner of the speaker.
– Unscrew the Taptic Engine connector cover with gusto.


Step 32


– Grab the speaker by its side edges and give it a gentle wiggle from side to side to break free from the adhesive that’s holding it snugly to the bottom edge of your iPhone.
– Now, carefully pull the speaker away from the bottom edge of the iPhone until that adhesive gasket lets go and sets you free!
Step 33


– Pop out the speaker—it’s time to say goodbye!
– Gently persuade the stuck adhesive gasket to leave the scene using tweezers. It’s a one-time performance, so no encores for this gasket!
– Let’s get the stage ready for the new star! Clean the area with some isopropyl alcohol and a lint-free cloth to ensure the new adhesive gasket sticks like it’s supposed to. Slide the fresh gasket onto the speaker, then snug that speaker back into its home.
Tools Used


Step 35


– Pop that Taptic Engine flex cable off with a spudger! Just give it a gentle pry straight up from its cozy socket.
Tools Used


