iPhone 6s Battery Replacement Guide: Step-by-Step DIY Tutorial
Duration: 45 minutes
Steps: 29 Steps
To keep your device running smoothly, make sure to give your freshly installed battery a little love by calibrating it. Also, don’t forget the battery connector bracket – it’s a key player in the performance game!
Hey there! Time to give your iPhone 6s a new lease on life with a shiny new battery. If your battery is feeling a bit puffed up, no worries, just take the necessary precautions. This guide will show you how to delicately detach the front panel assembly so you can avoid any display cable mishaps. Feeling brave? If you’re confident in your display-holding skills, you can skip ahead and get right to work on replacing that battery. And remember, for top-notch performance, once you’re done, give your new battery a little love: charge it up to 100% and keep it juiced for another couple of hours. Then, use your iPhone until it waves the white flag due to low battery. After that, charge it up all the way to a full 100%. This guide is also your go-to for switching out the battery connector bracket. If you need help, you can always schedule a repair.
Step 1
Before you dive into your iPhone’s guts, make sure to drain that battery below 25%. A fully charged lithium-ion battery can be a bit of a drama queen and may catch fire or even explode if it gets punctured. Safety first, folks!
First things first, make sure your iPhone is powered down before you dive into the disassembly adventure!
– Unscrew the two 3.4 mm P2 Pentalobe screws located on the bottom edge of your iPhone, right next to the Lightning connector. You’ve got this!
Step 2
Get ready to make the opening procedure a whole lot easier with our trusty Anti-Clamp tool. If you’re not using it, no worries – just skip ahead three steps and we’ll show you an alternate method. And remember, if you need help along the way, you can always schedule a repair
– Give that blue handle a gentle tug backward to free the Anti-Clamp’s arms.
– Slide those arms over the left or right edge of your iPhone with finesse.
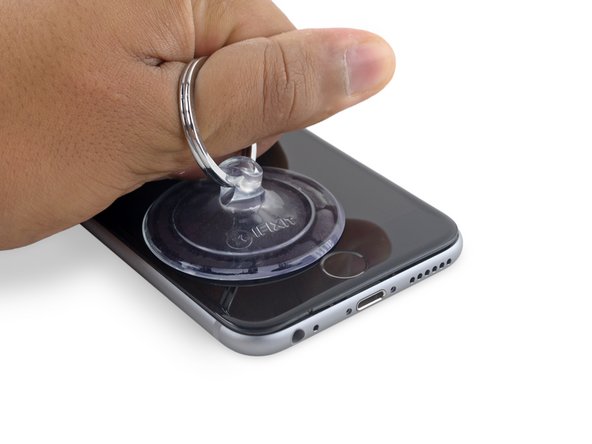
– Place the suction cups right near the bottom edge of your iPhone, just above the home button—one on the front and one on the back for good measure.
– Now, squeeze those cups together to create a strong bond with your chosen spot.
Step 3
– Give that blue handle a gentle pull forward to lock those arms in place.
– Now, twist the handle to the right a full 360 degrees, or until you see those cups starting to stretch a bit.
– When the Anti-Clamp has made a nice enough gap, slide an opening pick right under the screen.
– You can skip ahead by passing over the next three steps!
Step 4
– No Anti-Clamp? No problem! Just follow these next three simple steps to grab a suction handle.
– Warm up the lower edge of your iPhone with an iOpener or a hair dryer for about a minute. It’s like giving your device a cozy little spa treatment!
Tools Used
Step 5
– Grab a suction cup and gently place it on the lower left corner of the display assembly. You’re off to a great start!
Hey there, awesome repairer! You’re gonna lift up a slim strip of that sticky bonding around the screen’s edge. If you’re feelin’ adventurous, get some snazzy new adhesive strips ready. You totally can do this repair without it, but who wants to be like everyone else? 😉 If you need help, you can always schedule a repair.
Step 6
Be gentle! Yanking too hard might put a dent in the display assembly’s day. Just apply a little pressure to create a tiny gap between the display assembly and the rear case.
Having a bit of trouble? No worries! Just warm up the front of your iPhone with an iOpener, hair dryer, or a heat gun until it feels a tad too hot to handle. This little trick will help loosen the adhesive holding the display edges in place.
– With a steady and confident pull on the suction cup, create a small gap between the front panel and rear case. You’ve got this!
Tools Used
Step 7
Start your repair adventure at the clever little notch located on the underside of the display, right above the headphone jack. This spot is your best bet for safely easing the phone open.
– Gently slide the flat edge of a spudger into the tiny gap between the screen and the rear case, right above the headphone jack. You’ve got this!
Tools Used
Step 9
– Start by inserting the flat end of your trusty spudger on the left side of the phone, gently prying it between the display assembly and rear case – you’re making great progress already!
– Now, carefully slide the spudger up the side of the phone to loosen the adhesive and release those clips. You’re doing fantastic, keep it up! If you need help, you can always schedule a repair
Tools Used
Step 12
Hey there! Just a quick heads-up—try not to open the display more than 90º. It’s still got three cables hanging on at the top, and stretching them might lead to a broken connection. Let’s keep everything in one piece!
– Now’s your chance to show off your awesome skills! With a bit of finesse and a silly grin, use that handy-dandy suction cup to gently prise open the display and break free that pesky adhesive. Practically Picasso, am I right? You got this, Champ!
Step 13
– Gently lift up on the little nub on the top side of the trusty suction cup to detach it from the front panel.
Step 15
As you dive into this repair adventure, keep an eye on those screws! Make sure each one finds its way back to its original home to keep your iPhone safe and sound.
– Time to get your tools ready! Start by removing those two Phillips screws that are holding down the battery connector bracket. You got this!
Step 17
– Grab the pointy end of your trusty spudger and gently pry the battery connector straight up from the logic board. You’re doing great!
Tools Used
Step 18
– Gently nudge that battery connector away from the logic board until it’s happily separated from its socket. This will help you avoid any sneaky accidental connections to the battery while you tackle your repair. You’ve got this!
Step 19
– You’ve got this! Time to get your hands on those four little Phillips screws holding the display cable bracket in place. It’s just you and four tiny friends. Remember, we’re here to make your day with friendly help, so don’t hesitate to schedule a repair if you need a boost!
Step 21
– Grab a spudger or use your clean fingernail to gently lift the front camera flex cable out of its snug home on the logic board. Just pry it straight up, and you’ll be one step closer to success!
Tools Used
Step 22
– Gently wiggle and lift the digitizer cable straight upwards from its snug spot on the logic board.
Step 23
Remember, the magic happens when you disconnect the battery first before playing with any cables. Safety first, wizard!
– Easily detach the display cable by simply lifting it straight up from its socket on the logic board.
Step 25
Feel free to take out the Taptic Engine at this stage if you’d like. This will provide you with easier access to the adhesive strips.
– Grab your tweezers and gently start peeling back the tips of the two sticky strips at the bottom edge of the battery. It’s like unwrapping a little present!
Tools Used
Step 26
Make sure to keep those strips smooth and straight as you go; crinkly strips are party poopers that stick together and break rather than making a clean exit.
– Gently tug on one of the battery adhesive tabs, pulling it towards the bottom of the iPhone. Keep it slow and steady, you’ve got this!
Step 27
Ran into a sticky situation with broken adhesive strips under the battery? No worries! Just trickle a few drops of isopropyl alcohol (aim for 90% or higher) right under the battery edge where those pesky strips gave up. If that doesn’t do the trick, hang tight and check out the next step for more slick moves to free your battery!
– Do the same for the second strip. If you’ve already nailed removing both adhesive strips, jump ahead to step 27.
Step 28
You might also try using a piece of dental floss to pry the battery loose from the back case. If you’re looking for something with a bit more oomph, snag an unwound guitar string, like a 0.009 E string from a 12-string set. Rock on with your repair!
– Great job on getting those adhesive strips out! If all went well, you’re ready to roll on to the next step. If not, don’t sweat it—just gently pry the battery away from the rear case.
– Now, let’s prepare an iOpener and place it on the back of the rear case, right over that battery. If you don’t have one handy, a heat gun or hair dryer will do the trick to warm things up!
Tools Used
Step 29
If your replacement battery is snug in a plastic sleeve, give it a gentle tug to free it from the ribbon cable before you get started with the installation. You’ve got this!
– Pop that battery out like it’s nobody’s business!
– If there’s any leftover alcohol solution in your phone, take a moment to gently wipe it away or let it air dry before sliding in your shiny new battery.
– Before you stick that replacement battery in, give it a quick test by reconnecting the battery connector to the logic board socket. This little move helps make sure everything fits just right.
– If your new battery is missing the adhesive strips, check out this guide on how to add those sticky wonders.
– Don’t forget to give your device a forced restart after you’ve put it all back together. It’s a simple step that can save you from a world of headaches down the line!


