DIY Guide to Replace iPhone 16 Pro Max Rear Camera Assembly
Duration: 45 minutes
Steps: 32 Steps
Get ready to swap out that rear camera assembly in your iPhone 16 Pro Max! All three rear cameras are bundled together in one assembly, meaning if one gets a case of the blues, you’ll need to replace the whole crew. If your photos and videos are looking a bit fuzzy or your cameras are playing hard to focus, it might be time for a change. Don’t forget to grab some replacement back glass adhesive to wrap things up nicely. Once you’re done with the repair, give those Apple rear cameras a little calibration love using Repair Assistant. And if you need help, you can always schedule a repair.
Step 1


Let your iPhone’s battery dip below 25%. A fully charged lithium-ion battery can be a bit of a drama queen when it comes to safety.
– First things first, unplug any cables from your iPhone. We want it free and clear!
– Now, hold down the power button along with either volume button, and give that slider a gentle push to power off your iPhone. Easy peasy!
Step 2


Find a nice, smooth spot near the bottom edge that’s big enough for a suction cup to grab onto. You’re doing great!
– Got a screen or back glass that’s seen better days? No worries! Just grab some packing tape and lay down overlapping strips over the cracked glass. This little trick will keep you safe and make it a breeze to take things apart.
Tools Used

Step 3


– Grab your trusty P2 pentalobe driver and get ready to take action! Carefully remove the two screws, each measuring 7.4 mm, located on either side of the charging port. You’re doing great!
Step 4


Be careful not to shove that opening pick too deep! We want to keep your device safe and sound. A little marking goes a long way in protecting it.
Feel free to mark the other corners of the pick with different measurements for extra precision!
Another fun option is to tape a coin 3 mm from the tip of your pick. It’s a handy guide!
– Grab your opening pick and measure about 3 mm from the tip. Give it a little mark with a permanent marker so you know where to go!
Step 5

In the next four steps, we’ll introduce you to the Anti-Clamp, our nifty little gadget that makes opening your device a breeze! If you don’t have the Anti-Clamp handy, no worries—just skip ahead four steps for a different approach.
The Anti-Clamp creates a delightful suction on both the screen and the back glass. If you’re only looking to pop open the back glass, be sure to tape down the screen first. For detailed guidance on how to use that tape, check it out!
Curious about how to make the most of the Anti-Clamp? We’ve got a handy guide for you right here!
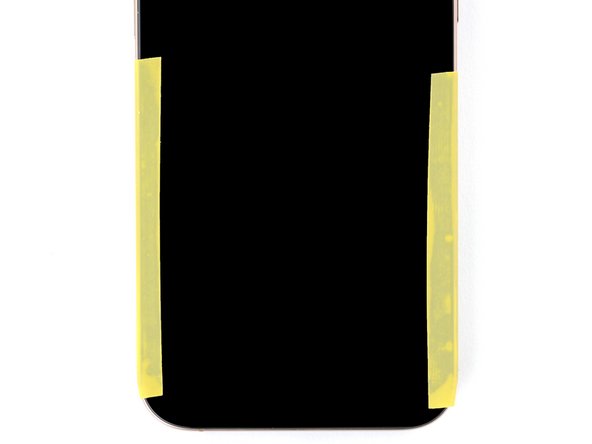
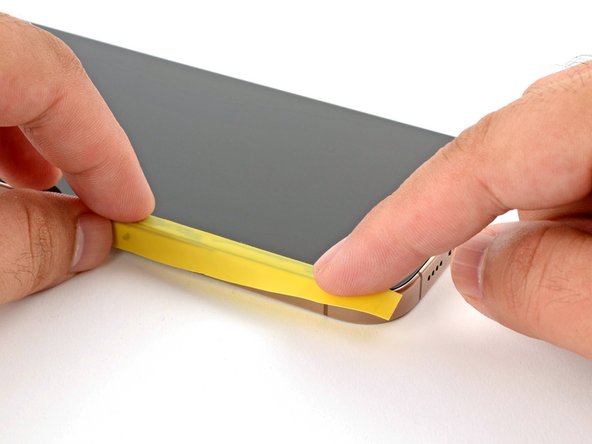
Just a quick tip: make sure the tape is only holding down the screen and not the back glass. Trust us, it makes all the difference!
– Snip two strips of tape, line them along the long edges of the iPhone, and fold them over the screen to keep it snug. If you need help, you can always schedule a repair
Step 6

If your iPhone’s surface is feeling a bit too slick for the Anti-Clamp to get a good grip, just slap some tape on there to boost that traction. You’ve got this!
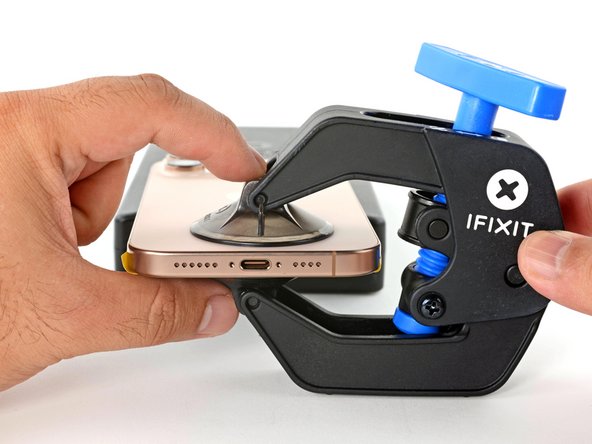
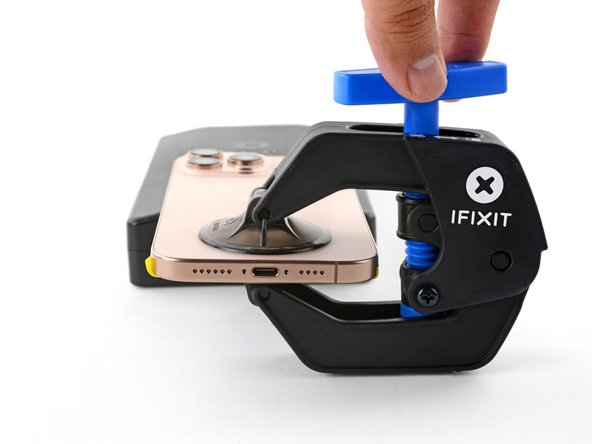
– Unlock the Anti-Clamp’s blue handle by pulling it backward.
– With the back glass facing up, position the arms over the right edge of your iPhone, placing one suction cup on the back glass and the other on the screen. Center those cups near the bottom edge.
– Make sure your iPhone is level while between the Anti-Clamp’s arms—a small box works like a charm.
– Squeeze the cups together to create that all-important suction.
Step 7


No tape? No problem! Warm up those suction cups for a better stick. If you need help, you can always schedule a repair.
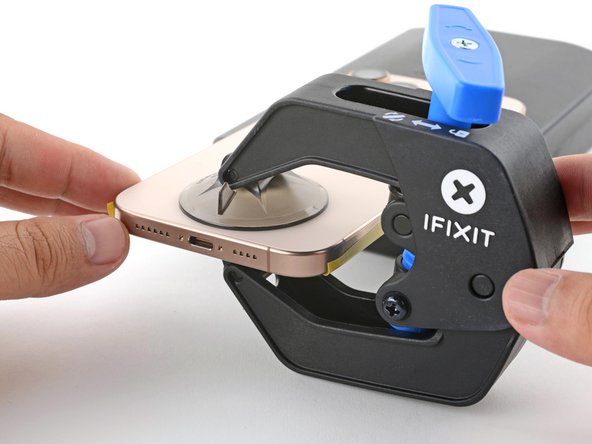
– Give that blue handle a tug forward to lock those arms in place.
– Spin the handle a full turn (yep, 360 degrees) or until the cups start stretching.
– As the cups stretch, make sure they stay lined up vertically. If they keep slipping, take off the Anti-Clamp and use some tape to make those cups stick.
Step 8

Watch out! Don’t let that iPhone get too toasty—the battery can get grumpy with heat. Keep it cool for a smooth repair!
If a gap doesn’t show up after a minute, just crank up the heat a bit more and give that handle a little quarter turn. Let the Anti-Clamp and a little patience do their magic for you.
– Grab your trusty hair dryer or heat gun and warm up that bottom edge of the back glass until it feels nice and toasty.
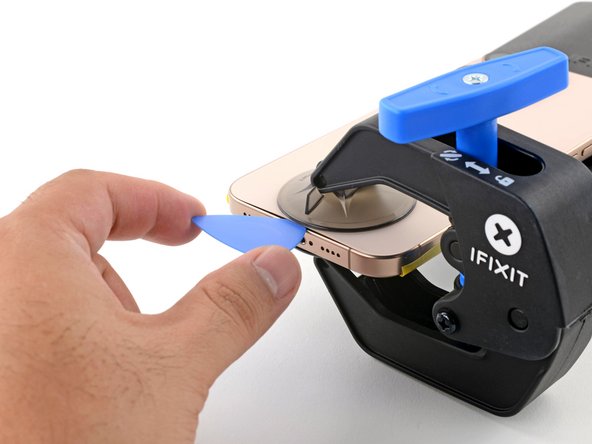
– Hang tight for about a minute while the adhesive gets cozy and a little gap opens up between the back glass and the frame.
– Slide an opening pick into that inviting gap you’ve just created.
– Time to say goodbye to the Anti-Clamp! Just pull on those handy tabs from the suction cups to set it free.
– Feel free to skip the next two steps; you’ve got this!
Tools Used


Step 9

Next up, we’re diving into the first two steps to create a little gap using a suction handle. It’s like giving your device a gentle hug! Don’t worry, it’s all good vibes here.
If you’re feeling fancy, grab an iOpener to warm up that back glass. Just follow these simple instructions to heat it up and apply the iOpener like a pro.
– Grab your trusty hair dryer or heat gun and give the bottom edge of that back glass a warm hug until it’s nice and toasty!
Tools Used


Step 10


If you don’t see a gap just yet, no worries! Give that edge a little more heat and give it another shot.
– Grab a suction handle and stick it on the bottom edge of that back glass like a pro.
– Give it a solid pull with some good vibes to make a little gap between the back glass and the frame.
– Slide the tip of an opening pick right into that gap and let’s keep going!
Tools Used
Step 11

As you carefully cut through the adhesive holding the back glass in place, remember to keep your pick no deeper than 3 mm. We want to steer clear of any damage to the sensitive areas below. You’ve got this!
– Be careful with that delicate cable connecting the back glass to the iPhone, right by the volume up button. It’s a bit shy, so avoid inserting your pick here to keep it from getting snipped!
– Watch out for those multiple spring contacts around the edges of the iPhone. They’re like little bouncers, so give them some space!
Step 12

Having trouble cutting through that adhesive? Give the edge a quick reheat for a minute, and you’ll be back in business. If you need help, you can always schedule a repair.
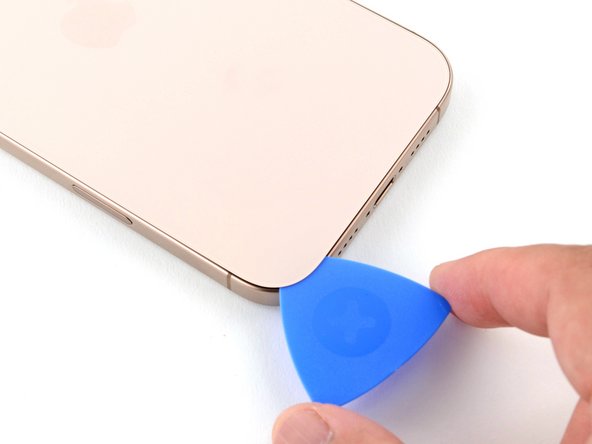
– Gently glide your trusty opening pick along the bottom edge to break free that stubborn adhesive.
– Keep the pick nestled in the bottom-left corner to ensure the adhesive doesn’t play any tricks on you by resealing.
Step 13

– Grab your trusty hair dryer or heat gun and warm up the left edge of that back glass until it’s comfortably warm to the touch. You’re doing great!
Tools Used
Step 14


Keep your pick’s depth under 3 mm to protect those spring contacts!
As you glide through, you’ll hear and feel those metal clips happily popping free!
– Pop a second opening pick into that bottom-left corner, right next to the one you’ve already got in there.
– Gently slide your pick along the left edge to help break the adhesive and free those metal clips.
– Keep this pick snugly in the top-left corner to stop the adhesive from sticking back together.
Step 15

– Grab your trusty hair dryer or heat gun and give that top edge and top-right corner of the back glass a little warmth until it feels nice and toasty to your touch.
Tools Used
Step 16


Keep your pick to a shallow dive—no deeper than 3 mm! We want to avoid any accidental damage to those delicate spring contacts.
– Pop a third opening pick into the top-left corner, just like tucking in a cozy blanket.
– Gently glide the opening pick along the top edge and around the top-right corner, stopping just above the volume up button—you’re doing great!
– Keep that pick in place to stop the adhesive from pulling a sneaky move and resealing.
Step 17

– Grab your trusty hair dryer or heat gun and give the right edge of that back glass a good warm-up until it’s nice and toasty to the touch!
Tools Used
Step 18


Just a heads-up: keep your pick’s depth to no more than 3 mm to protect those delicate spring contacts!
– Pop a fourth opening pick into the bottom-right corner.
– Slide that pick around the corner and up along the right edge, stopping just below the volume down button.
– Leave this pick in place to keep the adhesive from resealing.
Step 19


Now, the back glass should be off the frame. If it’s still clinging on for dear life, run your pick around the edges again to find any stubborn adhesive or clips that are holding it back.
– Gently slide the back glass to the right side of the iPhone to loosen the last bits of adhesive. You’ve got this!
– Prop up that back glass with something clean and sturdy to keep it steady while you work your magic.
Step 20

– Grab your trusty tri-point Y000 driver and let’s get those screws out! You’ll be removing three screws that hold the battery connector cover in place:
– Two screws that are 1.3 mm long – they’re the slightly longer ones!
– And one screw that’s 1.0 mm long – the little guy in the bunch.
Step 21


– Gently lift off the battery connector cover and set it aside.
Step 22


– Grab a spudger and gently lift up to disconnect that battery press connector. You’ve got this!
– When it’s time to reconnect those press connectors, just line it up nice and easy. Press down on one side until you hear that satisfying click, then do the same on the other side. You’re nailing it!
Tools Used

Step 23

– Grab your trusty tri-point Y000 driver and let’s get those four screws off to reveal the back glass connector cover:
– Two 1.3 mm screws
– Two 1.0 mm screws
Step 24


– Pop that back glass connector cover up and off.
Step 25


– Grab your trusty spudger and gently lift to pop that back glass connector loose. If you need help, you can always schedule a repair
Tools Used
Step 26

Time for a quick check-in! Hook up the battery and back glass, switch on your iPhone, and ensure it’s all systems go. Once it’s working like a charm, power it down, and let’s get back to piecing it together. If you need help, you can always schedule a repair
– Pop off the back glass.
– When you’re putting things back together:
– Follow this guide to stick the adhesive and slap that back glass on.
Step 27


– Use the spudger’s point to gently lift and detach the LiDAR sensor connector. If you need help, you can always schedule a repair
Tools Used
Step 28


– Grab your trusty Phillips screwdriver and let’s get those screws out! You’ll need to remove two screws holding the LiDAR sensor in place:
– One screw that’s 1.6 mm long
– And another one that’s 2.9 mm long
Step 29


– Gently use your fingers or tweezers to pop out and detach the LiDAR sensor. You’ve got this!
Tools Used

Step 30
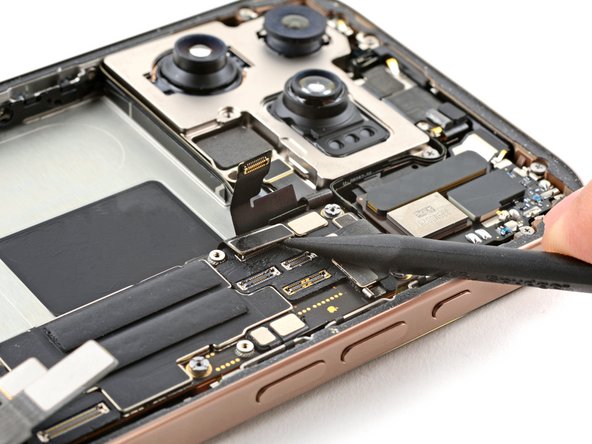
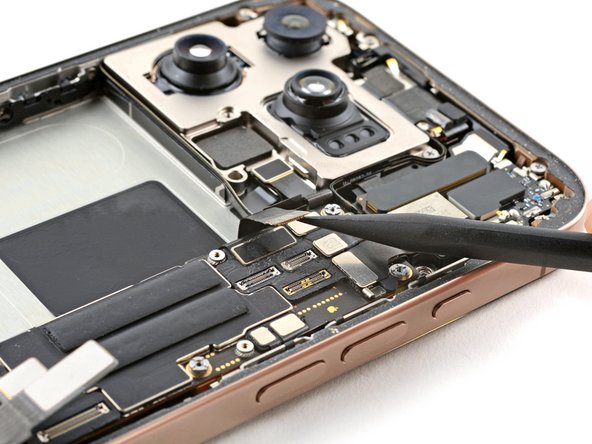
– Grab your spudger and gently pop up the first rear camera connector.
– Now, lift and disconnect the second camera connector right underneath the first. If you need help, you can always schedule a repair.
Tools Used
Step 31

– Grab your trusty Phillips screwdriver and let’s tackle this! Remove those two 2.9 mm-long screws holding the rear camera assembly in place. You’ve got this!
Step 32


Avoid touching the camera lens! If you accidentally do, just give it a gentle wipe with a lint-free cloth. If you need help, you can always schedule a repair.
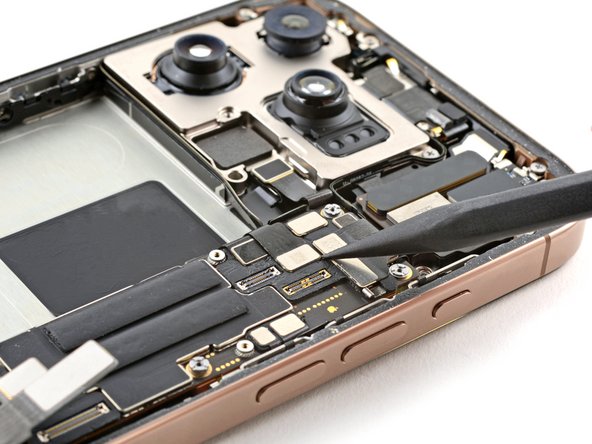
– Gently slide the tip of a spudger beneath the upper edge of the rear camera assembly.
– Carefully pry the assembly upwards to release it from the frame.
– Take out the rear camera assembly with a steady hand.
Tools Used
