DIY Tutorial: iPhone 16 Pro Max Loudspeaker Replacement Guide
Duration: 45 minutes
Steps: 42 Steps
Ready to bring the sound back to life in your iPhone 16 Pro Max? This guide walks you through the process of removing and replacing the loudspeaker or lower speaker. If the tunes coming from your bottom speaker are sounding a bit weak or crackly, it’s time for a new loudspeaker! Don’t forget, you’ll need some replacement back glass adhesive to wrap things up nicely. If you need help, you can always schedule a repair.
Step 1
Make sure your iPhone’s battery drops below 25%—a fully charged lithium-ion battery can be a bit of a party crasher. If you need help, you can always schedule a repair
– First things first, let’s give your iPhone some breathing room—unplug any cables attached to it.
– Now, get ready to power it down! Press and hold the power button along with either volume button, then slide to turn off your iPhone. Easy peasy!
Step 2
Find a nice, flat spot near the bottom edge where a suction cup can happily attach itself.
– If your screen or back glass has seen better days and is sporting some serious cracks, don’t fret! Just lay some overlapping strips of packing tape over the glass. This will keep you safe and make the disassembly process a breeze. Remember, if you need help, you can always schedule a repair.
Tools Used
Step 3
– Grab your P2 pentalobe driver and unscrew those two 7.4mm-long screws by the charging port. If you need help, you can always schedule a repair.
Step 4
Hey there! Just a friendly reminder: if you push your opening pick in too deep, it might cause some harm to your device. So, let’s take a moment to mark your pick and keep everything safe and sound!
Want to be extra cautious? Go ahead and mark the other corners of your pick with various measurements.
As a fun alternative, you can tape a coin about 3 mm from the tip of the pick. Easy peasy!
– Grab your trusty opening pick and measure about 3mm from the tip. Use a permanent marker to make a little mark there. You’re getting closer to opening up that device!
Step 5
In the next four steps, we’ll show you how to use the Anti-Clamp, our nifty tool designed to make opening your device a breeze! If you’re opting out of the Anti-Clamp experience, feel free to jump down four steps for an alternative method.
The Anti-Clamp works its magic by applying suction to both the screen and the back glass. If you’re just looking to open the back glass, be sure to tape down the screen first. For a detailed guide on how to use that tape like a pro, check it out!
Want the full scoop on using the Anti-Clamp? Head over to this guide.
Just a quick reminder: make sure the tape is only keeping the screen in place and not the back glass. We want everything to go smoothly!
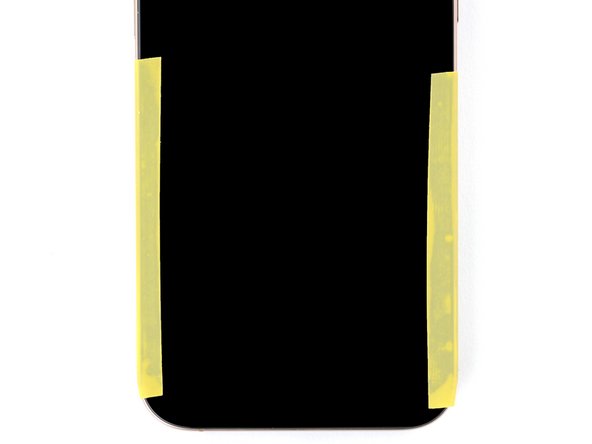
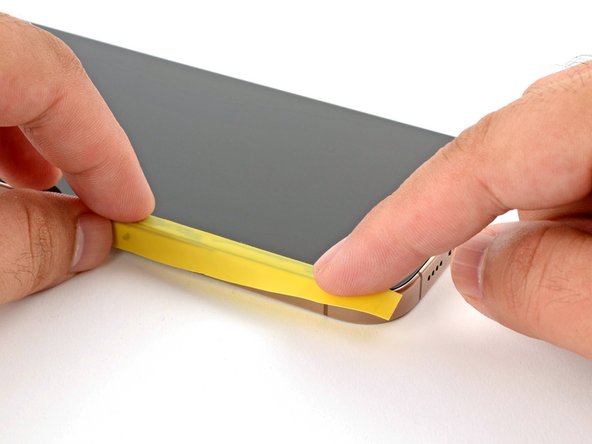
– Grab two strips of tape and lay them along the long edges of your iPhone. Give them a little fold over the screen to keep everything nice and snug. You’ve got this!
Step 6
If your iPhone’s surface feels a bit too slick for the Anti-Clamp to grip, just grab some tape and give it a little texture! It’s a simple trick to help keep things steady.
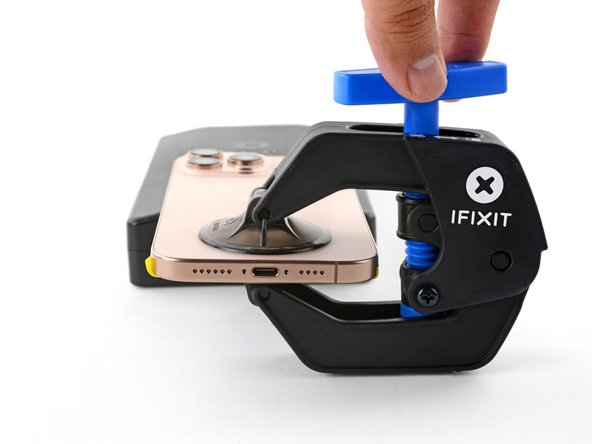
– Pull the Anti-Clamp’s blue handle backward to unlock the arms.
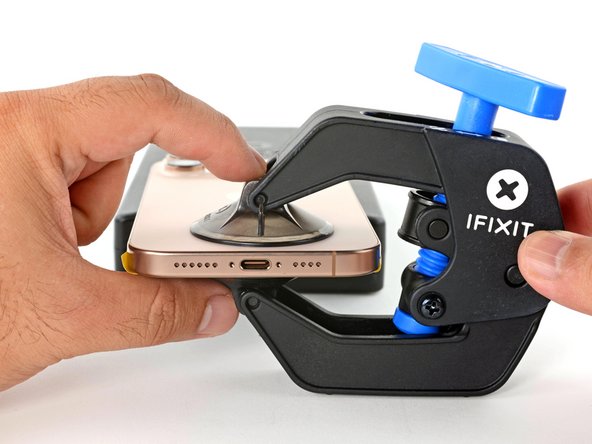
– With the back glass facing up, slide the arms over the right edge of your iPhone, with one suction cup on the back glass and the other on the screen. Center the suction cups near the bottom edge.
– Support your iPhone so it rests level while between the Anti-Clamp’s arms—a small box works well.
– Squeeze the cups together to create suction.
Step 7
If you find yourself without tape, simply warm up those suction cups a bit to boost their sticking power!
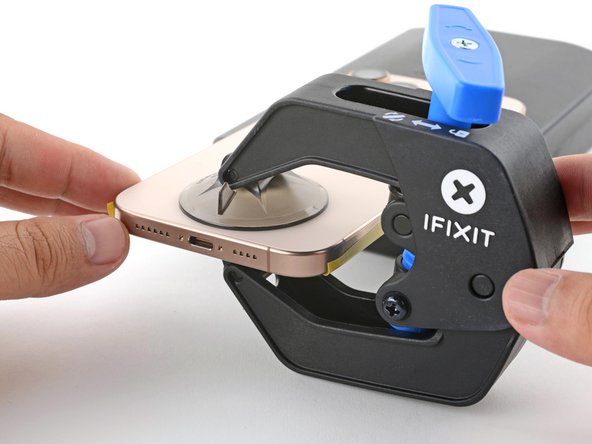
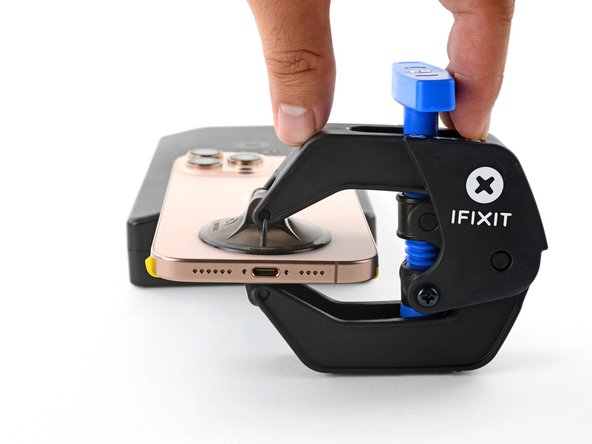
– Give that blue handle a gentle tug forward to snugly lock the arms in place.
– Now, twist the handle a full turn (360 degrees) or until those cups start to stretch out just right.
– As the cups stretch, keep an eye on their vertical alignment. If they start to slip around, no worries! Just pop off the Anti-Clamp and slap some tape on there for a better grip.
Step 8
Heads up! Don’t heat your iPhone too much—the battery can’t handle the heat. If you need help, you can always schedule a repair
If you don’t see a gap after a minute, give it a bit more heat and twist the handle a quarter turn. Let the Anti-Clamp and time work their magic for you.
– Warm up the bottom edge of the back glass with a hair dryer or heat gun until it’s nice and toasty.
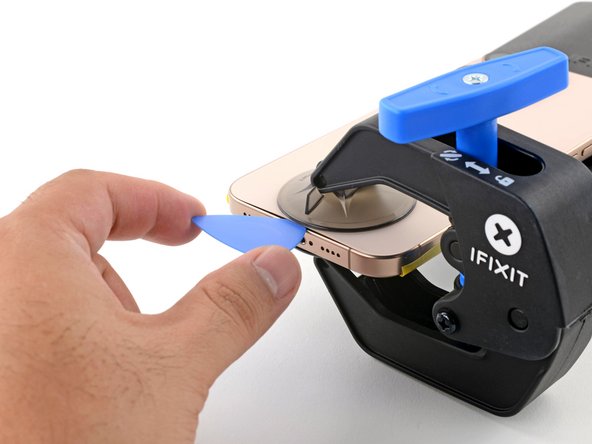
– Give it up to a minute for the adhesive to loosen and a gap to appear between the back glass and frame.
– Slide an opening pick into the gap.
– Take off the Anti-Clamp using the pull tabs on the suction cups.
– Skip the next two steps.
Tools Used
Step 9
Let’s get started with the next two steps, where we’ll show you how to create an initial gap using a handy suction handle. It’s easier than it sounds!
Want to give that back glass a little warmth? Grab an iOpener and follow these simple instructions to heat it up just right before applying. You’ve got this!
– Grab your trusty hair dryer or heat gun and warm up the bottom edge of that back glass until it feels nice and toasty!
Tools Used
Step 10
If you don’t see a gap forming, just crank up the heat a bit more on the edge and give it another go!
– Stick a suction handle on the lower edge of the back glass.
– Give it a good pull with steady, strong force to crack open a gap between the back glass and the frame.
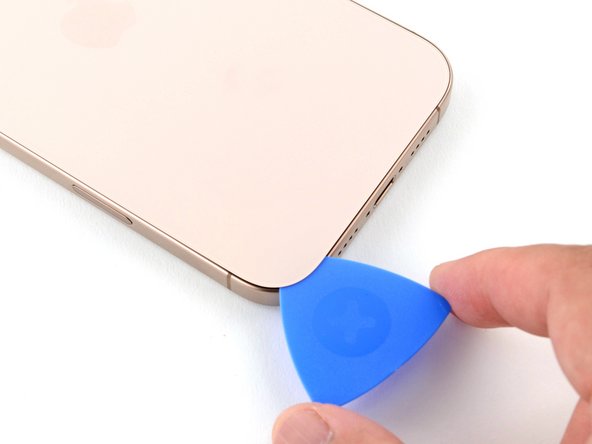
– Slide the tip of an opening pick into the gap.
Tools Used
Step 11
As you carefully slice through the adhesive holding the back glass in place, remember: keep your pick no deeper than 3 mm to steer clear of any sensitive areas below!
– Be careful around this slender cable that connects the back glass to your iPhone, right near the volume up button. It’s a sensitive little guy, so steer clear with your pick to keep it intact!
– You’ll find several spring contacts hugging the edges of your iPhone. They’re like little springs ready to bounce back, so treat them gently!
Step 12
If you’re struggling to cut through that adhesive, just give it a little heat for a minute and give it another go!
– Glide that opening pick along the bottom edge to slice through the adhesive.
– Keep the opening pick chillin’ in the bottom-left corner to stop the adhesive from resealing.
Step 13
– Grab your trusty hair dryer or heat gun and gently warm up the left edge of the back glass. Get it nice and toasty, but be careful—no burnt fingers!
Tools Used
Step 14
Be careful not to push your pick in deeper than 3 mm; we wouldn’t want to accidentally tickle those delicate spring contacts!
As you glide through, you’ll hear and feel those little metal clips popping free, like a satisfying snap!
– Pop a second opening pick into the bottom-left corner, right next to the one that’s already there.
– Slide your pick up along the left edge to slice through the adhesive and free those metal clips.
– Leave this pick hanging out in the top-left corner to keep the adhesive from sticking back together.
Step 15
– Grab a hair dryer or heat gun and warm up the top edge and top-right corner of the back glass until it’s nice and toasty. If you need help, you can always schedule a repair.
Tools Used
Step 16
Keep that pick of yours no deeper than 3 mm to steer clear of any spring contact mishaps!
– Pop a third opening pick into the top-left corner—just like a pro!
– Gently glide that pick along the top edge and around the top-right corner, making sure to pause right above the volume up button.
– Keep this pick in place to keep the adhesive from becoming a clingy ex.
Step 17
– Grab a hair dryer or heat gun and give the right edge of that back glass a nice warm hug until it’s toasty enough to touch. You’ll be on your way to a smooth repair in no time!
Tools Used
Step 18
Keep your pick at a maximum depth of 3 mm to steer clear of any damage to those delicate spring contacts. You’ve got this!
– Pop that fourth opening pick into the bottom-right corner.
– Shimmy the pick around the corner and up the right side, stopping right below the volume down button.
– Keep this pick in place to stop the adhesive from sticking back.
Step 19
Alright, by now, the back glass should be off the frame. If it’s being stubborn, grab your pick and go around the edges again to catch any leftover adhesive or stuck clips. If you need help, you can always schedule a repair.
– Gently swing the back glass to the right side of your iPhone to break free from the stubborn adhesive holding it tight.
– Support the back glass with a clean, sturdy object to keep it steady while you work your magic.
Step 20
– Grab your trusty tri-point Y000 driver and get ready to unscrew! First up, let’s tackle those three little screws holding on the battery connector cover:
– Two screws that are 1.3 mm long (they’re the bigger pair, so give them some love!),
– And one sneaky 1.0 mm long screw (a little smaller, but just as important!).
Step 21
– Pop off that battery connector cover with a smooth move.
Step 22
– Grab your trusty spudger and gently pop off the battery press connector.
– When reattaching, align carefully and press down on one side until you hear a click, then do the same on the other side.
Tools Used
Step 23
– Grab your trusty tri-point Y000 driver and let’s get those four screws out that are holding the back glass connector cover in place:
– Two screws that are 1.3 mm long
– Two screws that are 1.0 mm long
Step 24
– Gently pop off the back glass connector cover by lifting it straight up and away. You’ve got this!
Step 25
– Use a spudger’s point to carefully pop up and unplug the back glass connector. Need a hand? You can always schedule a repair.
Tools Used
Step 26
Now’s a great time to check if your repair is on point before closing up your iPhone. Just temporarily reconnect the battery and back glass, power it on, and see if it’s working as expected. Power it back down and keep reassembling. If you need help, you can always schedule a repair.
– Let’s get started by taking off that back glass. It’s time to reveal the inner workings!
– As you put everything back together:
– Follow this guide to reapply some adhesive and snugly fit your back glass back in place. You’ll be a pro at this in no time!
Step 27
– Grab your trusty Phillips screwdriver and let’s get those screws out of the way! You’ll need to remove the three screws holding the Taptic Engine cover in place:
– One screw that’s 2.9 mm long
– One screw that’s 1.3 mm long
– And one screw that’s 2.4 mm long
Step 28
– Grab your trusty tweezers or just use your fingers to gently lift the top edge of the Taptic Engine cover. You’ve got this!
– Once the bottom edge pops free from the frame, go ahead and remove that Taptic Engine cover like a pro.
– When you’re putting everything back together, just make sure that bottom edge clicks back into place on the frame. Easy peasy!
Tools Used
Step 29
– Grab your trusty spudger and gently pop up that lower assembly cable from the logic board. If you need help, you can always schedule a repair
Tools Used
Step 30
– Grab your spudger and gently pop up the two connectors located at the bottom right edge of the frame. If you need help, you can always schedule a repair
Tools Used
Step 31
– Let’s get those two screws holding the lower assembly cable out of the way:
– One 1.0 mm tri-point Y000 screw
– One 1.3 mm Phillips screw
– If you need help, you can always schedule a repair
Step 32
– Grab a hair dryer and give some love to the lower assembly cable section on top of the Taptic Engine. Warm it up until it’s nice and toasty to the touch!
Tools Used
Step 33
– Wiggle an opening pick under the lower assembly cable and free it from the Taptic Engine.
– Gently nudge the cable out of the way to get clear access to the Taptic Engine.
Step 34
– Grab your trusty Phillips screwdriver and gently unscrew the 2.1 mm-long screw that’s holding the Taptic Engine in place. You’ve got this!
Step 35
– Grab your trusty spudger and gently pivot that corner bracket up like a pro!
Tools Used
Step 36
– Gently glide the edge of your opening pick along the top of the Taptic Engine to free the plastic buffer strip that’s stuck to it. You’re doing great!
Step 37
Watch out! Steer clear of prying directly against the battery. We want to keep it safe and sound!
– Grab your trusty spudger and gently nudge the Taptic Engine up. It’s like giving it a little lift-off!
– Now, go ahead and remove the Taptic Engine. You’ve got this!
Tools Used
Step 38
– Pop out those three screws holding the bottom microphone in place:
– A 3.4 mm standoff screw
– A 3 mm standoff screw
– A 1.4 mm tri-point Y000 screw
Step 39
Avoid prying against the battery, or you might mess it up. If you need help, you can always schedule a repair
You’re going to feel a bit of resistance as the microphone pops free from its frame gasket. If you need help, you can always schedule a repair.
– Grab your trusty spudger and gently lift up the bottom microphone using its flat end. You’re doing great!
– Now, go ahead and remove that bottom microphone like a pro!
Tools Used
Step 40
– Alright, it’s reassembly time! First up, grab those tweezers or your trusty fingers and gently peel away the old adhesive gasket from the bottom of the frame. It’s like unwrapping a gift, but this one’s just a bit stickier!
– If your shiny new microphone comes with an adhesive gasket already installed, just peel off the liner to reveal its sticky side. Easy peasy!
– No gasket? No problem! If your replacement microphone didn’t come with one, just apply a fresh gasket either to the frame or right on the microphone. You’ve got this!
– Now, gently slide the microphone back in at a downward angle, then press it flat against the frame to secure it before you wrap up the reassembly. You’re doing great!
Tools Used
Step 41
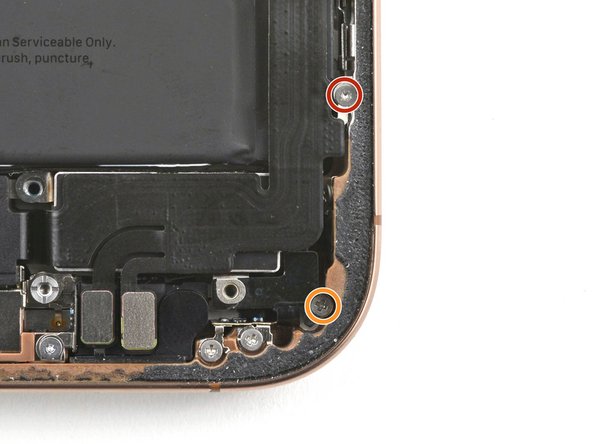
– Time to get those screws out and free the loudspeaker! Here’s what you need to remove:
– One 1.7 mm-long Phillips screw – it’s the little guy that packs a punch!
– One 1.5 mm-long Phillips screw – another tiny hero in this repair saga!
– One 4.1 mm-long standoff screw – the tall one holding everything together!
– One 1.3 mm-long tri-point Y000 screw – the quirky one that likes to stand out!
Step 42
– Slide the tip of a spudger under the bottom-right screw hole of the loudspeaker. You’ve got this!
– Gently lift and detach the loudspeaker. You’re making progress!
Tools Used


