DIY Guide: iPhone 16 Pro Max Earpiece Speaker Replacement
Duration: 45 minutes
Steps: 33 Steps
Welcome to the step-by-step guide on how to remove and replace the earpiece speaker (aka top speaker) for your iPhone 16 Pro Max. If the sound from your top speaker sounds like it’s auditioning for a static-filled horror movie, it’s time to give that earpiece a swap. You’ll need some replacement back glass and antenna adhesive (or double-sided tape like Tesa tape) to get the job done. If you need help, you can always schedule a repair.
Step 1


Make sure to let your iPhone’s battery dip below 25% before proceeding, as a fully charged lithium-ion battery can be a bit of a safety drama.
– First things first, unplug any cables from your iPhone. Let it breathe a little!
– Now, press and hold the power button along with either of the volume buttons, then slide to power off your iPhone. You’ve got this!
Step 2


Ensure there’s a nice, smooth spot near the bottom edge that’s large enough for a suction cup to get a good grip.
– Got a screen or back glass looking like a spider web? Slap some overlapping strips of packing tape on there to keep those shards in check and make the teardown smoother. If you need help, you can always schedule a repair.
Tools Used

Step 3


– Grab your trusty P2 pentalobe driver and gently unscrew the two 7.4 mm-long screws on each side of the charging port. You’ve got this!
Step 4


Be careful not to insert your opening pick too deeply, as it could harm your device. To keep things safe, take a moment to mark your pick and avoid any mishaps.
Feel free to mark the other corners of the pick with different measurements for extra precision.
Or, if you’re feeling a bit crafty, stick a coin to the pick about 3 mm from the tip to help guide your way.
– Measure out 3mm from the tip and give that opening pick a little mark with a permanent marker. Feeling unsure? If you need help, you can always schedule a repair
Step 5

Get ready for the next four steps, where we’ll show you how to use the Anti-Clamp—a nifty little gadget we whipped up to help make the opening process a breeze. If you’re not using the Anti-Clamp, feel free to skip ahead four steps for a different technique.
The Anti-Clamp works its magic by applying suction to both the screen and the back glass. If you’re just looking to access the back glass, make sure to secure the screen with some tape. For a detailed rundown on how to use this tape, check out our guide.
Want the full scoop on using the Anti-Clamp? We’ve got you covered—just take a peek at this guide.
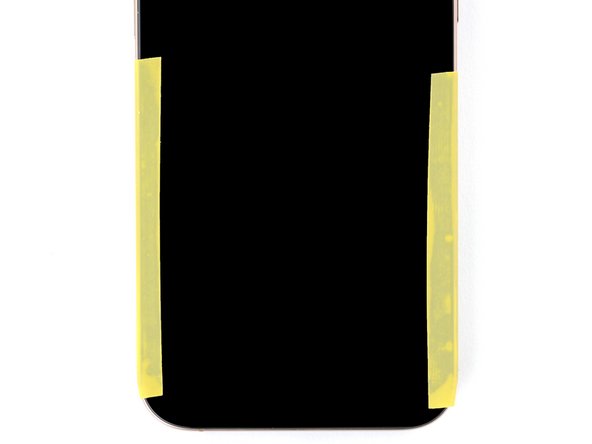
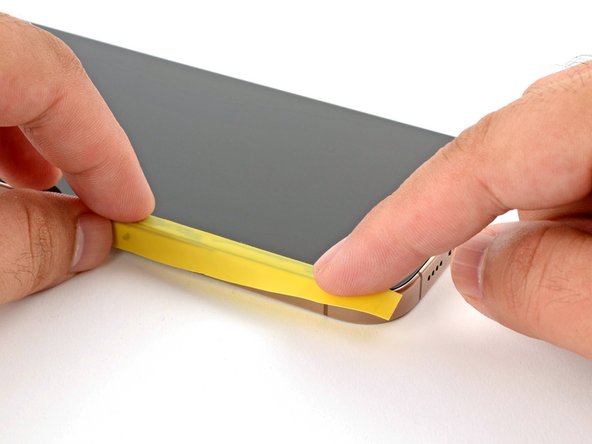
Just a quick reminder: ensure the tape is only holding down the screen and not the back glass. We want to keep things tidy!
– Snip two strips of tape, place them along the longer sides of the iPhone, and gently fold them over the screen to keep it nice and tight.
Step 6

If your iPhone is feeling a bit too slick for the Anti-Clamp to do its job, a little tape can work wonders! Slap some on to give it a bit more grip and keep everything in place.
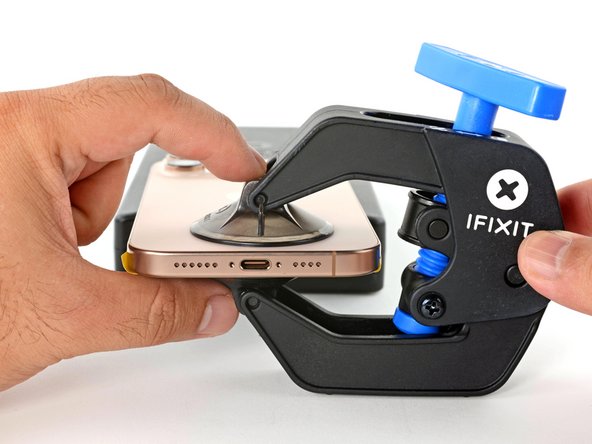
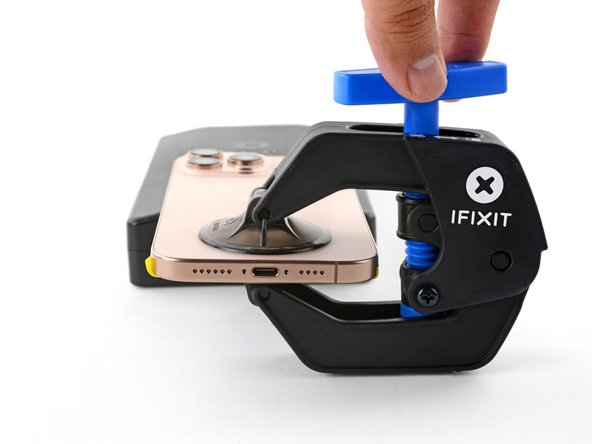
– Pull back the Anti-Clamp’s blue handle to unlock those arms.
– With the back glass up, slide the arms over the right edge of your iPhone, placing one suction cup on the back glass and the other on the screen. Center those cups near the bottom edge.
– Rest your iPhone level between the Anti-Clamp’s arms—grab a small box or something similar to help.
– Squeeze the cups together to get that suction action going.
Step 7


If you’re short on tape, try warming up those suction cups a bit to help them grip better!
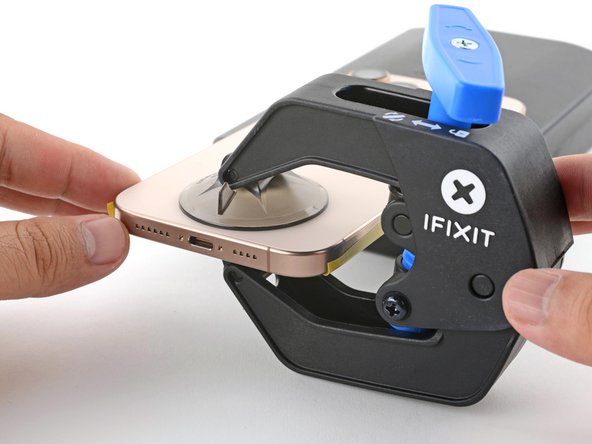
– Give that blue handle a gentle pull forward to lock those arms in place.
– Twist the handle a full turn (that’s 360 degrees!) or until you see those cups start to stretch out.
– As those cups stretch, keep an eye on their vertical alignment. If they start to wobble, just remove the Anti-Clamp and stick some tape on there to help the cups stay put.
Step 8

Keep it cool! Don’t heat the iPhone beyond this point—too much heat can harm the battery. If you need help, you can always schedule a repair.
If a gap isn’t showing up after a minute, give it another blast of heat and twist that handle a quarter turn. Let the Anti‑Clamp and the power of time work their magic for you!
– Grab a hair dryer or heat gun and warm up the bottom edge of that back glass until it’s nice and toasty.
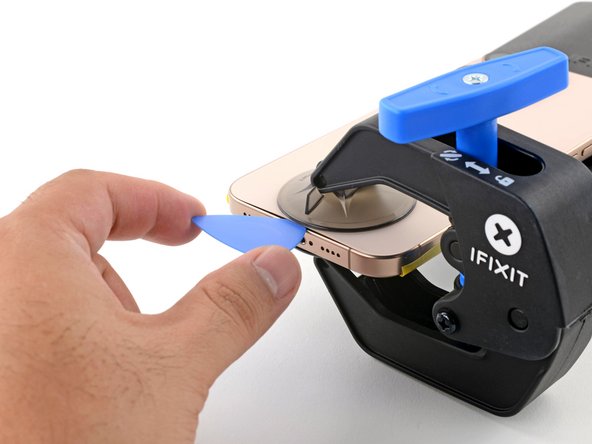
– Give it about a minute for the adhesive to loosen up and create a little gap between the back glass and the frame.
– Slide an opening pick into that gap you’ve just made.
– Time to remove the Anti-Clamp! Just pull on those tabs from the suction cups.
– You can totally skip the next two steps.
Tools Used


Step 9

Let’s kick things off with a couple of steps to create a little space using a suction handle. It’s easier than it sounds!
Feeling a bit chilly? Grab an iOpener to warm up that back glass. Just follow these handy instructions to heat and use the iOpener like a pro.
– Grab a hair dryer or heat gun and warm up the bottom edge of the back glass until it feels nice and toasty.
Tools Used


Step 10


If you don’t see a gap forming, just give it another shot with some extra heat along the edge and try again.
– Start by placing a suction handle on the bottom edge of that back glass. You’ve got this!
– Give the handle a strong, steady pull to open up a little gap between the back glass and the frame. Just a little tug will do the trick!
– Now, slide the tip of an opening pick into that newly created gap. You’re on the right track!
Tools Used
Step 11

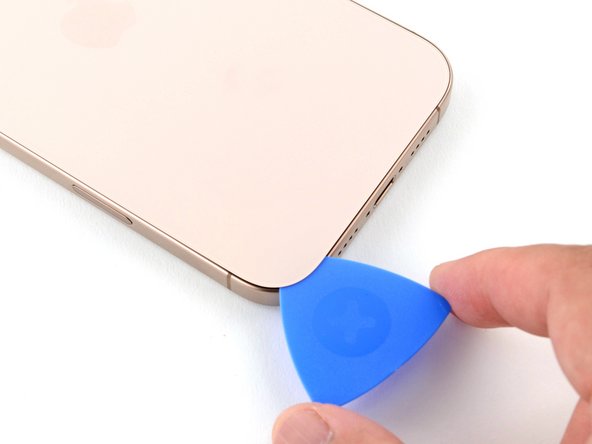
As you carefully cut through the adhesive holding the back glass in place, remember to keep your pick no deeper than 3 mm. We want to keep everything safe and sound, especially those delicate areas below!
– There’s a delicate cable connecting the back glass to the iPhone, right by the volume up button. Avoid inserting your pick here to prevent slicing the cable. If you need help, you can always schedule a repair.
– You’ll find multiple spring contacts around the perimeter of the iPhone. If you need help, you can always schedule a repair.
Step 12

If slicing the adhesive feels tough, give the edge a minute to reheat and try slicing again.
– Glide the opening pick along the bottom edge to slice through the adhesive.
– Keep the opening pick in the bottom-left corner to stop the adhesive from sealing back up.
Step 13

– Grab a hair dryer or a heat gun and give that left edge of the back glass a little warm-up until it’s comfortably hot to the touch.
Tools Used
Step 14


Keep your pick within 3 mm to steer clear of any mishaps with the spring contacts!
As you glide on through, you’ll hear and feel those metal clips giving way – it’s like a little dance!
– Pop a second opening pick into the bottom-left corner, right next to the one already there.
– Glide your pick along the left edge to break the adhesive and pop the metal clips loose.
– Keep that pick in the top-left corner to stop the adhesive from sticking back together.
Step 15

– Grab your trusty hair dryer or heat gun and give that top edge and top-right corner of the back glass a gentle warm-up until it feels nice and toasty to the touch.
Tools Used
Step 16


Don’t go deeper than 3 mm with your pick to keep those spring contacts safe. If you need help, you can always schedule a repair.
– Pop in a third pick to the top-left corner.
– Glide the pick along the top edge, curve around the top-right corner, and stop just above the volume up button.
– Leave this pick in place to keep that adhesive from sticking back.
Step 17

– Grab your trusty hair dryer or heat gun and warm up the right edge of that back glass until it feels nice and toasty to the touch.
Tools Used
Step 18


Keep your pick shallow (under 3 mm) to keep those spring contacts happy and intact!
– Slide a fourth opening pick into the bottom-right corner like a pro.
– Gently glide that pick around the corner and up the right edge, pausing right under the volume down button.
– Keep this pick in place to stop that pesky adhesive from rejoining the party.
Step 19


Now that you’ve made some progress, the back glass should be ready to come off the frame! If it seems a bit clingy, don’t worry—just take your pick and gently run it around the edges to see if there’s any leftover adhesive or clips holding it back. You’re almost there!
– Gently swing the back glass open to the right side of your iPhone to detach the stubborn adhesive still holding it in place.
– Support that back glass with a nice, clean, sturdy object to keep things steady while you work!
Step 20

– Grab your trusty tri-point Y000 driver and let’s tackle those three screws holding the battery connector cover in place:
– Two screws that are 1.3 mm long, just waiting to be unscrewed
– One tiny screw, measuring 1.0 mm, ready to join the party
Step 21


– Gently pop off the battery connector cover and set it aside for later. You’ve got this!
Step 22


– Grab your trusty spudger and gently pry up to disconnect the battery press connector. You’ve got this!
– To reconnect those press connectors, just align them carefully and give a gentle press on one side until you hear that satisfying click. Don’t forget to do the same on the other side to make sure it’s snug!
Tools Used

Step 23

– Grab your tri-point Y000 driver and take out the four screws holding down the back glass connector cover:
– Two 1.3 mm screws
– Two 1.0 mm screws
Step 24


– Gently pop the back glass connector cover straight up and take it off with care.
Step 25


– Take your trusty spudger and carefully pop off the back glass connector. If you need help, you can always schedule a repair
Tools Used
Step 26

Now’s a perfect moment to give your repair a quick test before you wrap up your iPhone. Just temporarily reconnect the battery and back glass, power it on, and check that everything is working smoothly. Once you’re satisfied, power it down again and get back to reassembling. Keep it up!
– Carefully detach the back glass.
– When putting everything back together:
– Follow this guide to reapply adhesive and securely attach your back glass once more.
Step 27
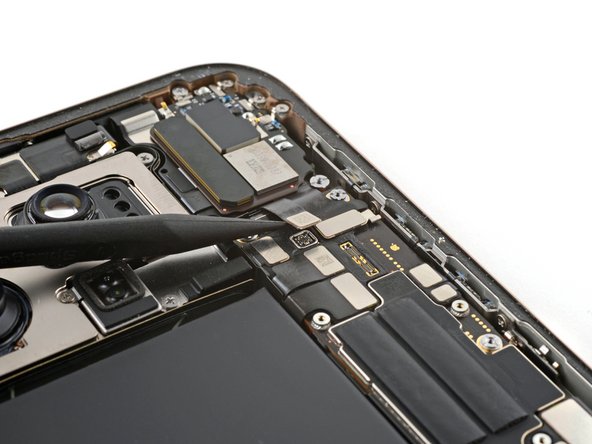

– Grab your spudger and gently pop up and disconnect that 5G mmWave antenna connector. If you need help, you can always schedule a repair.
Tools Used
Step 28


The 5G mmWave antenna is held down with a tiny piece of stretch-release adhesive. If you need help, you can always schedule a repair
– Gently grab the tweezers and carefully lift up the antenna’s black adhesive pull tab.
Tools Used

Step 29


If the adhesive gives way, grab the loose end with tweezers and keep on pulling like a pro!
If you can’t manage to get the adhesive out in one go, no worries! Just drop some high concentration (>90%) isopropyl alcohol beneath the antenna and move on to the next step.
– Grab that adhesive pull tab with your trusty tweezers and give it a gentle tug at a slight angle. You’ve got this!
Tools Used
Step 30


– Grab a spudger and gently pop off the 5G mmWave antenna.
– When reassembling:
– Use tweezers or a spudger to clear off any sticky leftovers from the earpiece speaker and the back of the antenna.
– If your new part doesn’t have adhesive, use a tiny piece of double-sided tape to attach the antenna to the earpiece speaker.
– Firmly press the antenna onto the earpiece speaker to stick it.
Step 31


– Gently use a spudger’s tip to pop up and detach the earpiece speaker connector. If you need help, you can always schedule a repair.
Tools Used
Step 32


When it comes to removing those tricky standoff screws, a dedicated standoff driver or driver bit is your best buddy. If you’re in a bind, a small flathead screwdriver can step in—but tread carefully to avoid any slips that could mess with nearby components.
– Let’s get things started by removing the six screws that hold the earpiece speaker in place. Here’s what you’ll need:
– One 2.4 mm-long Phillips screw
– Three 1.3 mm-long Phillips screws
– One 1.6 mm-long Phillips screw
– One 3.3 mm-long standoff screw
Step 33


You might encounter a bit of resistance near the top edge where the speaker gasket snuggles up against the frame. Just give the speaker a gentle tug to break the seal.
– Grab those tweezers and gently lift out the earpiece speaker like a pro!
Tools Used
