How To Replace MacBook Pro 15 Front Display Glass Tutorial
Duration: 45 minutes
Steps: 29 Steps
Oopsie daisy, it looks like you’re not in the clear!
Dive into this step-by-step guide to swap out your front display glass panel. You’ll need to remove the front glass to get to the LCD. While it’s not strictly necessary to take off the whole display to reach the front glass, doing so makes the job much easier. Heads up: this guide isn’t for anti-glare displays. If you need help, you can always schedule a repair.
Step 1

– Time to get your screwdriver ready! Let’s tackle those ten screws that are holding the lower case snugly against the upper case. Unscrew them and set them aside—you’re doing great!
Step 2


– With both hands, lift the lower case near the vent to pop it off the two clips securing it to the upper case. Feels like unlocking a treasure!
– Gently set the lower case aside like it’s your favorite gadget. Nice work!
Step 3

– Time to bid farewell to those two 5-Point Pentalobe screws chilling at the top edge of the battery.
Hey there! Removing the battery may seem daunting, but don’t worry, you don’t have to follow steps 3-6 to get to that hard drive swap. However, it’s always a good idea to unplug all power sources before diving into any electronics. If you need help along the way, you can always schedule a repair with us. Happy repairing!


Step 6

– Give the battery a little tilt to peek at the battery cable connector underneath.
– Gently pull the battery cable connector from its cozy socket on the logic board and lift the battery out of the upper case.
Step 7

Apple uses a nifty little strip of clear plastic with adhesive on one side to keep the logic board snug behind the camera cable connector. When you’re gently moving it aside, just watch out not to accidentally pop off any of those tiny surface-mount components!
Step 8


Gently slide the connector parallel to the logic board’s surface, rather than pulling it straight up. You got this!
– Gently coax the camera cable out of its socket on the logic board.
Step 9
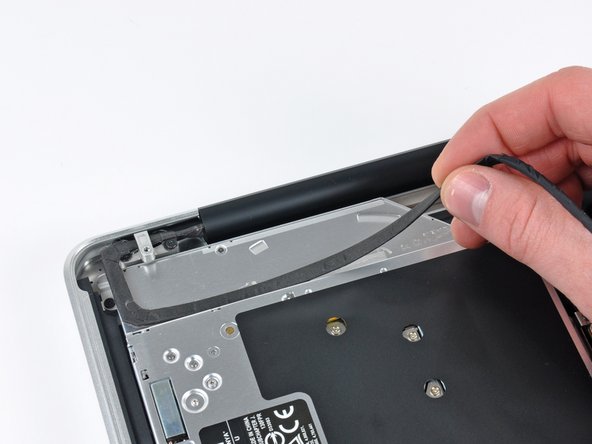
– Gently lift the camera cable away from the sticky stuff holding it to the optical drive. You’ve got this!
Step 10


Gently slide the connector along the face of the logic board – no vertical moves, just parallel finesse!
If your screen is anti-glare, this step is a must-do! But hey, if it’s glossy, just jump ahead to step 12 and you’re golden!
Step 11


Only tackle this step if you’re rocking an anti-glare display!
Keep an eye out for that sneaky screw that might stick around in the Bluetooth/camera cable ground loop. If you’re swapping out the display, make sure to transfer this little guy to the new unit. You’ve got this!
– Take out the two 8 mm Phillips screws holding the Bluetooth/camera cable retainer to the top case.
– Gently lift the Bluetooth board/cable retainer assembly out of the top case.
Step 12


– Start by unscrewing those two 8 mm Phillips screws that are holding the camera cable retainer snugly to the upper case.
– Just a heads up, one of those screws might decide to stick around in the camera cable ground loop. If you’re swapping out the display, make sure to move that little guy over to the new unit.
– Now, gently lift the camera cable retainer out of the upper case and give yourself a pat on the back!
Step 13


– Pull that plastic tab attached to the display data cable lock and give it a gentle twist towards the DC-In side of your computer. You’ve got this!
Step 14


– First up, grab your trusty Phillips screwdriver and take out that single 7 mm screw holding the display data cable retainer snugly to the upper case.
– No worries if that screw decides to stick around in the display data cable ground loop! If you’re swapping out the display, just remember to bring that little guy along to the new unit.
– Now, gently lift off the display data cable retainer from the upper case and you’re one step closer to your repair!
Step 15

Gently pull the connector along the surface of the logic board, not straight up from the socket.
Make sure to double-check that the display data cable lock is turned towards the DC-In board before moving forward.
– Gently wiggle and pull the display data cable connector straight out from its socket, just like you’re giving it a little hug goodbye!
Step 16


– Time to get those display hinges free! Start by unscrewing the two outer T6 Torx screws that are holding both hinges to the upper case. That’s four screws in total, so let’s make sure they’re all out and ready for the next step!

Step 18

Hold onto both the display and upper case with your left hand. If you don’t, they might fall apart and get damaged. If you need help, you can always schedule a repair.
– Let’s bid adieu to the final T6 Torx screw holding the display to the upper case.
Step 19


– With your right hand, gently grab the upper case and give it a little twist toward the top of the display to make sure the upper display bracket clears the edge.
– Now, carefully tilt the display a bit away from the upper case.
– Lift that display up and away from the upper case, but keep an eye out for any brackets or cables that might be trying to hitch a ride. If you need help, you can always schedule a repair.
Step 20


Make sure the heat gun steers clear of the soft rubber strip around the display glass. Heating the rubber will cause it to melt a bit, shifting its finish from matte to glossy. Touching overheated rubber can lead to permanent deformation. If you need help, you can always schedule a repair.
Get ready to roll up your sleeves! In the next steps, you’ll be using a heat gun to gently warm up the adhesive that’s holding the sleek black border on the back of that front glass panel. The adhesive area is highlighted in red in the second picture—easy peasy!
Don’t be alarmed if you spot a bit of condensation forming on the inside of the glass panel or outside of the LCD due to the heat. It’s all part of the process! Once you’ve separated the glass from the display, a little glass cleaner will make it sparkle again.
– Before you dive in, grab a lint-free cloth, dampen it slightly with a mild solution, and give that display glass a good cleaning. This will make the suction cup stick like a charm and help you spot any dust during reassembly.
– Set your heat gun to low, and start warming up the outer black border near the upper right corner of the glass panel.
Tools Used

Step 21


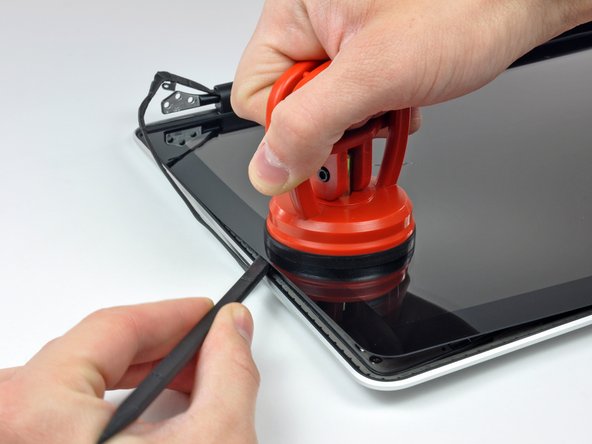
Avoid sticking the suction cup right on the rubber strip that hugs the edge of the display glass.
First up, grab those suction cups from Salvation Repair. Align the movable handle parallel to the glass panel’s face. Gently hold the suction cup against the glass and lift the movable handle until it’s parallel with the other handle.
If you only see the top edge of the glass lifting (like in picture three), rinse and repeat steps one and two until you can lift up a corner. If you need help, you can always schedule a repair.
– Once you’ve warmed up that panel nice and cozy, grab a sturdy suction cup and place it near the upper right corner of the display glass.
– Gently and patiently lift that corner of the display glass away from the display assembly. You’ve got this!
Step 22


– Carefully lift the display glass corner just enough to slide a spudger between it and the display assembly.
– Using the flat end of your spudger, gently pry up the adhesive holding the front glass to the display.
– Lift the glass panel a few inches away from the upper right corner, working along the top and right edges of the display.
Tools Used
Step 23

Grab a guitar pick or any thin plastic buddy you have lying around to keep that upper right corner of the front glass panel from getting cozy with the display assembly again. It’s a little trick that makes the process smoother!
– Grab your heat gun and warm up that adhesive on the black strip along the right side of the front glass panel.
– Stick a suction cup right there on the right side of the front glass panel.
– Gently tug on the glass panel while using a spudger to ease it away from the rest of the display assembly.
– Keep working along the right edge of the front display glass until it’s free from the display. If you need help, you can always schedule a repair
Step 24


– Grab your trusty heat gun and warm up that adhesive hiding beneath the black strip at the top of your glass display panel. It’s like giving it a little spa treatment!
– Now, let’s get a suction cup in on the action! Stick it near the top edge of the glass display and gently pull it up to free the glass panel from its cozy spot.
– Take your spudger and glide along the top edge of the glass panel, carefully prying apart any stubborn adhesive. Just be gentle; we want to keep everything happy here!
Step 25


– Grab your trusty heat gun and gently warm up the adhesive lurking beneath the black strip at the upper left corner of the glass display panel. Let’s soften that up!
– Next, pop a suction cup right by that same corner of the glass display panel. It’s time to get a good grip!
– Now, give that suction cup a gentle pull while using the flat end of a spudger to carefully ease the glass display panel away from the display assembly. You’ve got this!
Step 26


– Alright, let’s kick things off by using a heat gun to gently soften the adhesive under the black strip along the left side of the front glass panel.
– Next up, grab a suction cup and attach it neatly along the left side of the front glass panel.
– Now comes the fun part – gently pull up on the glass panel while using the flat end of a spudger to work your magic and separate it from the rest of the display assembly.
– Keep going like a pro along the left edge of the front display glass until it’s nicely separated from the display.
Step 27


– Once you’ve freed the top, left, and right edges of the glass from the display, gently lift the top edge of the glass panel and carefully rotate it away from the display. Think of it as giving your device a little stretch!
– Before you put everything back together, take a moment to clean both the inside of the glass display panel and the LCD. Trust us, any dust or fingerprints hiding in there will be super annoying when your device is powered on!
Tools Used
Step 28


– Gently slide a plastic opening tool between the display glass and the camera bracket, smoothly tracing around the camera bracket to detach it from the display glass.
– Remember, it’s important to securely affix the camera bracket to the new front display glass before putting everything back together.
Step 29


– Alright, let’s get that cable back in action! Start by using the pointy end of your spudger to peel away the foam tape that’s cozying up to the camera cable ZIF socket.
– Next, use that same spudger magic to lift the ZIF cable retainer on the camera cable socket—just a little flick should do the trick!
– Now, gently slide the camera cable into its snug home on the camera board, and give a little push with your spudger to snap down the ZIF cable retainer. Boom! That cable is locked in and ready to roll.
– Finally, don’t forget to put back that piece of tape covering the camera cable socket. It’s like tucking your device in for a good night’s sleep!
Hey there! Just a heads up: sometimes, while removing the glass, the camera cable might get a little too friendly with the adhesive, causing it to detach from the camera board. No worries, though! If your camera cable is still happily connected to the camera board, you can skip this step. If you need help, you can always schedule a repair.


