DIY Guide to Replace MacBook Pro 15 Upper Case – Step-by-Step Tutorial
Duration: 45 minutes
Steps: 38 Steps
Heads up! Before diving in, make sure you have all the tools and parts ready. If you need help, you can always schedule a repair. Now, let’s get fixing!
Swapping out the upper case means you’ll need to take out a bunch of components from your MacBook Pro. Don’t worry, it’s all part of the adventure! If you need help, you can always schedule a repair.
Step 1

– Let’s kick things off by removing ten screws that are holding the lower case and upper case together:
Step 2

– With a confident grip from both hands, gently lift the lower case near the vent to release the two clips holding it snugly to the upper case.
– Carefully remove the lower case and place it somewhere safe for now.
Step 3

No Pentalobe driver? No problem! Grab a 1.5 mm flathead screwdriver and make sure it fits snugly across two of the five points of the screw head. A loose fit can strip the screw head, and we definitely don’t want that!
If your screwdriver’s head is too loose, find a bigger bit and file it down until it fits snugly. Then proceed with confidence!
You don’t have to follow steps 3-7 to remove the battery in order to replace the hard drive. But hey, it’s always a good idea to remove all power sources from electronics before working on them.
– To get that battery out, you’ll need to tackle three Pentalobe screws holding it snugly to the upper case. Grab that special driver and let’s get to work!
Step 4

– Time to get those screws out! Grab your trusty five-point Pentalobe screwdriver and carefully remove the two visible screws at the top edge of the battery. You’re doing great—keep it up!


Step 7

– Gently tip the battery back to get to the battery cable connector.
– Disconnect the battery cable connector from its slot on the logic board and lift the battery out of the upper case.
Step 8


Check out the fan socket and connector in the second and third pictures! Just a heads up, be gentle when using your spudger to lift that fan connector straight up and out of its socket—don’t want to snap the plastic fan socket off the logic board! The layout in the second picture might look a bit different from yours, but rest assured, that fan socket is still the same.
– Gently use the flat end of a spudger to lift the fan cable connector away from its socket on the logic board. You’ve got this!
Tools Used
Step 9

– Let’s kick things off by removing the trio of T6 Torx screws that are holding the fan snugly in place on the upper case.
Step 10

– Gently lift the fan out from its cozy spot in the upper case.
Step 11

Salvation Repair has a clever trick up its sleeve! Behind the camera cable connector, you’ll find a tiny piece of clear plastic with sticky stuff on one side. It’s there to make sure everything stays put. When you move it, remember: delicate components are attached to the logic board. Handle with care, and all will be well.
Step 12

Gently slide the connector out parallel to the logic board’s surface—no need to pull it straight up!
– Gently pull the male end of the camera cable straight out from its socket to disconnect it. You’ve got this!
Step 13

– Gently slide the flat end of your trusty spudger under the optical drive cable connector and give it a little lift off the logic board. You’ve got this!
Tools Used
Step 14

– Grab your trusty spudger and gently lift the subwoofer connector straight up from the logic board. You’ve got this!
Tools Used
Step 15

– Gently slide the flat end of a spudger under the hard drive/IR sensor cable connector and lift it off the logic board with care. You’ve got this!
Tools Used
Step 16


– Let’s kick things off by removing those two tiny 1.5 mm Phillips screws holding the cable cover snugly to the logic board.
– With a gentle touch, lift that cable cover out of its home in the upper case.
Step 17

– Grab a spudger and pop that trackpad flex ribbon cable connector right off the logic board.
Tools Used
Step 18

– Grab your trusty spudger and gently lift the keyboard ribbon cable retaining flap. You’ve got this!
– Now, with a steady hand, pull the keyboard ribbon cable straight out of its socket. Easy peasy!
Tools Used
Step 19

– Grab a spudger and gently lift the battery indicator ribbon cable connector off the logic board. If you need help, you can always schedule a repair
Tools Used
Step 20


Hey there! If you’re replacing the display, don’t forget about our little screw friend hanging out in the display data cable ground loop. Make sure to bring it along to the new display unit. Need a hand? Feel free to schedule a repair.
Step 21


Hey champ, remember to slide the connector parallel to the board’s surface—like a ninja, not like a rocket taking off!
Step 22


– With the spudger’s tip, nudge up the flap holding the keyboard backlight ribbon cable.
– Gently slide the keyboard backlight ribbon cable straight out from its socket.
Tools Used
Step 23

Hold up! Don’t go removing that logic board just yet. We’ve got some connectors hanging out underneath that need some attention first!
– Take out the screws listed below:
Step 24

Hold your horses on that logic board! Don’t take it out just yet!
Before moving on, make sure that all connections to the upper case are disconnected from the logic board, except for the battery connector.
– Gently lift the logic board assembly from the left side and guide it out of the upper case, paying attention to the port side that might snag as you remove it.
Step 25


– Gently lift the logic board to create space and grab a spudger to lift the microphone off the upper case.
– Carefully move the logic board away from the port openings and raise the assembly out of the upper case.
– Prior to putting the logic board back in place, it’s best to firmly press the microphone into its home in the left speaker to secure it.
Tools Used
Step 26

These screws are securely attached to the hard drive bracket, so they won’t go wandering off on their own.
– Unscrew the two Phillips screws holding the hard drive bracket to the upper case.
– Lift the hard drive bracket out of the upper case.
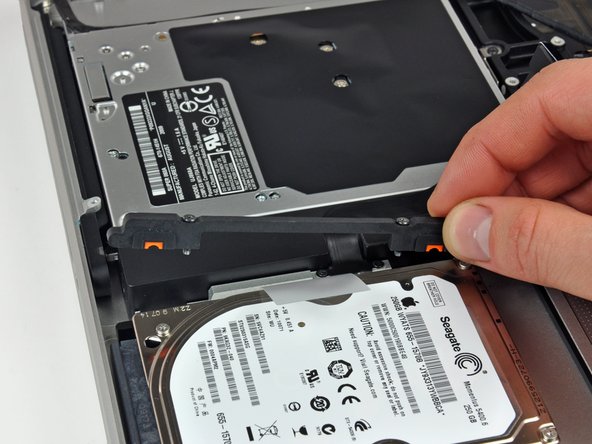
Step 27

– Gently lift the hard drive out of the upper case using its handy plastic pull tab, but be careful of the cable that’s still connected to your computer.
Step 28


– Gently unplug the hard drive from its cable by pulling the connector straight out from the drive. You’re doing great!
Step 29

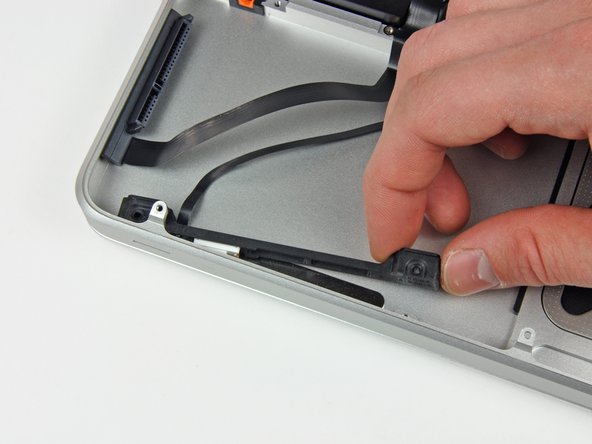
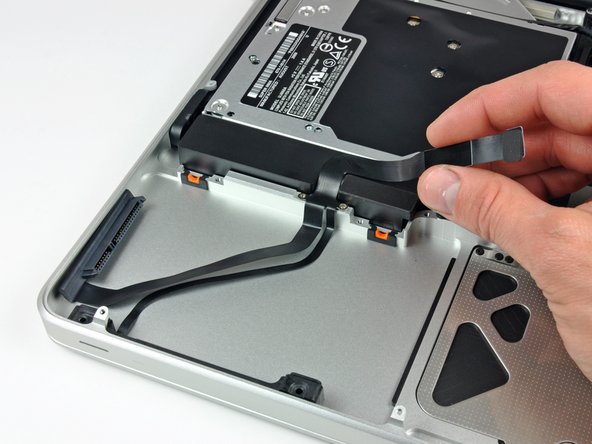
– First up, let’s tackle those four screws holding down the hard drive and IR sensor cable to the upper case. Grab your trusty screwdriver!
– Next, gently slide that hard drive and IR sensor bracket away from the edge of the upper case. It’s like giving it a little nudge!
– Now, with a careful touch, peel the hard drive and IR sensor cable away from the upper case. Take your time—this part’s all about finesse!
– Finally, remove the hard drive/IR sensor cable from the upper case and set it aside. You’re on a roll!
Step 30

– Gently peel off the camera cable from the adhesive that’s keeping it snugly attached to the optical drive.
Step 31


– Take out the trio of 3.5 mm Phillips screws holding the optical drive to the upper case. Say goodbye, screws!
– Gently lift the optical drive from its left side and slide it out of the computer. Out it goes!
Step 32


– Get ready to bid farewell to those four pesky screws holding hands with the subwoofer and right speaker on the upper case:
– Gently lift and escort the subwoofer and right speaker duo out of the upper case.
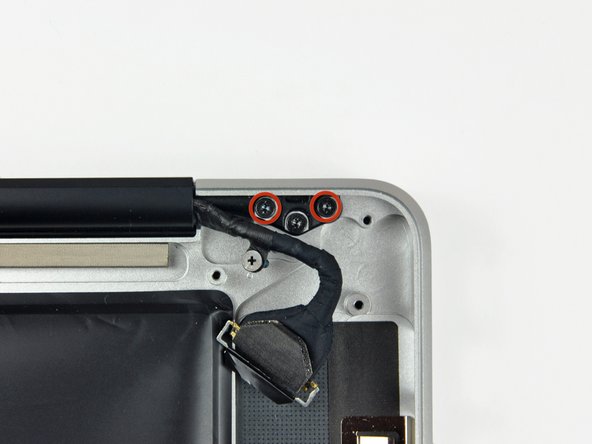
Step 33


– Go ahead and remove those two 8 mm Phillips screws that are holding the camera cable retainer in place on the upper case.
– Now, gently lift out the camera cable retainer from the upper case.
Step 34

We’ve left one screw in each hinge to keep things steady for the next steps. If you need help, you can always schedule a repair.
– Time to get your hands a little dirty! Grab your trusty Torx screwdriver and unscrew those two outer 6 mm screws on each side of the display. That’s four screws in total holding everything together. Let’s get that display off!
Step 35

– Get ready to showcase your tech skills by opening your MacBook Pro just like a pro – making sure the display is super straight with the upper case.
– Find a cozy spot for your MacBook Pro on a flat table – follow along with the picture for that flawless setup.
– Hold that display and upper case tight with one hand while your other hand works its magic to say goodbye to the 6 mm Torx screw from the lower display bracket.
Step 36

Make sure to keep the display and upper case together with your other hand. Letting go could lead to a drop, which might damage both parts. If you need help, you can always schedule a repair.
– Time to bid farewell to the last 6 mm Torx screw holding the display in place! Give it a gentle twist and watch it come free, revealing the next phase of this repair journey.
Step 37
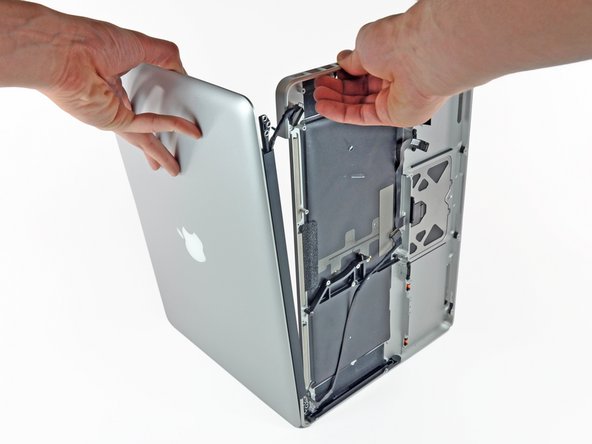

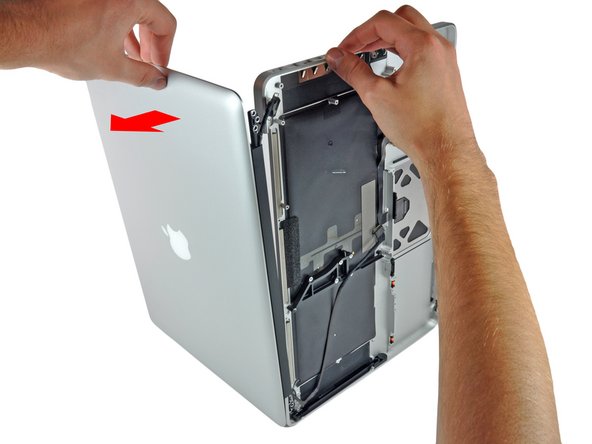
– With your right hand, gently grab the upper case and give it a little twist toward the top of the display to let that upper display bracket clear the edge of the upper case.
– Now, give the display a slight nudge away from the upper case.
– Carefully lift the display off the upper case, keeping an eye out for any brackets or cables that might want to tag along for the ride.
Step 38

When you’re transferring parts to a fresh Upper Case, remember to bid farewell to the bracket holding the logic board and other components snug.
Unscrew the pair of phillips head screws, and give the bracket some breathing room for a sec.


