DIY MacBook Pro 15 Display Inverter Replacement Guide
Duration: 45 minutes
Steps: 26 Steps
Hey there! If you’re feeling stuck, don’t worry. We’ve got your back! Need some assistance? You can always schedule a repair with us!

Step 2

– Pop out the three matching Phillips screws from the memory door.
Step 3

– Lift the memory door just enough to grab hold of it, then slide it toward you and pull it away from the casing. If you need help, you can always schedule a repair
Step 4

– Get ready to say goodbye to the two 2.8 mm Phillips screws hanging out in the battery compartment near the latch. Let’s show them the exit door!
Step 5

– Let’s spice things up by saying goodbye to 6 screws:
Step 6

– Time to get your screwdriver ready! Unscrew those four 3.2 mm Phillips screws on the port side of your computer. You’ve got this!
Step 7

– Give that computer a quarter-turn and pop out those two 3.2 mm Phillips screws from the back. If you need help, you can always schedule a repair.
Step 8

– Give that computer another 90-degree spin and pop out those four 3.2 mm Phillips screws from its side.
Step 9

Gently detach the upper case as it is connected to the logic board using a delicate ribbon cable. Rushing could lead to unwanted consequences!
– Gently lift up the back of the case and glide your fingers along the sides, releasing the case with finesse. As you make your way around, feel free to give the case a little dance to gracefully loosen the front of the upper case (there are some sneaky plastic clips waiting to join the party).
Step 10

– Time to part ways with the trackpad and keyboard ribbon cable on the logic board – gently untangling them like solving a puzzle. Peel off any tape that’s overstayed its welcome.
– Ready for the grand opening? Lift off the upper case with confidence, like opening a book to an exciting new chapter.
Step 11

– First things first, let’s disconnect those three antenna cables from the Airport Extreme card. You’ve got this!
– And hey, good news! Apple has thoughtfully labeled where each color antenna cable goes. So, when you’re ready to reconnect them, just check the labels to ensure everything’s plugged in perfectly.
Step 12

– Gently coax the Airport antenna cables out of their snug little channel in the left speaker. You’ve got this!
Step 13

– Unplug that iSight cable from the logic board by sliding it left and out of its connector. If you need help, you can always schedule a repair.
Step 14

– Lift the inverter cable from the logic board using a spudger. If you need help, you can always schedule a repair.
Tools Used

Step 15

– Gently slide the display data cable off the logic board like you’re giving it a little nudge to say goodbye!
Step 16

– Time to get your hands a little dirty! Start by unscrewing the shiny silver T6 Torx screw that’s holding the ground loop of the display data cable snugly against the casing. You’ve got this!
Step 17

– Hold the screen up with one hand while you zap out these next 3 screws:
Step 18

– Grab each side of the display assembly and gently hoist it up and away from the computer. It’s like lifting a treasure chest out of the sand—exciting and rewarding!
Step 19


– Unscrew the two cheeky 5 mm Phillips screws chilling at the lower left and right corners of the display. You’ve got this—just two screws and you’re on to the next step!
Step 20


– Slip the flat end of a spudger into the gap between the plastic strip on the back bezel and the front bezel, aligning it perpendicular to the display.
– Once in, give the spudger a twist away from the display to pry apart the bezels.
– Slide along the left edge of the display, gently separating the rear bezel from the front until they part ways evenly.
Tools Used
Step 21


– Grab that trusty spudger and slide the flat end in between the plastic strip on the back bezel and the front bezel like you’re tucking in a shirt. Make sure it’s nice and perpendicular to the display!
– Now that you’ve got it in there, give it a little twist away from the display to start separating those bezels. You’re doing great!
– Keep working your way along the right edge of the display until the rear bezel is happily separated from the front bezel. Almost there!
Tools Used
Step 22


– Get that trusty spudger ready and slide its flat end between the front bezel and the plastic strip connected to the rear bezel near those screw holes at the lower corners of the display.
– Now, gently twist your spudger towards the rear bezel to start separating it from the front bezel.
– If needed, make that space between the bottom part of the rear bezel and the clutch cover a bit bigger until those two parts break up completely. You got this!
Tools Used

Step 24
Hey there! Just a heads up: the display inverter is a super slim and sensitive circuit board, so handle it with care to avoid any mishaps. If you need help, you can always schedule a repair!
– Gently elevate the inverter board from the clutch cover.
Step 25

– Gently unplug the LCD backlight from the inverter by pulling its connector away from the inverter board. You’ve got this!
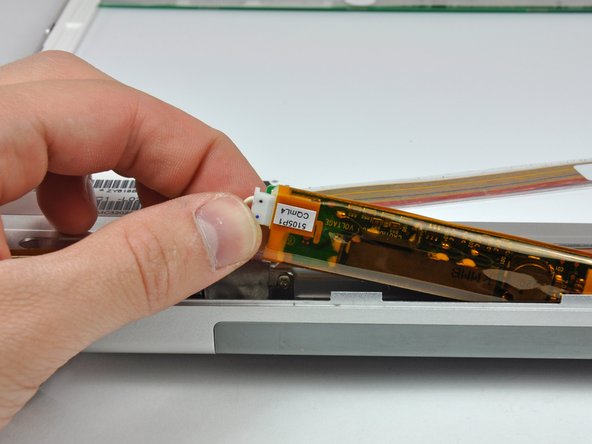
Step 26

Hey there! When working with the inverter cable ground loop, treat it like a delicate flower – gentle and careful. We don’t want to put any strain on this precious wire, so handle it with the utmost care.
– Gently unplug the inverter cable by giving its connector a friendly tug away from the inverter socket. If you need help, you can always schedule a repair.

