
DIY Guide to Replace MacBook Pro 15 Display Inverter – Step-by-Step Tutorial
Duration: 45 minutes
Steps: 25 Steps
Heads up, tech whiz! Make sure you’re grounded to prevent any static woes while handling your gadget’s internals.
Step 2

– Whip out your screwdriver and unscrew the trio of identical Phillips screws securing the memory door. Party time!
– Keep a log of where each screw came from—it’s like a treasure map for putting things back together!
Step 3

– Gently lift the memory door just enough to get a good grip, then slide it toward you and whisk it away from the casing like magic!
Step 4

– Unscrew the dynamic duo of Phillips screws chilling in the battery compartment near the latch.
Step 5

– Time to unscrew some mysteries! Grab your screwdriver and whisk away these 6 screws:
Step 6

– Unscrew the fab four Phillips screws chilling on the port side of your computer!
Step 7

– Twist your device 90 degrees and unscrew the two Phillips screws chilling at the back. Keep it groovy!
Step 8

– Twist your computer 90 degrees once more and unscrew the four Phillips screws on the side. Keep the groove going!
Step 9

Hold your horses! Don’t just rip off the upper case like a band-aid. It’s still connected to the logic board with a delicate ribbon cable. Let’s keep it chill and careful!
– Start by lifting the rear of the case and snake your fingers along the sides to loosen it. Keep going until the sides feel free. Next, you might have to wiggle the case up and down a bit to detach the front. Watch out, this part can be a bit of a puzzle! Especially over the DVD reader where there are four sneaky tabs that need to be pulled out vertically.
– Heads up! The two tiny tabs on the front left side of the upper case might get a little bent out of shape during your removal extravaganza. When you’re putting it back together, you might need to give them a little nudge back into their grooves in the lower case.
Step 10

– Unplug the trackpad and keyboard ribbon cable from the logic board, peeling off any tape that gets in your way.
– Wave goodbye to the upper case as you lift it off.
Step 11

– Unhook those two snazzy antenna cables from the Airport Extreme card.
– The white antenna cable likes to party on the left side of the Airport Extreme card.
Step 12

– Let’s give those Airport antenna cables a new path! Gently guide them out of their cozy channel in the left speaker. It’s like leading tiny electronic snakes back into the wild. Fun, right?
Step 13

– Unhook the iSight, inverter, and left fan cables from the logic board with a gentle tug in the direction they’re facing. Just like leading a dance, let them follow your lead.
Step 14

– Unhook that snazzy display data cable from the logic board.
Step 15

– Unscrew the shiny silver T6 Torx screw that’s keeping the ground loop of the display data cable snug against the casing. You’re doing great!
Step 16

– Hold the screen up with one hand and dance out those three screws:
Step 17

– Grab each side of the display assembly and gently lift it away from the computer. You’re doing great!
Step 18


– Unscrew the two 5 mm Phillips screws chilling in the lower left and right corners of the display. Just two screws, you got this!
Step 19


– Slide the flat end of a spudger in between the plastic strip clinging to the rear bezel and the front bezel. Make sure it’s perpendicular to the display face like a little spudger soldier!
– Keep that spudger in place and give it a little twist away from the display. It’s like opening a jar of cookies, but here you’re unlocking your device’s secrets!
– Cruise down the left edge with your trusty spudger, prying as you go, until the rear bezel lifts away from the front like a curtain on stage reveal. Ensure it’s an even separation, like parting your hair on a good day!
Tools Used

Step 20


– Wedge the flat end of a spudger between the plastic strip on the rear bezel and the front bezel, perpendicular to the display. It’s like sneaking a spatula under a particularly stubborn pancake!
– Keep the spudger in place and twist it away from the display. This action pops the front and rear bezels apart like a gently opening clamshell.
– Slide along the right edge of the display with your spudger tool, prying gently as you go, to make sure the rear bezel breaks up with the front bezel evenly. It’s all about keeping things smooth and steady!
Tools Used
Step 21


– Wedge the flat end of your spudger between the front bezel and the plastic strip clinging to the rear bezel near the screw holes at the bottom corners of the display. It’s like prying open a treasure chest!
– Twist your spudger toward the rear bezel to gently encourage it to part ways with the front bezel. Think of it as breaking up a cookie sandwich!
– If needed, gently widen the gap between the lower edge of the rear bezel and the clutch cover until they’re completely free from each other. You’re almost there!
Tools Used

Step 23
Heads up! The display inverter is super slim and super delicate. It’s like handling a piece of fine art! Handle with care to avoid any oops moments.
– Gently hoist that inverter board out of the clutch cover like you’re lifting a slice of precious pizza.
Step 24

– Unplug the LCD backlight from the inverter by sliding its connector off the inverter board. Easy-peasy!
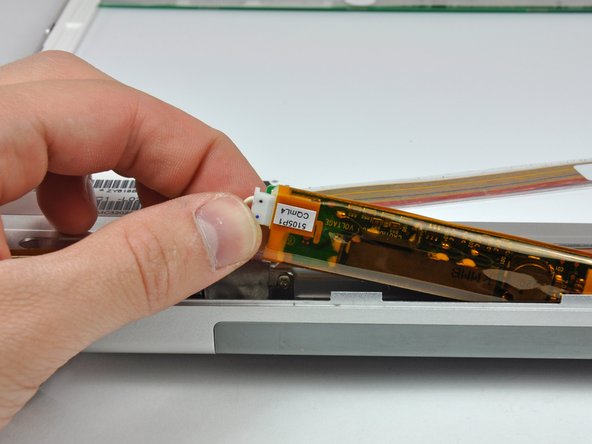
Step 25

Watch out! Make sure not to stress the inverter cable ground loop—it’s super thin and delicate, like a spider’s silk!
– Unplug the inverter cable by gently tugging its connector from the socket on the inverter. Easy peasy!


