How to Replace MacBook Pro 14″ Late 2023 Battery
Duration: 45 minutes
Steps: 30 Steps
Heads up, tech whiz! Make sure you’ve got your tools ready and your workspace clear. Let’s ace this repair together!
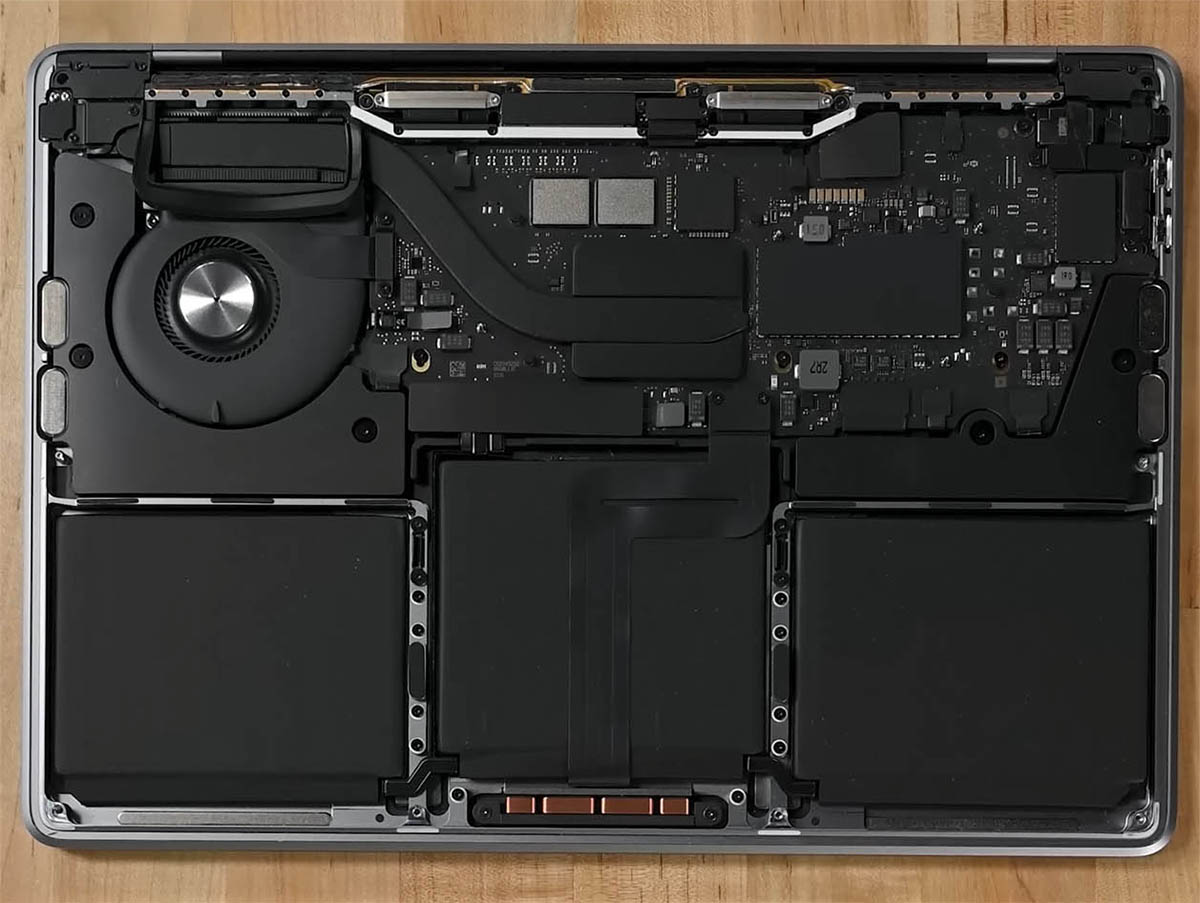
Ready to give your MacBook Pro 14″ a fresh start with a new battery? Dive into this guide to swap out the old battery for a new one in your late 2023 model, featuring those slick M3 Pro and M3 Max chips. We’ll be dealing with some stretchy adhesives that keep your battery snug as a bug—some of which are sneakily hidden under the trackpad. So, yep, you’ll need to remove that first. And don’t forget to grab some new battery adhesive to stick everything back together nicely. Heads up, some pics might look a tad different since they’re from another model, but no worries, they’ll guide you just right!
Step 1


– Power down your MacBook, snap that lid shut, and flip it onto its back. Remember, no peeking inside until that battery is totally unplugged!
– Disconnect the MagSafe power cable and any gadgets hitching a ride on your MacBook.
Step 2


Before we jump into the repair, make sure your MacBook Pro is powered off and unplugged. Flip it over to get started like a boss!
As you dive into the repair, keep a keen eye on each screw, ensuring each one dances back to its original stage to prevent any backstage mishaps with your gadget.
– Grab your P5 Pentalobe driver and let’s remove those eight screws holding the lower case. It’s like a mini treasure hunt!
Step 3


– Slap a suction cup near the front edge of the lower case, right between those pesky screw holes.
– Give that suction handle a hearty tug to lift and create a wee gap under the lower case.
Tools Used

Step 4


– Pop an opening pick into the little space you just made. Let’s get this party started!
– Whoosh the pick around the nearest corner and glide it up halfway along the side of the MacBook Pro like a skateboarder on a ramp.
Step 5


– Now, let’s do that magic on the other side! Grab your opening pick and gently release the second clip. You’re doing great!
Step 6


The back edge of your MacBook has some sneaky sliding clips that keep the lower case in place. Popping these open can be a bit of a wrestling match, and those case edges can be sharp! Might want to suit up with some gloves for this showdown to keep your hands happy and scratch-free.
– Gently tug the lower case away from the back edge, one corner at a time, to pop those sneaky sliding clips free.
Step 7


– Pop off that lower case, champ!
– To pop it back on:
Step 8


– Gently coax any tape hiding the battery board data cable connector on the logic board into the open.


Step 10


– Slide the battery board data cable out of its cozy little socket on the logic board like a pro!
Step 11

While your MacBook might be throwing some Torx Plus screws your way, no worries—standard Torx bits will handle the job just fine. Just remember to press down firmly and evenly to keep those pesky screws from stripping!
– Grab your T3 Torx driver and unscrew the two 2.1 mm-long 3IP Torx Plus screws that are keeping the trackpad cable bracket snug against the logic board. Let’s make this happen!


Step 13


When reconnecting press connectors like this one, align and gently press one side until you hear a satisfying click, then do the same on the other side. Avoid the middle to prevent a pinch mishap. Misalignment could lead to bent pins and a heartbreak of a permanently damaged connector!
– Grab your trusty spudger and gently pop off the trackpad cable’s press connector from the logic board. It’s just a little nudge!
Tools Used


Step 15


– Gently peel back any tape hiding the battery board data cable connector right under that big pancake screw.


Step 20


Pop that connector up just enough so it doesn’t sneakily touch anything during your repair adventure—aim for no more than a 45-degree angle to avoid a hinge-tragedy!
To up your safety game, slip something like a piece of a playing card between the connector and board—it’s a smooth move!
Step 21


– Grab your T5 Torx driver and remove the ten 5.7 mm 5IP Torx Plus screws holding the trackpad assembly together. It’s like a puzzle waiting to be solved!
– Consider dabbing a bit of blue threadlocker on those screw threads as you put them back. It’s a great trick to keep them from dancing out over time.
– Start off by screwing them in loosely—just enough to hold. Once everything looks aligned and feels right, go ahead and give them a final snug. Perfect alignment makes for a smooth glide!
Step 22


– Gently flip your MacBook upside-down and open the screen just a tad. It’s like a little peek-a-boo! The trackpad should gracefully make its exit and lay flat, taking a nap on the screen.
– Now, carefully wiggle the trackpad’s ribbon cable through its cozy slot in the frame like you’re threading a needle.

Step 24


– Grab your T5 Torx driver and unscrew the 4 mm 5IP Torx Plus screw that’s keeping the battery board in place.