DIY MacBook Pro 13 Subwoofer Right Speaker Replacement
Duration: 45 minutes
Steps: 14 Steps
Hey there, champ! Just a heads-up, make sure you’ve got your tools ready and you’re in a well-lit area. Safety first, rockstar!
Is the right speaker on your MacBook Pro giving you the silent treatment? Cheer up and follow this guide to swap out the subwoofer and right speaker. Let’s bring the noise back!
Step 1

– Alright, gear up for some screw-removing action! You’ll need to whisk away these 10 screws that are playing keep-away with the lower case of your MacBook Pro 13″ Unibody:
Step 2

– Gently lift the lower case a bit and nudge it toward the back of the computer to unhook those pesky mounting tabs.
Step 3

Just a heads-up, it’s a good idea to unplug the battery connector from the logic board to prevent any unexpected zaps!
– Grab the flat end of your trusty spudger and gently pop the battery connector out of its cozy home on the logic board.
Tools Used

Step 4

Gently lift from beneath the cables to pry them up.
– Grab your spudger and with the flat end, give the right speaker/subwoofer cable connector a gentle nudge straight upwards off the logic board. Remember, no Hulk-smashes! Just lift the connector, not the socket, and wiggle it towards the optical drive.
Tools Used
Step 5

– Slide the camera cable connector toward the optical drive and gently disconnect it from the logic board. Rock on, you’re doing great!
You’ll need to gently shimmy the small clear plastic cable retainer (highlighted in red) that’s glued to the logic board. It’s like moving a sleeping cat without waking it up — be super careful not to disturb any other components on the board as you wiggle it away from the camera cable connector!
Heads up! This socket is like a delicate dance partner—metal and prone to bending. Make sure the connector and its socket on the logic board are perfectly aligned before you bring them together. It’s all about the perfect fit!
Step 6

– Gently slide the flat end of a spudger under the optical drive connector and lift it straight up from the logic board. You’ve got this!
Tools Used
Step 7

– Grab the flat end of a spudger and give that hard drive connector a firm, friendly nudge straight up off the logic board. You got this!
Tools Used
Step 8

– Take out the two Phillips screws that are keeping the subwoofer attached to the upper case. You’ll find the right screw is a 5 mm show-off and the left one is a slightly more humble 3.9 mm.
– Remember, the longer screw likes to hang out on the right side.
Step 9


– Hold up! The subwoofer is still shaking hands with the right speaker—don’t pull them apart just yet.
– Gently lift the subwoofer off the optical drive and let it chill above the computer.
Step 10


Heads up! The right screw might just decide to hang out with the camera cable and not come out.
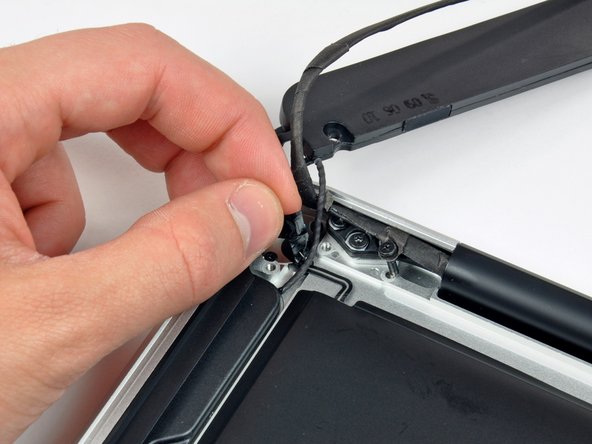
– Unscrew the two 8.4 mm Phillips screws that are keeping the camera cable bracket snugly attached to the upper case.
– Gently lift the camera cable bracket right out of the upper case and voila!
Step 11


– Unscrew the three 2.5 mm Phillips screws that are keeping the optical drive attached to the upper case. You’re doing great!
– Gently lift the optical drive by its right edge and smoothly slide it out of the computer. You’ve got this!
Step 12
Heads up, cool cat! Right beneath this tape lies the sneaky power button ribbon cable. Let’s keep it chill and careful!
– Gently peel off the tiny strip of black tape hiding the right speaker cable. It’s just a small wardrobe change for your device!

Step 14

– Pop out the subwoofer and right speaker assembly from the upper case like you’re lifting a treasure out of a chest. You got this!


