How to Replace MacBook Pro 13 Unibody Mid 2009 Hard Drive Cable: Step-by-Step Guide
Duration: 45 minutes
Steps: 11 Steps
Heads up, tech hero! Make sure you’re in a swanky spot with good lighting. Wouldn’t want to miss a step while you’re doing your magic!
Ready to jazz up your device? This guide’s got your back! We’ll help you swap out that old hard drive cable or give it a good tighten if it’s feeling a bit wobbly.
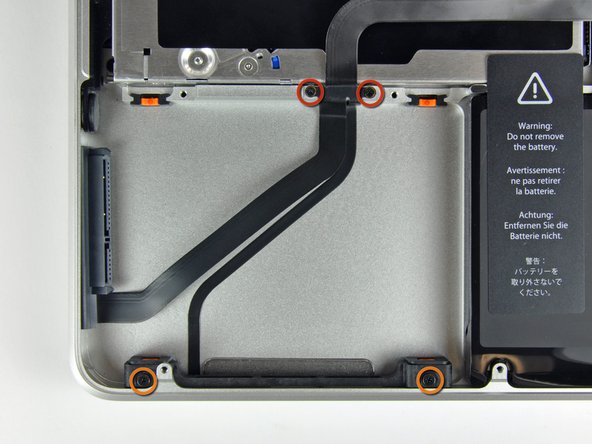
Step 1

– Alrighty, it’s time to unscrew some things! You’ll need to remove the following 10 screws that are keeping the lower case attached to your MacBook Pro 13″ Unibody:
Step 2

– Gently hoist up the lower case just a tad and nudge it toward the back of the computer to unhook those pesky mounting tabs.
Step 3

Hey there, quick heads up! It’s a smart move to unplug the battery connector from the logic board. This little step helps dodge any unexpected zaps. Safety first, right?
– Grab the flat end of a spudger and pop that battery connector out of its cozy home on the logic board.
Tools Used

Step 4

These little rascals are sticking with the hard drive bracket like loyal friends!
– Whip out your Phillips screwdriver and unscrew the dynamic duo of screws holding the hard drive bracket like a champ!
Step 5

– Hoist that retaining bracket right out of the upper case like a champ!
Step 6

– Grab the pull tab and gently lift the hard drive out of its cozy spot in the chassis. Watch out for the sneaky cable still hugging it to the computer!
Step 7

– Gently pull the hard drive cable connector straight out from the hard drive like you’re unplugging a fridge to grab a snack.
Step 8
– Unscrew these four awesome screws that are holding the hard drive and IR sensor cable to the upper case:
Step 9


– Gently scoot the hard drive along with the IR sensor bracket away from the upper case edge. It’s like sliding into a cozy bed, but for your hardware!
– Now, tenderly peel the hard drive and IR sensor cable off the upper case. Think of it as detaching a sticker from your favorite notebook.
Step 10

– Grab the flat end of your spudger and give the hard drive cable connector a gentle nudge off the logic board. It’s like coaxing a sleepy cat off your laptop—easy does it!
Tools Used
Step 11

If the shiny new replacement part you’ve got doesn’t come with the hard drive bracket and indicator light, you’ll need to snag those from the old part and pop them onto the new one. Keep the vibes high and the tools handy!
– Hoist the hard drive/IR sensor cable assembly out of the upper case like you’re lifting a trophy.
– Your replacement might arrive with a few snazzy adhesive foam bumpers to ensure your hard drive and bracket don’t do the jitterbug inside the case. Stick ’em on as needed to keep things cozy!


