
Replacing hard drive on MacBook Pro 15: Step-by-step DIY tutorial for MacBook users
Duration: 45 minutes
Steps: 18 Steps
Hey there! Looks like we’ve got a little bump in the road, but no worries, we’ll have this fixed up in no time. Your device will be back in action before you know it. Keep up the great work! Remember, if you need help, you can always schedule a repair.
Adding a second hard drive to your laptop has a bunch of perks like faster speeds, extra storage space, and less hassle when setting up new software. Follow this groovy guide to slap one in using our optical bay hard drive enclosure.


Step 2


– First up, let’s tackle those three identical 2mm Phillips screws hanging out by the memory door. Go ahead and remove them with a trusty screwdriver!
– Now, gently lift the memory door just enough to get a good grip, and then slide it toward you, away from the casing. You’ve got this!
Step 3

– Unscrew the two 2.8 mm Phillips screws chilling near the latch in the battery compartment.
Step 4

– Alright, let’s whisk away those 6 screws next:
Step 5

– Time to get your screwdriver ready! Start by taking out those four 3.2 mm PH00 Phillips screws on the port side of your computer. You’ve got this!
Step 6

– Twist your computer 90 degrees and whisk away those two 3.2 mm Phillips screws from the back end. Keep it groovy!
Step 7

– Twist that computer 90 degrees once more and whisk away those four 3.2 mm Phillips screws from the side. Keep it going, you’re doing great!
Step 8


Hold up, speedster! Don’t just rip off the upper case like it’s a band-aid. It’s still connected to the logic board by a sneaky little ribbon cable!
– Start by gently lifting the back of the case and let your fingers glide along the sides, freeing it as you go. Once the sides are loose, give the case a little rock up and down to help release the front of the upper case.
– You’ll find four sneaky plastic clips hiding above the DVD slot, plus another one above and to the left of the IR sensor. These little guys can be tricky to disengage without a little prying, and they might give you a hard time when it’s time to put everything back together.
– Reassembly Tip: Give a firm press on the top case right above each clip until you hear that satisfying snap, ensuring they settle back into their slots.
– Reassembly Tip: The two center DVD clips can be a bit stubborn and might not snap back into place without a little assistance. To avoid deforming the frame around the DVD slot, support it by sliding a plastic spudger into the DVD slot right under the clip location until it fits snugly, then press down until you hear that reassuring snap.
Tools Used

Step 9


Heads up! You can swap out the hard drive without having to disconnect the keyboard from the chassis. Just keep it propped up so it doesn’t get in your way while you tackle that drive removal with both hands.
Take it easy when you’re disconnecting the keyboard-trackpad ribbon cable. Make sure the back of the upper case is clear from the hinge area. It’s a breeze to accidentally bend those screw receivers on either side of the keyboard, and we definitely want to avoid that!
– Gently detach the trackpad and keyboard ribbon cable from the logic board, and feel free to peel off any tape standing in your way.
– Carefully lift off the upper case.
Step 10

– Grab your trusty spudger and gently use its flat end to disconnect that pesky orange SuperDrive ribbon cable from the logic board. Don’t forget to peel away any tape that might be holding it back—you’re almost there!
Tools Used
Step 11

– Unscrew those 4 little screws like a pro!
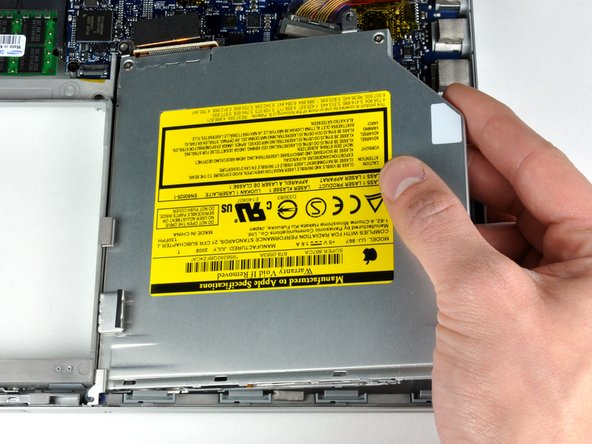
– Gently lift the optical drive out of the computer and give it a little wiggle if it’s feeling stubborn.
Step 12

If your shiny new optical drive comes with brackets already attached, just swap over the data cable to your fresh drive. Feel free to skip the bracket removal steps below and get right to the fun part!
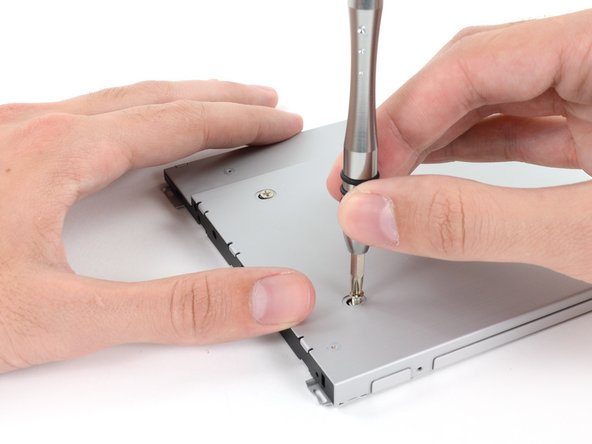
– First up, grab your trusty screwdriver and take out those two shiny Phillips screws holding the mounting bracket on the left side of the optical drive. You’ve got this!
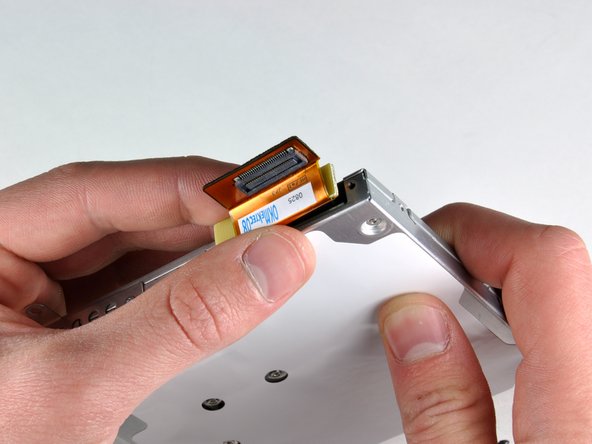
– Now, gently rotate the drive and unplug that feisty orange ribbon cable from the optical drive. Easy peasy!
Step 13

– Unscrew those two Phillips screws that are holding the mounting bracket snugly to the back of the optical drive. You’ve got this!
Step 14

Got a CD or something else stuck in your optical drive? No worries! Check out our optical drive repair guide for some handy tips. If you need help, you can always schedule a repair.
– Give that drive a little spin and unscrew the two Phillips screws holding the bracket in place on the right side of the optical drive.
Step 15


– To get that plastic spacer out of the optical bay hard drive enclosure, simply press in on one of the clips on either side and lift it up and away. Easy peasy!
Step 16


– Make sure to double-check that the hard drive connectors are facing downwards before gently sliding it into the enclosure.
– With a soft touch, carefully place the hard drive into the designated slot in the enclosure.
Step 17


– After ensuring the hard drive is comfortably nestled in, pop that plastic spacer back in while giving the hard drive a gentle hug against the enclosure’s bottom. Keep it snug and secure!
Step 18

Now, let’s get those brackets and optical cables from the old drive hitched onto your new fancy enclosure. Just reverse the steps to pop it back into your MacBook Pro. Easy peasy!
– Grab two Phillips #1 screws and party on by securing the drive to its enclosure.


