How to Replace the TRIAC Switch in Weller WLC100 Soldering Iron
Duration: 45 minutes
Steps: 17 Steps
Hey there, repair champ! Just a friendly reminder to handle your device with care. If things get a bit tricky or you need a helping hand, don’t hesitate to schedule a repair. You’ve got this!
Sometimes the adjustable heat dial on the Weller WLC100 soldering station can act up, usually due to a little trouble with the TRIAC switch on the heat board. But don’t sweat it! Swapping out this budget-friendly switch is an easy fix. Just grab your trusty Weller iron, and you’ll de-solder the old TRIAC switch before soldering in the shiny new one. If you’re a Weller owner, you probably know your way around soldering irons, so this should be a breeze. Just keep in mind that while this repair should take under two hours, there’s always a chance of a little burn here and there, so handle those hot tools with care. If you need help, you can always schedule a repair.
Step 1

– Give that adjustment dial a little twist and pop off the knob!
Step 2

– Go ahead and take out those two 8.6 mm Phillips #1 screws from the bottom of the soldering station. You’re doing great!
Step 3

– Pop off those rubber feet to reveal the hidden screws waiting for you!
Step 4

– Time to say goodbye to those last two 8.6 mm Phillips #1 screws at the bottom of the soldering station. Let’s get them out of there!
Step 5

– Gently pry apart the top and bottom halves of the soldering station.
Step 6

– Time to take off that adjustable heat dial board!
Step 7


– Position the new TRIAC switch just like the old one was set up. You’ve got this!
Step 8

If you’re looking to sharpen your soldering skills, check out our guide on How to Solder and Desolder Connections! It’s packed with tips to help you tackle those tricky connections like a pro.
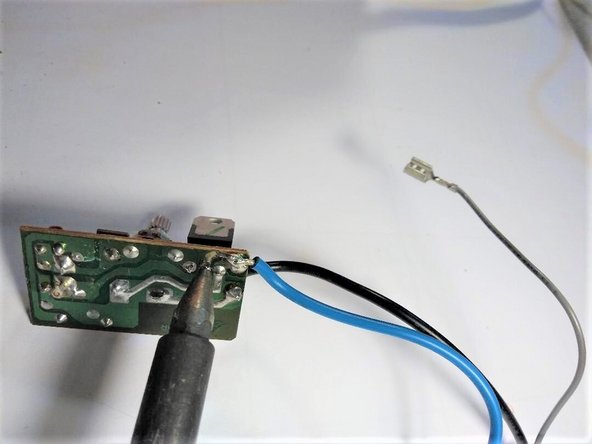
– Carefully remove the three pins by de-soldering them.
Step 9

– Once you’ve successfully melted away all the solder from those little pins, it’s time to carefully pop out the TRIAC switch. You’re almost there!
Step 10

– Pop that shiny new TRIAC switch right into the three holes left behind by the old one. You’ve got this!
Step 11

– Attach the new TRIAC switch to the board with a little solder magic!
Step 12

– Make sure all three pins are securely soldered in place and that none of the solder is making contact with the other pins. Keep it neat and tidy!
Step 13

– Pop that board back into the soldering station and get ready to work your magic!
Step 14

– Gently press the knob into the hole until it pokes out the other side, just like a surprise party waiting to happen!
Step 15

– Make sure the knob is poking through the opposite side of the soldering station.
Step 16

– Pop that dial back onto the knob like a pro!
Step 17

– Pop the bottom back on and secure it by fastening all four screws and replacing those rubber feet. Just follow the steps from four to two in reverse, and you’ll be back in business in no time!