How to Replace Cable Connectors in NEC Electronics Skills
Duration: 45 minutes
Steps: 18 Steps
Hey there, savvy fixer! Before you dive in, remember to keep your workspace tidy and take it easy. If you run into any bumps on the road, no worries! Just schedule a repair and let the pros handle it!
Modern gadgets are packed with a mind-boggling variety of internal data and power cable connectors. There’s nothing quite like the feeling of hitting a roadblock when a connector goes kaput! This guide is here to help you get acquainted with the most common types of connectors and equip you with the tools and techniques needed to safely disconnect and reconnect them. Here’s what you’ll learn about: ZIF Connectors, No-Fuss Ribbon Cable Connectors, Locking Tab Connectors, Other Ribbon Cable Connectors, Flat-Topped (Low Profile) Connectors, Press Connectors, Coaxial Cable Connectors, Display Cable Connectors, Sliding Connectors, Large Sliding Connectors, JST Connectors, Power Cable Connectors, Bundled Cable Connectors, Glued-Down Cables, SATA Cables, Soldered Connections, and even some Rare & Exotic Connectors (Part 1 and Part 2)! So let’s dive in and get those connections sorted. And remember, if you need help, you can always schedule a repair.
Step 1


ZIF connectors, or Zero Insertion Force connectors, are the unsung heroes that keep those delicate ribbon cables snug and secure! Picture a clever little hinged flap perched atop the socket, ready to welcome the cable with open arms along one of its long edges. It’s a simple yet brilliant design that makes your repair journey a breeze!
– Ready to disconnect that cable? Grab a spudger, an opening tool, or even a clean fingernail to flip up the locking flap—just like that, you’re in the unlocked zone!
– With the flap up, gently pull the cable out of its socket using tweezers or your fingers. Easy peasy!
– Now, let’s get that cable back in action! Make sure the locking flap is flipped up and carefully reinsert the cable. Once it’s snug, flip that locking flap down to keep it secure. The cable should slide in smoothly; no need to force it! If things get tricky, just pull it out, double-check that the flap is fully unlocked, and give it another go. You’ve got this! If you need help, you can always schedule a repair.


Step 2


Before you dive into disconnecting those cables, take a moment to look for a release mechanism and ensure it’s not a ZIF connector. If you skip this step, you might end up doing some unintentional damage to the socket and cable by yanking it out. So, let’s be careful and keep everything in one piece!
Keep an eye out for a ribbon cable that sports a ZIF connector without a flap. Typically, this cable is a bit sturdier, featuring a tough, reinforced plastic end. You’ll often find these connectors in larger gadgets like printers, projectors, or gaming consoles. If you need help, you can always schedule a repair.
– Just give those ‘no-fuss’ ribbon cables a gentle tug straight out of their socket to disconnect them. Easy peasy!
– When you’re ready to reconnect, grab the cable close to the end and slide it back into the connector. Remember to apply pressure to the sturdy plastic reinforcement instead of the cable itself. You’ve got this!
Step 3


Some ribbon cable connectors come with a handy little plastic locking tab. You’ll often find these gems in larger game consoles and mice, keeping everything snug and secure.
– Grab your trusty spudger and gently nudge the plastic tab on alternating sides until it pops up, unlocking the magic within!
– With the tab free, carefully pull the cable straight out of its cozy socket.
– When you’re putting everything back together, slide the cable back into its socket and use the flat end of that spudger to press the tab down and lock it in place.
Tools Used
Step 4


There are various types of ribbon cable connectors out there, and some may need you to get a little creative with how you disconnect them. For instance, certain Xbox gaming consoles sport ribbon cables that have a fun little twist around the connector, complete with a locking tab to keep things secure.
– Alright, let’s get that connector disconnected! Grab a spudger or your trusty clean fingernail and gently lift the looped tab away from the connector.
– Next up, take the tip of your spudger and give the plastic locking tab a little nudge away from the socket—it just needs to move about 1–2 mm, so no need to go wild!
– Now, with a steady hand, you can pull the cable straight out of its socket. Easy peasy!
– For reinstallation, just follow the steps in reverse and you’re all set!
Tools Used
Step 5


Some connectors sport a sleek, flat plastic top that fits snugly onto their socket. Often, these little guys have a bunch of cables hanging out with them. You’ll typically find these larger flat-topped connectors connecting batteries in laptops and hefty gaming devices. So, if you’re diving into some repair work, keep an eye out for these!
– To disconnect the cable, grab your trusty spudger and gently lift the outer edges of the connector. A little nudge with your fingers may be needed to fully free it from its cozy socket.
– When it’s time to reconnect the cable, just hover the connector over its socket and give it a gentle press straight down—listen for that satisfying snap! If it’s being stubborn, it might just need a little realignment. Give it another go!
Tools Used
Step 6


Press (or ‘pop’) connectors are those handy little connectors you find at the end of a ribbon cable, sporting a flat, metal or plastic top—usually in a rectangular shape. These guys are super popular in smartphones and laptops, linking up a whole range of cables from screens to batteries and everything in between. So, if you’re diving into a repair, don’t be surprised to see these familiar faces!
– Slide a spudger or your trusty opening tool under the edge of the connector and gently pry it straight up to disconnect it. Easy peasy!
– Every now and then, you might come across a larger pop-style connector with a nifty pull-tab for an effortless disconnect. Just lift straight up and you’re golden!
– When it’s time to reconnect, make sure to line up that connector just right over its socket and give it a gentle press with your fingertip—first on one short side, then the other—until you hear that satisfying click. No need to force it! If it’s being a bit stubborn, just reposition it and give it another go.
Tools Used
Step 7


These coaxial connectors—often known as antenna, U.FL, or IPEX connectors—feature a metal head that clicks snugly onto a circular socket on the board, much like a snap button on your favorite shirt. They come in different sizes and are typically used to connect Wi-Fi or cellular antenna cables. If you find yourself in need of assistance, remember you can always schedule a repair.
– Alright, let’s disconnect that cable! Grab a thin, ESD-safe pry tool or some angled tweezers, and gently slide it under the metal neck of the connector, getting as close to the head as you can. Now, lift straight up from the board like you’re raising the roof!
– Reconnecting can be a bit of a puzzle, but don’t worry! Use your trusty tweezers to hold the connector right over its socket, then gently press down with your finger or a spudger. You should hear a satisfying ‘snap’ when it clicks into place. If it’s being a little stubborn, just reposition the head and give it another go.
Step 8


– Alright, let’s kick things off by disconnecting those cables! It’s a simple two-step dance. First, slide the tip of your spudger under the metal buckle and give it a gentle nudge to unclip it. Once that’s done, swing it over to the socket like a pro.
– Now, keep holding the buckle and cable together, and with a gentle tug, pull that connector straight out of its cozy socket.
– Ready to reconnect? Let’s do this!
The display cables (sometimes called eDP cables in laptops) and camera cable connectors usually feature a nifty little metal buckle that wraps around the socket, keeping everything snug and secure. These connectors tend to be on the wider side and may come with tape attached to that buckle for added safety. Remember, if you find yourself needing assistance, you can always schedule a repair.
Tools Used
Step 9


Some connectors like to sneak into their sockets from the side or top, and finding a spot to pry or pull can feel like a treasure hunt! These sneaky connectors usually come with a bunch of cables and are typically found with small batteries or speakers. Keep at it, and if you need help, you can always schedule a repair.
Step 10


Big sliding connectors operate just like their smaller counterparts, typically gliding into the side of a socket. These connectors often come with multiple cables and are a common sight in laptop batteries. So, if you’re dealing with one of these, you’re in good company!
– Ready to disconnect? Grab the wide end of your trusty spudger and gently push on the connector tab to slide it out of its cozy socket.
– Now, for reconnecting the cable, just align that connector like a pro and give a little push against the tab with your spudger to snugly seat it back into the socket.
Tools Used
Step 11


JST connectors are nifty little sliding connectors that often come with a bunch of twisted cables hanging out. They’re usually on the petite side and are commonly found in gadgets like mice or speakers.
– To disconnect the cable, start by giving a gentle push on alternating sides of the connector, just like you’re sliding open a tiny secret compartment.
– If that doesn’t do the trick, grab a pair of tweezers and hold them firmly on the sides of the connector, then pull straight out from the socket. Remember, a closer grip gives you a better hold!
– If the connector’s socket has those nifty cutouts, slide the arms of your sharp tweezers into them and carefully nudge the connector out.
– When it’s time to reconnect the cable, simply insert the connector back into its socket and give the edges a little push until it’s snug and secure.
Tools Used
Step 12


Power connectors and their trusty power supply cables usually come with a bunch of wires leading to a hefty plug that sports a handy locking tab. You’ll typically spot these in the big guys of electronics, like gaming consoles and desktop PCs. They may look a bit intimidating, but don’t worry, you’ve got this! If you need help, you can always schedule a repair.
– Give that tab a little squeeze against the connector and pull straight up to disconnect it. Easy peasy!
– When you’re ready to reconnect, just pop the connector back over the socket and push until you hear that satisfying ‘click.’ It’s like a little victory dance!
Step 13


Bundled cable connectors come with a bunch of tiny wires snuggled inside, often cozy in a sleeve. They might not offer a good spot to poke with a spudger or a place to grab with tweezers. Sometimes, the only way to go is to gently tug on the cables themselves. Just remember, if you need help, you can always schedule a repair.
– Grab all those cables in one go, holding them close to the connector, and gently pull the connector out of its socket like you’re unwrapping a present.
– When it’s time to reconnect, line up the connector just right and give it a little nudge with a spudger or your clean fingernail to slide that connector head snugly back into the socket.
Step 14


Sometimes, just unplugging the connector isn’t quite enough—there might be a couple more steps to get that cable loose. In this case, we’ve got a ribbon cable that’s playing hard to get with a little adhesive holding it down.
– Gently slide a spudger or opening pick underneath the cable to break the adhesive seal. You’ve got this!
Tools Used
Step 15


Some frequently used internal power and data cables, like these SATA cables, function similarly to the regular audio/video cables you probably have lying around your home.
– To take them off, gently tug in the direction of the cable.
Step 16
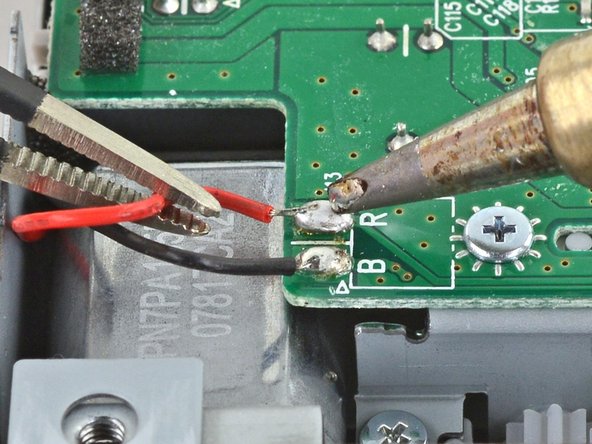

Watch out for those sneaky wires that are meant to stay put! They’re soldered in, so proceed with a bit of caution.
– No worries at all! A soldering iron and some soldering wick will make quick work of these little components.
Step 17


Take your time and use a gentle wiggling motion. If your first try doesn’t quite hit the mark, no worries! Just switch it up and see if a different tool works better for you.
At some point, you’re likely to encounter a connector that’s a bit of a mystery to you.
– Take a good look at that connector! See if you can figure out how it comes apart.
– Still feeling stuck? No worries! Check out guides for similar devices to see if they can shed some light, or swing by our Answers forum for some extra support.
Tools Used
Step 18


Hey there! Just a friendly reminder: take your time and give those cables a little wiggle – gentle does it! No need to force anything out of the board connectors. Usually, once you give it the unlock magic, the cable should slide right out with ease.
Some connectors might be playing hard to get with their quirky or unexpected locking styles. But don’t worry, you’ve got this!
– Photo 1: Check out that sturdy metal cover! It’s like a guardian for the connector, keeping it snug and secure.
– Photo 2: Time to get hands-on! Gently push that metal tab in—don’t pull it out! That’s the secret to unlocking the flat cable.