How to Replace iPad Wi-Fi Battery: Step-by-Step Guide
Duration: 45 minutes
Steps: 23 Steps
Hey there, tech wizard! Before you dive into this repair adventure, make sure you’ve got all the right tools and a comfy workspace. If you hit a snag or feel a little lost, no worries! You can always schedule a repair and let the pros handle it. Happy fixing!
Ready to give your iPad a fresh start? Follow this guide to swap out that old battery and keep the good times rolling! And remember, if you need help, you can always schedule a repair.
Step 1


Pop on those safety glasses to keep your peepers safe, and remember to treat that LCD screen with some TLC—no smashing allowed!
– If your display glass has taken a hit and is cracked, let’s keep those shards in check and avoid any unintended ouchies while you tackle this repair—just grab some tape and cover that glass up.
– Start by laying down some overlapping strips of clear packing tape across your iPad’s display until the whole front is nice and secure.
– Now, as you dive into the rest of the guide, keep in mind that once the glass starts cracking, it might just want to keep doing its thing. You might find it helpful to use a metal prying tool to carefully scoop out the broken pieces.
Step 2


– There are 14 metal clips keeping the display assembly snug and secure, just like a well-fitted hat. As you work through the upcoming steps, aim to gently pry around these clips instead of slicing through them with your opening tool. You’ve got this!
Step 3


– Gently slide a metal spudger between the top edge of the display assembly and the rear panel assembly. It’s like giving your device a little stretch!
– Now, rotate that spudger away from you to pop those tabs along the top edge of the display. You’re doing great!
– To keep those tabs from snapping back like a rubber band, insert a second metal spudger right where the first one is. Teamwork makes the dream work!
Tools Used


Step 4


Pry with care and a gentle touch—if you hit a snag, take a breather and try another spot.
– Grab your trusty spudger and start sliding along the right edge of your iPad like a pro.
– The front panel is snugly held to the aluminum back by some metal clips up top, at the bottom, and on the left side. Meanwhile, the right side features plastic tabs that fit neatly into little recesses on the backplate.
– Once you’ve freed those clips, gently lift the left side of the front panel and slide it to the left to pop those tabs out of the aluminum backplate.
Tools Used

Step 6

– Alright, let’s get ready to tackle this! In the next steps, we’ll be disconnecting the three cables that link the display assembly to the logic board. These cables are responsible for some pretty important components:
Step 7


Just a friendly reminder: make sure you’re lifting the retaining flap, not the socket itself!
– Grab your trusty plastic opening tool and gently lift the little retaining flaps that keep the digitizer ribbon cables snug in their sockets on the logic board. You’ve got this!
– Once those flaps are up, carefully pull the digitizer ribbon cables straight out of their cozy sockets. Easy peasy!
Step 8

– Grab a plastic opening tool and gently pry upward to pop the ambient light sensor connector out of its socket. You’ve got this!
Step 9


Gently tug the connector straight out, keeping it parallel to the logic board’s surface. You’ve got this!
– Gently lift the metal retainer using the black plastic pull tab to free the display data cable from the main board. It’s like giving it a little nudge!
– Now, carefully pull the cable connector straight out of its socket. You’ve got this!
Step 10

– Gently detach the display assembly from the rear panel assembly. You’ve got this!
Step 11


Remember to gently lift the retaining flap, not the socket itself! You’ve got this!
– Grab your trusty plastic opening tool and let’s get to work:
– Gently lift the ZIF ribbon cable retaining flap on the socket located near the headphone jack. Take your time—it’s like a little treasure chest!
– Now, pull the headphone jack ribbon cable to the left side of the iPad to free it from its cozy socket. You’ve got this!
Step 12

– Unscrew the screws that are holding the logic board in place on the rear panel assembly.
Step 13
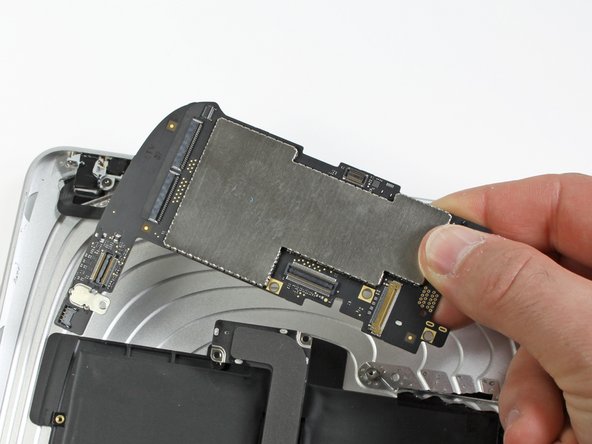

– Gently slide the edge of your trusty plastic opening tool underneath the dock cable connector and lift it straight up from the logic board—like a little magic trick!
– Now, it’s time to carefully lift the logic board out of the rear panel assembly. You’re doing great—keep it steady!
Step 14

– Let’s kick things off by unscrewing those two 2.84 mm T5 Torx screws that are keeping the speaker assembly snug against the rear panel assembly. Easy peasy!
– Next up, grab your T5 Torx screwdriver and remove the single screw that’s holding the dock cable in place right in the middle of the rear panel assembly. You’ve got this!
Step 15

– Let’s get started! Grab your trusty T5 Torx screwdriver and carefully take out those two 2.84 mm screws that are holding the dock connector cable to the rear case. You’re doing great!
Step 16

– Grab a trusty plastic opening tool and gently pry off the plastic cover that’s protecting the WiFi/Bluetooth board and the dock connector cable. You’ve got this!
Step 17

– Gently lift the Wi-Fi and Bluetooth antennas out of their cozy little homes on the Wi-Fi/Bluetooth board.
Step 18

– Gently pop the dock connector cable out of the rear panel assembly. You’ve got this!
Step 19


– Carefully guide the speaker cable away from the left side of the battery case.
– Gently maneuver the Wi-Fi antenna through its designated path in the speaker assembly.
Step 20


– Gently lift the speaker assembly and slide it forward until the ports pop free from the lower case. You’re almost there!
– Carefully detach the speaker assembly from the rear panel assembly. You’ve got this!