How To Replace Car Battery in Toyota Corolla: Step-by-Step Guide
Duration: 45 minutes
Steps: 14 Steps
Heads up!
If your trusty ride isn’t firing up, it might be time to give that battery a little TLC and swap it out! Typically, a car battery hangs in there for about 3-4 years, but remember, that can change based on how you drive and where you live. We’ll be using a Toyota Corolla as our example, but don’t worry—most vehicles follow a similar groove. If you just need to disconnect the battery for a bit instead of going for a full-on replacement, check out our quick and easy guide. A quick heads-up: if your vehicle is equipped with a start-stop system, it probably has a battery management system (BMS). That means after you swap the battery, you’ll need some special gear to get it back in sync. And don’t forget—unplugging the battery might reset your infotainment system, power windows, and other cool tech, so you might need to reconfigure those settings. Sometimes, you might even run into some pesky error codes that need sorting out. For the nitty-gritty details, be sure to check your owner’s manual!
Step 1


Before you dive in, make sure to turn off the ignition and take out the key. Safety first, right?
Slip on those work gloves and grab your safety goggles if you have them handy. Let’s keep it safe and stylish!
– Ensure your transmission is set to Park (or first gear if you’re rocking a manual) and give that parking brake a good pull to keep everything steady.
Step 2


Most vehicle batteries like to hang out in the engine bay, right under the hood (or as some might call it, the bonnet). If your battery is feeling a bit rebellious and is hiding somewhere else, just jump to Step 5!
– Give that hood release lever a little tug! You’ll usually find it cozying up inside the car, right by the steering wheel.
Step 3


– Lift the hood by pressing up on the hood latch release while giving it a little nudge. You’ll usually find this handy latch right under the front edge of the hood, close to the center or slightly to the right. Go on, give it a try!
Step 4


At this stage, your vehicle might just surprise you by popping the hood up and holding itself open like a champ!
– If that’s not working out, use one hand to keep the hood propped open for a bit while you get the prop rod in place:
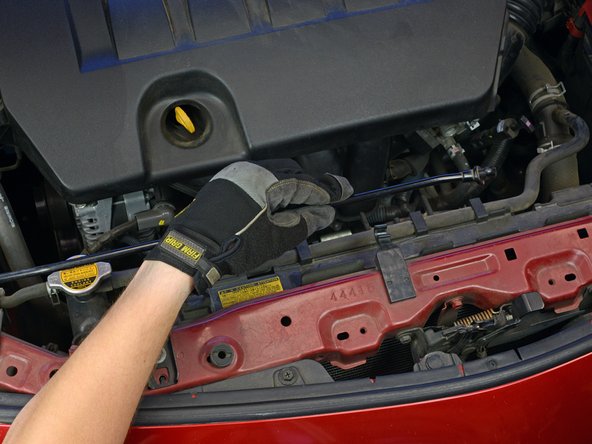
Step 5


– Find the battery! It’s usually a rectangular shape and measures about 8 to 14 inches across.
Step 6


– Grab a wrench or socket that fits just right, and give that nut or bolt on the negative battery terminal a gentle twist to loosen it up. You’re doing great!
Step 7


Before hooking up that battery, give those terminals a little scrubbing and make sure the cable clamp is spick and span. A little prep goes a long way!
Step 8


Keep that cable from accidentally touching the terminal! Just nudge it aside or wrap the cable clamp with a dry rag to keep things neat and tidy.


Step 10


– Grab your trusty wrench or socket that fits just right, and give that nut/bolt on the positive battery terminal a gentle twist to loosen it up. You’ve got this!


Step 12

– U
– n
– s
– c
– r
– e
– w
–
– a
– n
– y
–
– b
– o
– l
– t
– s
–
– h
– o
– l
– d
– i
– n
– g
–
– t
– h
– e
–
– b
– a
– t
– t
– e
– r
– y
–
– i
– n
–
– p
– l
– a
– c
– e
– .
Step 13

– Time to set the battery free! Go ahead and take off any bars or brackets that are holding it in place.
Step 14


Hey there! Don’t just toss that old battery in the trash like it’s yesterday’s news. Many auto parts stores and service stations will gladly take it off your hands for safe disposal, and they might even do it for free!
– First things first, let’s pop that battery out! Give it a gentle pull and you’re on your way.
– Now, if those battery cable clamps are looking a bit grimy or have a touch of corrosion, grab a wire brush and a mix of water and baking soda. A little scrub-a-dub will do wonders before you slide in your shiny new battery.
– To keep future corrosion at bay, slather on a smidge of dielectric grease or petroleum jelly on the new battery’s terminals. It’s like sunscreen for your battery!
Tools Used
