
HP Pavilion Laptop Battery Recalibration Guide: Step-by-Step Tutorial
Duration: 45 minutes
Steps: 9 Steps
Heads up! Recalibration is only a remedy for tired batteries. Unfortunately, we can’t turn back the clock on aging.
If your battery gets too hot (30-40 °C or 86-104 °F), it’s time for a new one!
Seeing a dip in capacity? That’s actually a good sign, not a bad one.
Try not to use your laptop while it’s charging; it could throw off the calibration.
If you’re getting mixed signals, it might be a sign your battery has reached the end of its life. With proper care, you can delay this, but it’s not reversible.
If your battery’s been around for a while, consider a light discharge of about 10%. A complete discharge might just do it in.
Watch out for BIOS lockouts and end-of-life quirks!
(BIOS lockout) HP laptops have a 15% BIOS lockout that needs a little workaround for a full discharge.
This applies to all HP and most Compaq laptops.
(BIOS lockout)
It only happens if the laptop shuts off too soon. No big deal, you can easily work around it.
(EOL quirk) Some Dell batteries might show incorrect data when they’re quite worn out or at their end of life. Don’t worry, this usually fixes itself over time. I’ve noticed this with a few OEM Dell batteries, like the NX31D and RMJFW 65Wh Extended from 2014. The 45Wh 34GKR can be affected too, but less so.
(Firmware quirk) Some laptops, especially HP models, might like to display 0% wear in BatteryInfoView. To get the real scoop with HP, run the diagnostics (you might need UEFI), or use the HP Support Assistant battery check for advanced info. This isn’t a hardware issue—just a little quirk with HP.
Is your laptop battery feeling a bit long in the tooth or not reporting its true self? No worries! You might just need to recalibrate it. This nifty trick can help align the reported capacity or battery gauge, giving your battery a little extra life. But remember, recalibration is like giving a worn-out battery a pep talk; it can’t turn back time on aging. Want to dive deeper into battery calibration? Check out the Battery Calibration Wiki for all the deets! Now, here are some handy notes: If your battery gets hotter than 30-40 °C (86-104 °F), it’s time to say goodbye and REPLACE IT! A drop in capacity? That’s a good sign, not a bad one! And while your laptop is charging, it’s best to let it chill—using it during this time can mess with the calibration. If you’re getting inconsistent readings, it might be a sign of an end-of-life (EOL) battery. While good care can slow the aging process, it can’t stop it. If your battery is on the older side, aim for a gentle ~10% discharge. Going all the way down could be the end of the line for your battery. Ready to recalibrate? Here’s how: First, charge your laptop to 100%. Then, use it until it shuts down completely. Check out those BIOS lockouts and EOL quirks for HP and Lenovo models. Once it powers down, plug it back in right away and try to avoid using it during the recharge. Now, a heads-up on BIOS lockouts: HP laptops have a 15% lockout that you’ll need to bypass for a full discharge, so charge it immediately when it shuts off. Most HP and some Compaq laptops follow this rule. As for Lenovo, some models have a 7% critical capacity lockout (0190) that you can easily dodge if the laptop shuts down too soon. And for our Dell friends, some batteries might hold onto incorrect data when they’re heavily worn or at EOL, but don’t fret; this usually corrects itself over time. A quick mention: Some laptops, especially HP models, like to show 0% wear in BatteryInfoView. To get the real scoop, you’ll need to run diagnostics (UEFI might be needed) or use the HP Support Assistant battery check to find the advanced info. This isn’t a hardware issue; it’s just one of HP’s little quirks. If you need help, you can always schedule a repair.
Step 2


Heads up! Any data from this step will vanish into thin air. Just plug in your laptop to get it rolling again from that pesky BIOS lockout.
If you’re rocking a Windows laptop, don’t forget to power it back on after the initial shutdown. Windows likes to take a little snooze when the battery dips to around 3%. You might need a quick boost from the power adapter if it refuses to wake up until it gets some love from the AC power.
– Go ahead and use your laptop until it decides to take a nap! Keep it going until it powers down completely. If you’re on Windows, fire it up again and repeat the process until it refuses to wake up. This little dance ensures it’s fully discharged and ready for the next step!
Step 3


– Using your laptop is totally fine, but just a heads-up: the calibration might not be spot on.
– Every laptop has its own unique way of telling you it’s out of juice. So, when your laptop is running on empty, plug it in right away. Give it a full charge to get back in the game!
Step 4

Proceed with caution, as this method might just send those old batteries into retirement!
– When you’re all done, take a moment to peek at the BMS data. It should be looking good and all corrected!
Step 5


This might not do the trick if your battery is a bit long in the tooth, even if it’s an official OEM pack.
– First things first, let’s get that Command Prompt up and running with admin rights! Type in ‘powercfg /batteryreport’ and hit enter.
– Once the report is ready, you’ll see a message letting you know where to find it. Give the data a good look to ensure everything checks out.
Step 6


This will completely drain the battery. Just a heads up, HP diagnostics won’t check the charge capacity.
– First things first, plug in your laptop and fire it up! Once it’s awake and ready, go ahead and unplug it. Now, hit that ESC key and choose System Diagnostics—let’s get to the nitty-gritty!
– Next, let’s dive into the Component tests menu. Pick either Memory or Hard Drive to see what’s going on under the hood.
– Now, it’s time for the Extensive test! Make sure to select Loop until error—this will help us find any sneaky problems.
– As soon as your laptop decides it’s had enough and powers down, give that battery a quick recharge. You got this!
Step 7


Hey there! Just a friendly reminder: steer clear of applying these settings to your main operating system. They could give your battery a rough time!
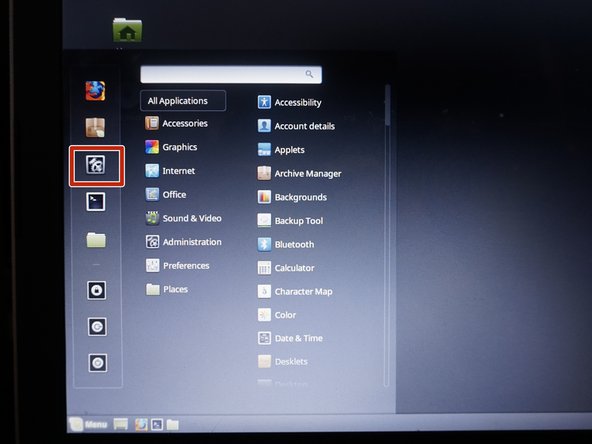
– Fire up your laptop and dive into a live Linux Mint Cinnamon session. Head over to Settings and tweak the following options:
– Keep using the laptop until it takes a nap and shuts down. Just a heads-up, everything from this session will disappear into the digital ether.
Step 8


– Plug in your laptop’s power adapter and let it work its magic until POST wraps up. Once that’s done, feel free to unplug your laptop!

