DIY MacBook Pro 13 Unibody Early 2011 Display Replacement Guide
Duration: 45 minutes
Steps: 20 Steps
Hey there, tech-savvy friend! Just a friendly reminder: tackle this repair with care and keep a watchful eye out for tiny screws and delicate parts. If things get tricky, don’t sweat it! You can always schedule a repair for some expert help. You’ve got this!
Ready to tackle that shattered display assembly? Let’s get your device looking fresh again! Follow this guide step by step, and remember, if you need help, you can always schedule a repair.
Step 1

– Time to unscrew some fun! Go ahead and take out the ten screws listed below:
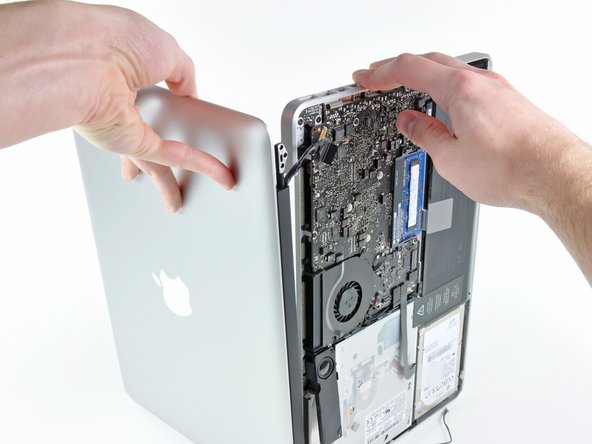
Step 2


– Gently use your fingers to pop the lower case off the MacBook near the vent—like unwrapping a present!
– Carefully lift away the lower case and set it aside.
Step 3


Gently nudge up on both short sides of the connector to coax it out of its snug little home. Watch out for the corners—they can be a bit fragile and might break off if you’re not careful!
– Gently nudge the battery connector upwards from its cozy spot on the logic board using the edge of your trusty spudger. You’ve got this!
Tools Used

Step 4

– Gently nudge the battery cable away from its connection on the logic board to keep it from making any surprise appearances while you work.
Step 5

– Gently slide the flat end of a spudger under the AirPort/Bluetooth ribbon cable connector and lift it up from its cozy spot on the logic board.
Tools Used
Step 6

Gently pull the cable straight out, keeping it parallel to the logic board. Tugging it up can be a bit risky and might harm the logic board or the cable itself.
– Gently wiggle and pull the camera cable out of its cozy home on the logic board.
Step 7


– Gently nudge the AirPort/Bluetooth ribbon cable out of the way while you peel the camera cable from the adhesive that’s holding it snugly to the subwoofer and the AirPort/Bluetooth bracket. You’ve got this!
– Carefully guide the camera cable out from underneath the retaining finger that’s molded into the AirPort/Bluetooth bracket. Just keep it steady!
Step 8


– Grab your trusty spudger and gently nudge the antenna connector nearest to the logic board out of its cozy spot on the AirPort/Bluetooth board.
– Now, let’s give that antenna cable a little detour—carefully guide it out from under the finger molded into the AirPort/Bluetooth bracket.
Tools Used
Step 9


– Now, let’s keep it rolling! Just like we did before, carefully unplug the last three antenna connectors. You’ve got this!
– Next up, gently guide their cables out from the slots in the AirPort/Bluetooth bracket. Easy peasy!
Step 10

– Let’s kick things off by unscrewing these five screws:
Step 11

– Gently lift the AirPort/Bluetooth assembly and the Subwoofer from the center of the optical drive’s side, making sure they clear each other as you go.
Step 12

– Gently detach the AirPort/Bluetooth assembly, being careful of that delicate antenna contact tucked away near the corner of the upper case. You’ve got this!
Step 13

We’re leaving one little screw holding the display to the upper case just for you! It’ll make things smoother in the upcoming steps, trust us.
– Let’s get started by taking out two of the three 6 mm T8 Torx screws that are holding the right side of the display snugly to the upper case. You’re doing great!
Step 14


Hey there! Just a friendly reminder: avoid lifting the display data cable since its socket is super delicate. Instead, gently pull the cable parallel to the logic board’s face. You’ve got this!
– Grab that handy plastic pull tab attached to the display data cable lock and give it a little twist toward the DC-In side of your computer.
– Now, gently pull the display data cable straight out from its cozy spot on the logic board.
Step 15


– Let’s get started by taking out these two screws: they’ve been holding things together for too long!
– Next up, gently lift the display data cable retainer from the upper case. It’s time to give it a little freedom!
Step 16

– Gently peel away the foam tape that’s hiding the display screws near the MagSafe DC-In board. It’s like uncovering a little treasure—just be careful!
Step 17

We want to keep one little screw holding the display to the upper case for the sake of making the next steps easier. Trust us, it’ll make things smoother!
– Carefully take out two of the three 6 mm T8 Torx screws that are holding the left side of the display to the upper case. You’ve got this!
Step 18

– First things first, open up your MacBook Pro so the display stands tall and proud, making a perfect angle with the upper case.
– Next, set your newly opened MacBook Pro down on a table, just like the picture shows, ready for some action.
– Now, with your left hand giving a gentle hug to both the display and upper case, go ahead and unscrew that last T8 Torx screw from the lower display bracket. You’ve got this!
Step 19

Make sure to keep a firm grip on the display and upper case with your left hand. If you let go, they might just take a tumble, and we wouldn’t want that to happen to our precious components!
– Time to get started – Remove the last remaining T8 Torx screw that’s holding the display in place on the upper case. If you need help, you can always schedule a repair.
Step 20
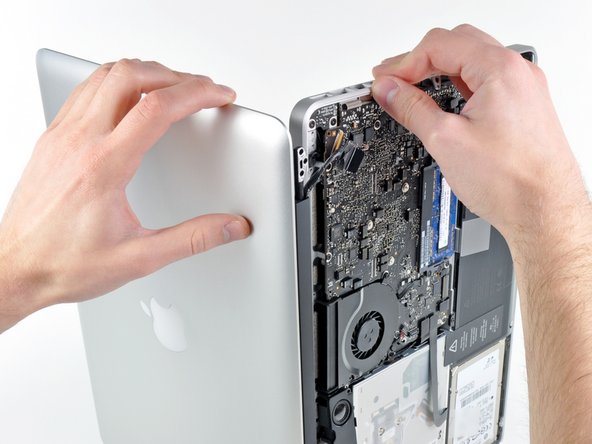

– With your right hand, gently grab the upper case and give it a little twist towards the top of the display, just enough for the upper display bracket to clear the edge of the upper case.
– Now, give the display a slight nudge away from the upper case.
– Carefully lift the display up and away from the upper case, keeping an eye out for any brackets or cables that might try to tag along.