MacBook Pro 13″ Unibody Mid 2010 Trackpad Replacement
Duration: 45 minutes
Steps: 11 Steps
Hey there, tech guru! Before you dive into this repair adventure, remember to keep your workspace tidy and your tools handy. If you hit a snag or just want to chat about your device’s woes, feel free to schedule a repair. You’ve got this!
Ready to give your trackpad a new lease on life? Follow this guide to swap out that pesky broken trackpad for a fresh one. Let’s get your device back in action!
Step 1

– Time to get your screwdriver ready! Let’s tackle those 10 screws holding the lower case of your MacBook Pro 13″ Unibody in place. You’ve got this!
Step 2

– Gently lift the bottom case and slide it toward the back of the device to release those sneaky mounting tabs.
Step 3

– Unscrew those tri-point screws holding the battery snugly in place against the upper case. You’ve got this!
Step 4

– Gently use the flat end of a spudger to nudge the battery connector up and out of its cozy little spot on the logic board. You’ve got this!
Tools Used

Step 5
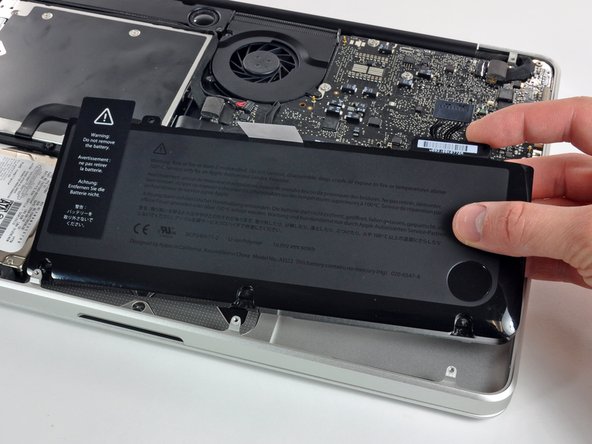
– Gently pop that battery out of the upper case like you’re unveiling a surprise! It’s all about that smooth extraction.
– Got a shiny new battery? Awesome! Just remember to give it a little calibration love after you install it to keep things running smoothly.
Step 6

– Gently use the flat end of a spudger to lift the trackpad connector out of its cozy little home on the logic board. You’ve got this!
Tools Used
Step 7

– Flip open your MacBook Pro and place it on a flat surface, just like you see here!
Step 8

– While gently gripping the edge of the trackpad nearest to the logic board with one hand, go ahead and unscrew those four 1.2 mm Phillips screws marked in red. You’ve got this!
Step 9


– If needed, gently nudge the edge of the trackpad closest to the keyboard out of its cozy spot in the upper case by pushing it away from the brackets holding it in place.
– Carefully guide the trackpad connector and cable down through the little slot carved into the upper case.
– You might find it helpful to use a spudger to assist in getting the trackpad connector past the edge of the logic board.
– Once the cable has made its grand exit through its slot in the upper case, gently pull the trackpad away from the outer edge of the upper case and remove it from the device.
Tools Used
Step 10

If you’re swapping out your old trackpad for a shiny new one that doesn’t come with its own flex cable, no worries! Just grab the cable from your trusty old trackpad and you’re all set to roll.
– Installing your new trackpad? It can be a bit tricky getting that cable through the upper case and around the logic board. No worries! Just grab the tip of a spudger to help guide the connector past the logic board while your other hand gently nudges the cable into its slot in the upper case. You’ve got this!
Tools Used
Step 11


Give those screws a good twist until they’re snug, then ease them back about a quarter turn. You’ve got this!
– Now, let’s get those four 1.2 mm Phillips screws back in place along the inner edge of the trackpad. You’ve got this!
– Take a moment to check that the trackpad is perfectly aligned with the keyboard side of the upper case. Once you’ve got it centered just right, go ahead and snug up those four Phillips screws all the way. You’re doing great!
