Repair Guide to Replacing Windows Hello Face Camera on Surface Tablets
Duration: 45 minutes
Steps: 34 Steps
Heads up: there’s a pretty good chance you might crack the delicate, unreinforced display panel during this step. Take your time and handle with care!
Ready to swap out the Windows Hello face camera on your Surface Pro 7? Heads up—this display is pretty delicate, so take it slow and be generous with the heat when loosening the adhesive. When slicing through, work carefully to avoid cracking the glass. Safety glasses are a smart move, just in case things get a little too exciting.
Step 1


Pop on your safety glasses to keep your eyes out of harm’s way, and handle the LCD screen with care—no one likes cracked displays!
Using some gentle prying tools helps keep glass shards contained and maintains the display’s structural strength while you’re lifting it. This way, you’ll avoid unnecessary breakage and keep everything sturdy during the process.
– If your display glass is cracked, start by containing any loose shards and preventing injuries during the repair—tape the glass down. Use overlapping strips of clear packing tape over the entire display face until it’s fully covered. Follow the rest of the guide as usual, but keep in mind that once the glass is broken, it might continue cracking as you work. You may need to gently pry the glass out with a metal tool. If you need help, you can always schedule a repair.
Step 2

Make sure your Surface is completely powered down before you start cracking it open.
You can use a hair dryer or heat gun for extra heat, but go easy—too much heat could mess up the screen or battery.
You may need to reheat and reapply the iOpener several times to get the tablet warm enough. Follow the iOpener instructions to avoid overheating.
– Warm up an iOpener and gently press it against the right edge of your Surface’s screen for a solid two minutes. This will soften things up and get you on your way!
Tools Used

Step 3

– Before you start peeling, take a quick mental snapshot of how the screen adhesive is laid out—helps keep things clear! Remember, the adhesive only sticks in certain zones, so these are safe to cut through without worry.
– The areas surrounding the display board and flex cables are just adhesive layers—go ahead and cut here without hesitation. Just make sure your cutting tool stays within the safe zone and doesn’t go more than 1/8 inch (3 mm) deep to avoid any mishaps.
– Under this part of the screen lie some delicate antenna cables. Handle with care and follow the step 13 procedure closely to keep them safe. Also, note that the adhesive in this region is a bit thicker, so take your time and work gently.
Step 4


Keep the opening pick no deeper than the black bezel around the screen. Going any further could mess with the LCD, and nobody wants that!
– Take your opening pick and gently slide it into the speaker slot on the screen, then work it between the glass and the speaker grille.
Step 5


– Give that pick a gentle spin down toward the bottom edge, and slip it under the lower side of the speaker cutout.
Step 6


– Glide your pick along the right side of the Surface—think of it as a butter knife making its way through a stubborn sandwich—to separate the adhesive under the screen.
– Let that pick hang out in the right edge to keep things from sticking back together while you work.
As you work your way through, if you hit a tough spot and resistance starts fighting back, take a breather and reheat that area. Pushing too hard with your pick can crack the glass—think of it like not wanting to break a window while trying to open it. Stay gentle, stay patient, and if things get tricky, you can always schedule a repair for extra help.
Step 7

– Heat up your iOpener and press it onto the bottom edge of the Surface’s screen for a good two minutes.
A hair dryer or heat gun can come in handy for more heat, but be cautious not to overdo it—your Surface’s screen and internal battery can be sensitive to excess heat. Keep an eye on the temperature to avoid damage. Need help? You can always schedule a repair.
You might need to give your iOpener a few extra rounds in the microwave to get your tablet warmed up enough. Stick to the iOpener guidelines so things don’t get too hot to handle.
Tools Used
Step 8


Be careful not to slide the opening pick too far past the black bezel on the screen’s side. Going too deep could risk damaging the LCD. Keep it cool and steady!
– Grab a fresh opening pick and slide it into the bottom right corner. Gently nudge it around the corner and towards the bottom edge.
– Now, keep that pick moving along the bottom edge of the Surface, slicing through the screen adhesive as you go.
– Once you’ve got that pick in place along the bottom, leave it there to keep the adhesive from sealing up again.
Step 9

– Warm up your iOpener until it’s nice and pliable, then gently press it along the left edge of the Surface’s screen for about two minutes to loosen things up.
You can use a hair dryer or heat gun for some extra warmth, but keep it cool—don’t overdo it. The Surface’s screen and internal battery are heat-sensitive, so take care!
You might need to give your iOpener a few reheats and reapplications to make sure the tablet gets warm enough. Just be sure to follow the iOpener instructions closely so you don’t overdo it!
Tools Used
Step 10


– Start by sliding a fresh opening pick into the bottom left corner and gently work it around the corner toward the left edge.
– Now, keep that pick moving along the left edge of the Surface to slice through the screen’s adhesive.
– Once you’re there, leave the pick in the left edge to keep the adhesive from sticking back together.
Watch out near the bottom 2.5 inches (65 mm) of the left edge—it’s a sensitive zone. Don’t insert the opening pick more than 1/8 inch (3 mm) here, since the display cables are hanging out close by and can get hurt easily. Once you’re past this cable area, keep the pick within the bezel to avoid any unnecessary damage. Got stuck? If you need a hand, you can always schedule a repair.
Step 11

A hair dryer or heat gun can bring the heat if needed, but keep it chill—too much warmth can mess with the screen or battery.
The adhesive is extra stubborn along this edge, so you might need to warm it up with the iOpener a few times to get things moving. Stick to the iOpener instructions so you don’t overheat anything.
– Give your iOpener a quick reheat, then press it gently against the left edge of the Surface’s screen for about two minutes. It’s like a warm hug for your device!
Tools Used
Step 12


The top 6 inches (15 cm) of your case hide the antennas, tucked between the case and the screen bezel. Take care—follow the next steps gently to keep those antennas safe and sound.
– Use the opening pick to gently round the left corner, sliding it along the top edge of the Surface. Keep going until the pick is approximately 2.75 inches (70 mm) from the left edge. Need a hand? You can always schedule a repair if things get tricky.
Step 13


Watch out for those delicate antenna cables hiding just beneath the top edge of the screen. Handle with care and follow the steps closely to keep them safe and sound.
– Start by gently placing the tip of your pick under the display at the spot where you stopped cutting. Keep it shallow – just enough to stay beneath the bezel’s edge.
– Now, slowly roll the pick to the right, pressing the longer side of it into the adhesive beneath the bezel. You’ll be cutting through the adhesive as you go. Just make sure not to slide the pick along the edge of the Surface.
– Repeat the process by inserting the pick at the last cut and rolling it to the right along the top edge. Keep going until you’ve moved about 2.5 inches (64 mm) from the right edge of the Surface.
Step 14


– After snipping through the adhesive above the antennas (about 8.5 inches or 22 cm from the left), glide your pick along the rest of the top edge, then round the top right corner to slice through any leftover sticky stuff.
Step 15


Hold up! Don’t remove that screen just yet. It’s still connected to the motherboard by two cables. Let’s keep those in mind before you proceed.
– Gently lift the screen assembly away from the Surface case. If you feel any resistance, take a moment to double-check that all adhesive is fully separated.
– Grab an opening pick and use it to slice through any stubborn adhesive still hanging on.
– Be aware that the flash lens might pop out of the Surface case. Don’t worry, just keep track of it and pop it back into place during reassembly.
Step 16


– Gently lift the top edge of the screen assembly away from the case, while guiding the bottom of the screen closer to the motherboard connectors. Keep a steady hold with one hand to keep everything in place. If you need help, you can always schedule a repair.
Keep those display ribbon cables chill—don’t pull or stretch them!
Keep your tweezers and spudger handy and within easy reach to make your repair smoother. Having your tools close by helps you work efficiently and stay organized as you go through the steps. If you need help at any point, remember you can always schedule a repair with Salvation Repair.


Step 17


– Grab your trusty spudger and use its pointy tip to gently press on each side of the battery connector.
– Now, take your time and alternate sides as you carefully ‘walk’ the connector out of its cozy socket.
Tools Used
Step 18


Leave the tape on the ribbon cable – it’s there to keep everything in place. Trust us, removing it can cause more headaches than it’s worth.
– Grab a pair of tweezers and gently peel back the shiny silver tape covering the left display cable connector.
– Slide the flat end of a spudger carefully beneath the tape and gently pry up the connector to disconnect it from the motherboard.
Step 19


Avoid removing the tape from the ribbon cable. It’s there for a reason, so let it do its job and leave it be!
– Grab your tweezers and gently peel back that shiny silver tape holding down the right display cable—kind of like unwrapping a tiny present.
– Now, take the flat end of your spudger and pop the right display cable straight up to disconnect it from the motherboard. Nice and easy does it!
Step 20

– Time to say goodbye to the screen! Carefully remove it, and keep things neat. Don’t stress, you’ve got this.
– When it’s time to put everything back together, make sure to check out the screen adhesive replacement guide to finish the job right.
Step 21

– Grab your trusty T3 Torx screwdriver and unscrew those four 2.4mm screws holding the EMI shield in place. You’ve got this!
Tools Used

Step 22


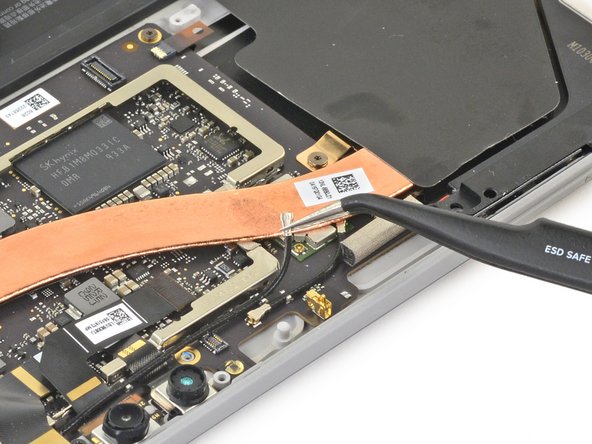
No need to fuss with these tape pieces—just leave them on the motherboard EMI shield, they don’t have to come all the way off. Easy does it!
– Grab a pair of tweezers and gently lift off the three pieces of silver tape holding the motherboard EMI shield to the copper heatsink. Take your time—no rush, we’ve got this!
Tools Used
Step 23

– Take a look at the small arrows circling the edge of the motherboard EMI shield. These little guys are marking the spots where the clips are holding the shield in place.
– When you’re putting everything back together, give each of these arrows a gentle press to make sure the clips are securely fastened.
Step 24


Handle the battery with care—using your opening tool, make sure not to puncture or bend it. We want to keep that battery safe and sound!
Be gentle with the EMI shield! A little bit of TLC here will go a long way since you’ll need to reuse it. Treat it like a fragile treasure.
– Begin by locating the clips next to the battery. Grab an opening tool and gently lift the motherboard EMI shield straight up from underneath each arrow to release the clips. Take your time—careful prying makes for a smooth repair. If you need extra help, you can always schedule a repair.
Step 25


Handle the EMI shield with care—try not to bend or deform it too much, since you’ll want to reuse it just as it is. Keep it smooth and intact for the best results!
– Keep gently prying with your opening tool to pop loose the clips all around the motherboard EMI shield’s edge. Take your time—patience makes perfect!
Step 26

– Gently pop off the motherboard EMI shield—think of it as removing a little metal hat.
Step 27

– Grab your T5 Torx screwdriver and get ready to remove four tiny screws holding down the antenna bracket:
– Three of these are 4.5 mm screws
– One is a 6 mm screw
Tools Used

Step 28


– Grab your trusty spudger and gently pry up the connector next to the rear-facing camera, then give it a careful disconnect. If you need help along the way, you can always schedule a repair.
Tools Used
Step 29


– Grab the pointed end of a spudger and gently pry up the connector next to the front-facing camera. Then, carefully disconnect it to free the component.
Tools Used
Step 30


– Take out the antenna bracket carefully.
– Gently remove the remaining clear plastic light guide that’s no longer secured and set it aside.
Step 31


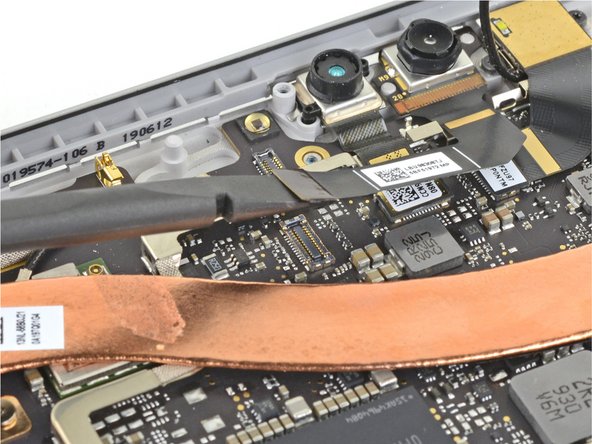
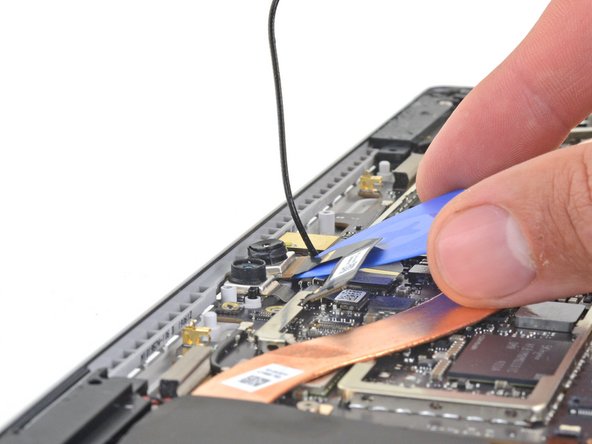
– Grab your tweezers and gently pop the antenna cable off its spot above the camera ribbon cables.
– Swing that antenna cable aside so it’s not cramping the style of those camera ribbons.
Tools Used
Step 32

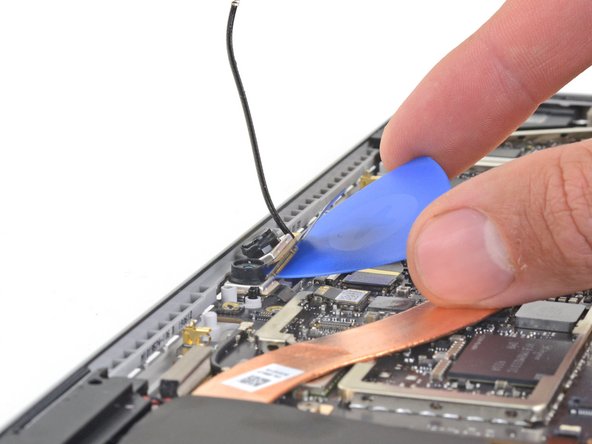
– Grab your trusty spudger and use the flat end to gently lift the camera connector off the motherboard, disconnecting it with ease.
Tools Used
Step 33

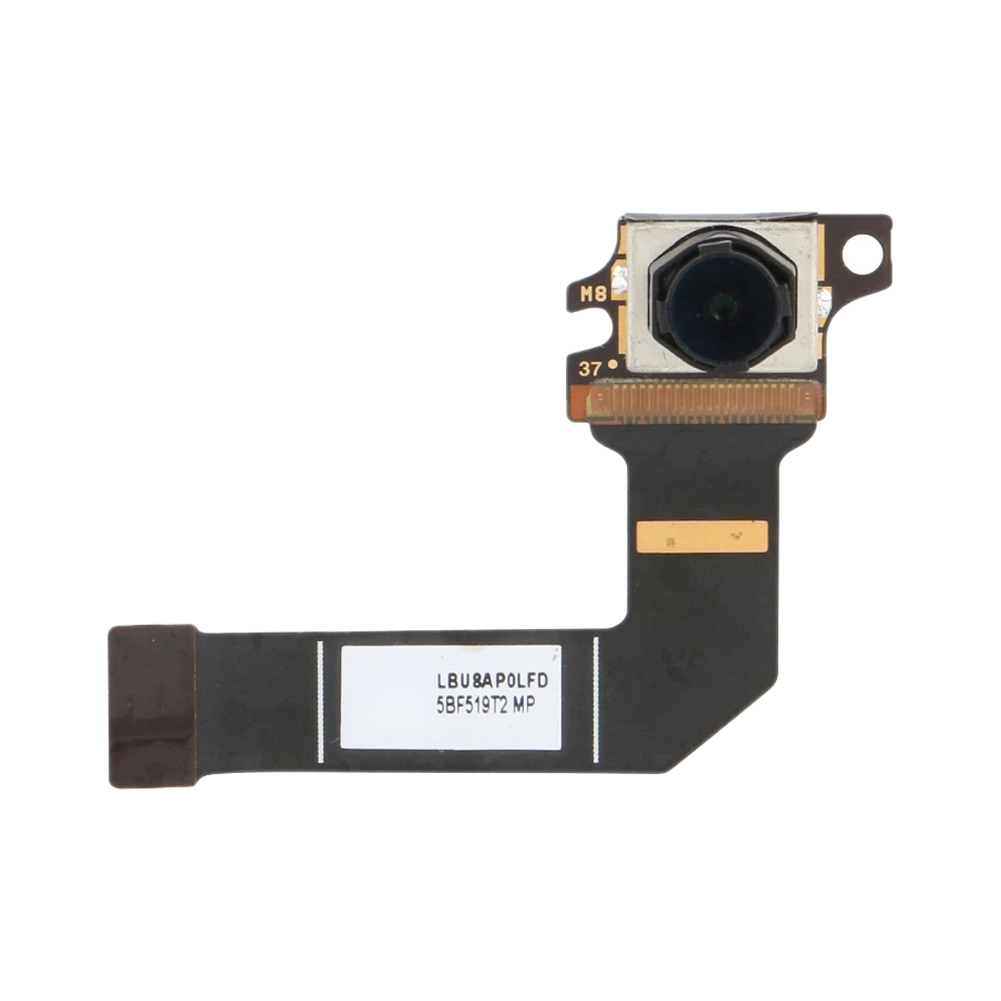
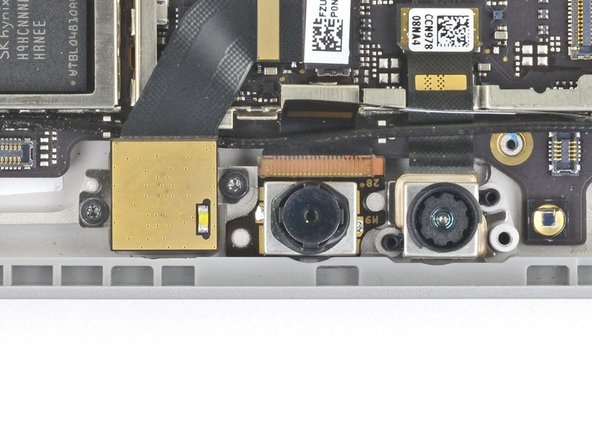
The camera is secured with a light adhesive. If it’s being stubborn, drop a few drops of high-strength isopropyl alcohol (≥90%) under the camera, wait a minute, and give it another go. It’ll come off, no problem!
– Gently slide an opening pick beneath the camera to gently pry it away from the Surface. Keep your movements smooth and steady to avoid any mishaps. If you need a hand, you can always schedule a repair.
Step 34


– Now it’s time to put everything back together—just reverse the steps above and you’re good to go.
– Got some e-waste? Make sure to recycle it the right way with an R2 or e-Stewards certified recycler.
– Did the repair not go as expected? No worries! Try a little troubleshooting or head over to our Answers community for some extra support.
–
Success!