Acer Aspire 3 A315-21-92FX Speakers Replacement
Duration: 45 minutes
Steps: 18 Steps
Ready to give your Acer Aspire 3 A315-21-92FX a sound upgrade? This guide will walk you through swapping out those aging speakers for some fresh new ones. Over time, your laptop’s speakers might start to sound a little dull, and when that happens, it’s time for a change! For any extra tips, check out the troubleshooting guide for your Acer Aspire 3 A315-21-92FX. And remember, if you need help, you can always schedule a repair.
Step 1

– Turn the Acer Aspire 3 A315-21-92FX upside down, making sure the back is facing up, ready for action.
Step 2


– Take out that lone 2.5mm Phillips #0 screw—like a pro!
Step 3

– Grab your trusty opening tool and gently pop off that tiny cover like a pro.
Tools Used

Step 4


– Gently press the tabs on either side of the RAM outwards, and – voilà! – the memory module will pop up at an angle, making it easy to remove and replace.
Step 5


– Gently slide the RAM out of the Acer Aspire 3 A315-21-92FX like you’re pulling a piece of toast from the toaster – nice and easy!
Step 6

Before you start, make sure the battery is completely drained and there’s no way for it to accidentally turn on – we want to avoid any unexpected sparks or power surges!
– Turn the Acer Aspire 3 A315-21-92FX onto its back with the underside facing upward. Keep those screws in your sights!
Step 7


– Unscrew the lone 2.5mm Phillips #0 screw and let’s get this party started!
Step 8

– Grab your trusty iFixit opening tool and gently use it to pop off the hard disk cover. Easy does it—this part doesn’t need any heavy lifting.
Tools Used
Step 9


Looks like this laptop is missing its hard drive. Time to track one down and get it back in action! If you need help, you can always schedule a repair.
– Gently and carefully slide the hard disk out of the Acer Aspire 3 A315-21-92FX, taking your time.
Step 10

Keep your eyes peeled—there might be a couple of sneaky screws hiding under the hard drive cover that need to be taken out before you go for the back cover.
– Take out all fourteen of those 2.5mm Phillips #0 screws from the laptop’s back panel—time to give those screws an early retirement!
Step 11


– Grab your trusty opening tool and gently pry off the back cover. It’s as easy as that! Just a little patience and you’re on your way. If you need help, you can always schedule a repair.
Tools Used
Step 12

– Time to disconnect the power source! Carefully pull out the plug that connects the battery to the motherboard.
Step 13


– Gently pop the battery out of its cozy little slot.
Step 14

– Start by gently lifting the speaker from the right side of your device with the trusty iFixit Opening Tool.
– Slide the edge of the iFixit Opening Tool underneath the speaker and give it a little tug upwards.
Tools Used
Step 15

– Use the Opening Tool to pop out the speaker located on the left side of your computer. Slide the edge under and gently pry upwards with a little elbow grease!
– Carefully wiggle the Tool under the speaker and lift it out smooth and steady. Voilà!
Tools Used
Step 16


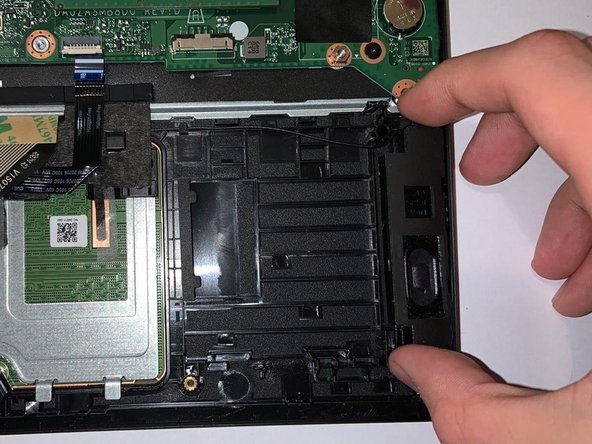
The cable that is connecting the speakers to the motherboard is placed under these plastic cables that are glued to the computer.
– Gently pry up these stuck-on cables using the Opening Tool—take your time, they might be a little clingy!
Tools Used
Step 17


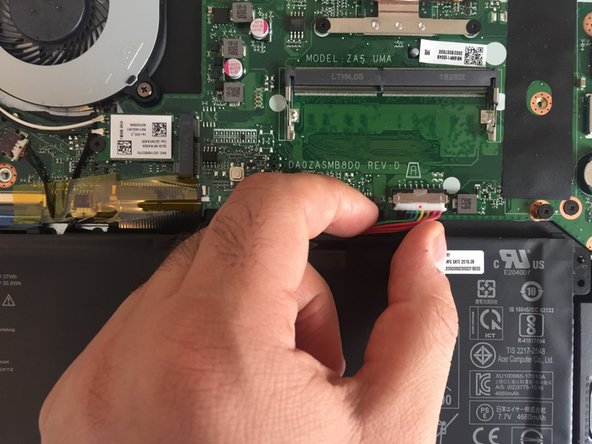
– Gently unplug the speaker connector from the motherboard using your fingers or a handy opening tool. Easy does it!
Tools Used
Step 18

– To put everything back together, just work your way through these steps in reverse – easy peasy!
– You did it! If you need help with another repair or have any questions, you can always schedule a repair.
Success!