Acer Aspire 3003WLCi RAM Replacement
Duration: 45 minutes
Steps: 8 Steps
Ready to give your laptop a boost? Swapping out the RAM is a breeze and only takes about ten minutes. RAM is your laptop’s short-term memory, so more of it means smoother multitasking. You’ll only need a couple of tools and five simple steps. Quick heads-up for those looking to upgrade: the Acer Aspire 3003WLCi comes with two 256 MB sticks and only has two RAM slots, with a max of 2 GB total. Don’t go over 2 GB between both sticks, or your laptop won’t be happy. Let’s get your device running smoother!
Step 1

– Flip your Acer Aspire 3003WLCi over so the bottom is facing up, with the battery hanging out on your left side—like you’re about to give it a checkup.
Step 2


– Let’s get started with the repair – you’ll find two switches on the back of your laptop, one near the top of the battery and another at the bottom.
– To unlock the battery, simply flip the bottom switch upwards – easy peasy!
– Now, to release the upper switch, give it a firm push upwards and hold it in place. You’re doing great!
Step 3


Keep that upper switch pulled upwards, or the battery just won’t budge – so hang in there and keep it in place!
Sometimes the battery can be a bit stubborn, so don’t hesitate to give it a gentle but firm tug to the left—if it hasn’t come out easily before. A bit of patience and a steady pull can go a long way in getting it free. Remember, if you need a hand, you can always schedule a repair.
– Hold the upper switch in the up position and gently slide the battery out to the left. It’s as easy as that! If you run into any trouble, don’t hesitate to schedule a repair.
Step 4

– The panel right in the center of your device is the one you’ll want to remove to swap out the RAM. Take a deep breath, grab your tools, and carefully lift that panel off. If you need a hand, you can always schedule a repair to get it done professionally.
Step 5


The screws are designed to stay in the panel and won’t come all the way out—totally normal, nothing’s stuck!
– Grab your Phillips #0 screwdriver and loosen up those two 5mm captive screws on the panel.
Tools Used

Step 6


During reassembly, you won’t need the spudger. You’ll simply need to replace and push on the panel until you hear it click back into place.
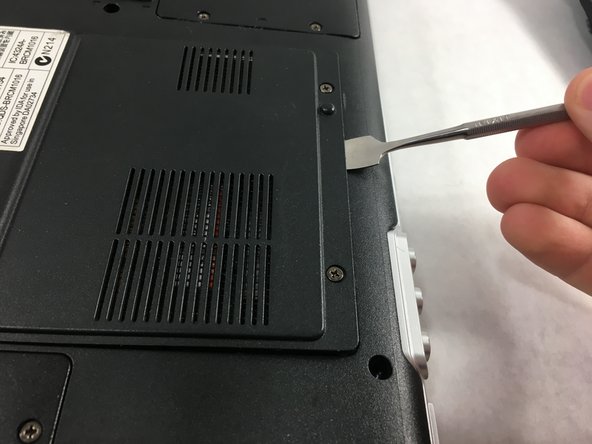
– Slide the tip of a spudger into the gap between the panel and the laptop chassis on the side with the screws.
– Gently pry upward on this side of the panel with the spudger to loosen it.
– Hold onto the lifted edge of the panel and carefully lift it away. You’ll hear a satisfying pop when it comes free.
Step 7


– Set your laptop down with the battery facing you—think of it as the laptop’s way of saying hello. The RAM slots are up at the top, and each stick of RAM is held in place by two little tabs.
– To free those RAM sticks, use your thumbs to gently push the tabs outward, away from the RAM you want to remove. When you’ve pushed them out far enough, the RAM stick will pop up at an angle, ready for you to lift out.
Step 8


– Pinch the RAM gently with your thumbs and forefingers, and slide it out, keeping it at the same angle. Easy does it!
– Do the same for the second RAM stick hiding underneath—just follow the last two steps again.
Success!