
Acer Aspire One ZG5 Fan Replacement
Duration: 45 minutes
Steps: 30 Steps
Once the motherboard is out, it is relatively straight forward to get to the fan.
Step 1

– Flip the netbook over so it’s belly-up, with the battery on top and pointing away from you.
Step 2

– Give that battery a gentle nudge by sliding the switch near the left hinge over to the left, where it says ‘unlocked’. You’re almost there!
Step 3

– Gently slide the latch that’s on the opposite hinge from the lock while giving the battery a little nudge upwards.
Step 4

These screws are part of the panel itself, so no need to twist them out completely—just loosen them up and you’re good to go!
– Carefully unscrew the two Phillips #0 screws holding down the small panel over the wireless card—take it nice and easy, no rush!
Step 5

– Gently lift the panel and slide it out of the case like a pro!
Step 6

– Unplug the two antenna cables from the left side of the wireless card. You’ve got this!
Step 7

– Unscrew the lone 3.9 mm Phillips #1 screw located at the bottom left of the wireless card. You’ve got this!
Step 8

– Carefully lift the left side of the wireless card and smoothly slide it out of its socket like a pro.
Step 9

– Flip your netbook over and swing open the display so the keyboard is right in front of you, ready for action!
Step 10


– There are three tabs on top of the keyboard, just waiting for you to give them a little attention.
– Grab your spudger, point it towards the display, and gently pry up to nudge each tab off the keyboard. It’s like giving them a little push to say, ‘You’re free!’
– When you move on to the next tab, make sure the one you just popped off doesn’t sneakily slip back into place. Keep an eye on it!
Tools Used

Step 11


Hey there! Just a heads up, there’s a nifty little ribbon cable that connects the keyboard to your netbook. Keep an eye on it!
– Gently lift the top of the keyboard. If it’s feeling a bit stubborn, check for tabs on the sides—use your trusty tool to nudge them aside and give the keyboard a little wiggle from side to side.
Step 12


– Gently lift the black plastic hinge to release the ribbon and carefully pull out the clear blue cable. You’re doing great!
Step 13

– Gently close the display and flip the ZG5 over, making sure the battery compartment is facing away from you. Let’s get started!
Step 14


– Let’s kick things off by unscrewing three 5.8 mm Phillips #0 screws from the bottom of the case. You’ve got this!
– Next up, it’s time to tackle the battery compartment. Remove three 3.9 mm Phillips #1 screws and keep that momentum going!
– Finally, don’t forget to take out two 5.8 mm Phillips #0 screws hiding underneath the feet near the hinges. Almost there!
Step 15

– Flip the netbook over and lift the display so the keyboard is facing you.
Step 16


– Pop open the retaining flap on the ZIF connector for the trackpad ribbon cable—like you’re flipping a tiny lever.
– Grab that blue tab and gently slide the trackpad ribbon cable out of its snug spot on the motherboard. Easy does it!
Step 17


– Unscrew the five black 4.7 mm Phillips #0 screws holding down the metal casing. You’re doing great—just a few twists and they’ll be out!
– Now tackle the single silver 4.3 mm Phillips #00 screw on the right side of the metal casing. You’re on fire—keep going!
Step 18


– Start by gently wedging a spudger or plastic opening tool into the seam between the two halves of the case, right at the red rings near the hinge.
– Slide the spudger carefully toward the front of the device, releasing the little clips that are holding down the top case.
– Once you’ve released the clips, lift off the top case with ease.
Tools Used
Step 19

– Pop off the two antenna cables hanging out on the right side of the wireless card. Easy does it!
Step 20

– Take out that lone 3.9 mm Phillips #1 screw holding the wireless card in place. You’re doing great!
Step 21

– Carefully nudge the wireless card to the right and slide it out of its cozy little socket.
Step 22

– Unplug the display cable from the top left corner of the motherboard. You’ve got this!
Step 23


– Unplug the speaker cable from its snug little spot on the motherboard.
Step 24

Some laptops might just rock a single 4.7 mm Phillips #0 screw instead—how fancy!
– Unscrew three 3.9 mm Phillips #1 screws from the tiny I/O board. It’s like a mini treasure hunt for screws!
– Next up, take out a single 3.9 mm Phillips #0 screw from the front of the motherboard. It’s a small screw, but a big step!
Step 25

– Unscrew those two 4.7 mm Phillips #1 screws that are holding the display snugly to the motherboard. You’ve got this!
Step 26

The I/O board connects to the motherboard with a little short cable—kind of like a tiny tech handshake.
– Carefully nudge the I/O board upward from the right side of the case. Take it nice and easy—you’ve got this!
Step 27

– Gently hoist that motherboard assembly out of the case, like you’re lifting the crown jewel from a treasure chest.
Step 28

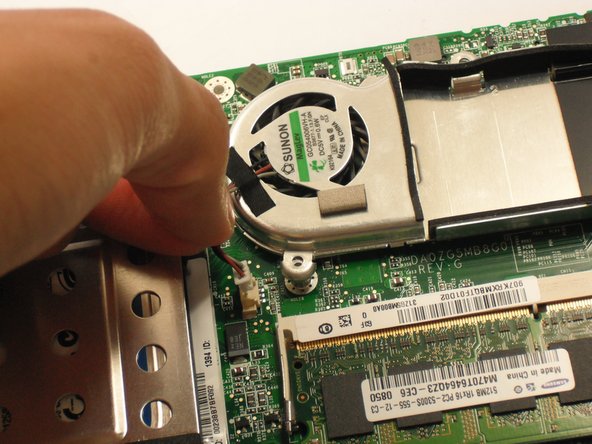
– Unplug that fan cable from the motherboard—it’s time to give it some freedom!
Step 29

– Grab your trusty Phillips #1 screwdriver and tackle those three 3.9mm screws like a pro!
Tools Used

Step 30

– Gently lift the fan housing away from the motherboard, like you’re unveiling a surprise gift!
Success!

