
AirPort Extreme A1521 Teardown
Duration: 45 minutes
Steps: 14 Steps
Ready to dive into the AirPort Extreme? So are we. Let’s see what Apple’s latest high-rise device is packing under the hood. If you’re more interested in the Apple Time Capsule, there’s a separate teardown for that. Want to keep up with more tech adventures? Check us out on Twitter or Facebook.
Step 1


– We grabbed this 2013 AirPort Extreme, fresh from its WWDC debut. Heads up: it’s way taller than you’d expect! Standing head and shoulders above the rest in the wireless router world, it features:
– Support for IEEE 802.11a/b/g/n/ac
– A beamforming antenna system for better signal targeting
– Dual-band Wi-Fi on both 2.4 GHz and 5 GHz at the same time
– A Gigabit Ethernet WAN port
– Three Gigabit Ethernet LAN ports
– USB 2.0 connectivity
Step 2


– Start by peeling off the protective stickers to reveal what’s underneath.
– Curious about sticker number one? Let’s see what’s hiding behind it.
– And what about sticker number two? Time to find out.
– Next up, a bunch of ports—lots of ’em. Let’s carefully disconnect and set them aside.
– Follow the step-by-step process to continue with the repair. If you need a hand, you can always schedule a repair.
Step 3


– Alright, let’s crack open this white brick and see what’s inside.
– To get in, slide a metal spudger around the edge to pop the clips holding the black base.
– With the base off, you might think you’re looking at a heat sink… but nope! Suspense builds.
– Before you toss the base aside, check out the new model number hiding underneath.
– This AirPort Extreme is rocking model number A1521. Nice find!
Tools Used


Step 4


– Much like its earlier Mac Mini cousins, this fresh new device hides its power supply inside, helping it achieve its sleek, compact design.
– Time to get to the fun part! Gently slide your spudger in and give it a twist with that trusty Torx screwdriver. The T8 Torx screws will pop right out without a hitch.
Tools Used
Step 5


– Let’s lift off the top cover and discover… a whopping 3.5″ of open space waiting for us!
– Although the AirPort Extreme isn’t built with storage in mind, we found a classic 3.5″ SATA hard drive just to see how it fits. Nice touch!
– This might be exciting news for all the DIY enthusiasts dreaming of transforming their AirPort Extreme into a Time Capsule—though we didn’t spot any connectors to plug in that hard drive, just some vacant spots on the logic board. Fingers crossed that we can dive into a Time Capsule soon!
Step 6


– Time to dust off that flexible shaft extension from your 54 bit driver kit—the AirPort Extreme is ready for a little attention.
– Just two spring-loaded, captive Torx T10 screws are holding the outer case on, but they won’t be for long.
– Once those are out, the inside of the AirPort Extreme pops free from its white plastic shell like corn from a cob.
Step 7
– Dive into the latest turn-table tech! We’re excited to show you every angle of the Extreme’s inner workings.
– Searching for your own turn-table tech solutions? You’ve come to the right place!
– For those who can’t wait to grab the newest Apple gadget, featuring vertical circuit boards around a spacious void, the AirPort Extreme is your top pick for now.
Step 8


– Videos are cool, but let’s get down to business step by step.
– Port side
– Starboard slot side
– Fan side
Step 9


When you compare it to 802.11n, 802.11ac is a beast! It packs up to four times more RF bandwidth (hitting up to 160 MHz), doubles the MIMO spatial streams (up to 8), and quadruples the modulation (up to 256 QAM). So, expect smoother, faster connections—it’s like upgrading from a tricycle to a sports car!
– Time to tackle the slick metal plate guarding the heart of the Extreme—yep, that’s the upgraded antenna array showing off.
– There are six antenna cables sneaking under what looks like the hard drive area, running right up the center, and connecting into a hefty plate at the top that’s pulling double duty as the antenna.
– With the new 802.11ac Wi-Fi, you’re looking at multi-station wireless speeds hitting at least 1 gigabit per second, and a single connection can cruise at 500 megabits per second. Not too shabby!
Step 10


– A bunch of T8 Torx screws are keeping those heat sinks snug on the logic board, and the logic board is chilling with the hard drive slot.
– Once those screws are out of the picture, the layers come apart like magic!
Step 11


– Alright, now it’s time for the logic board inspection. Here’s what we’ve got under the hood:
– A Broadcom BCM53019 router SOC, complete with a gigabit switch – always nice to see that fast connection.
– Next, we’ve got the Broadcom BCM4360KLMG – this little guy also made an appearance in yesterday’s MacBook Air teardown. Good to know we’re working with familiar tech.
– Hynix H5TC4G63AFR 4 Gb (512 MB) synchronous DDR3 SDRAM. It’s a solid choice for smooth performance, no doubt.
– Micron 25Q256A 32 MB serial flash. A trusty flash memory for all your storage needs.
– Skyworks 5003L1 5GHz WLAN power amplifier. For those high-speed wireless connections!
– Skyworks 2623L 2.4GHz WLAN power amplifier. You know, just in case you need a little more 2.4GHz power.
– And last but not least, the TDK TLA-7T201HF – looks like a pulse transformer. A real unsung hero in the circuit.
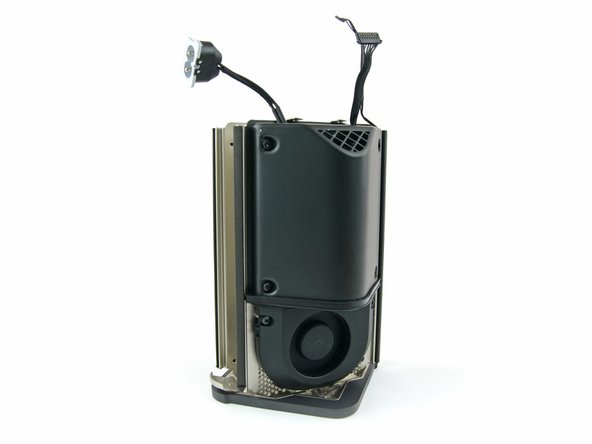
Step 12
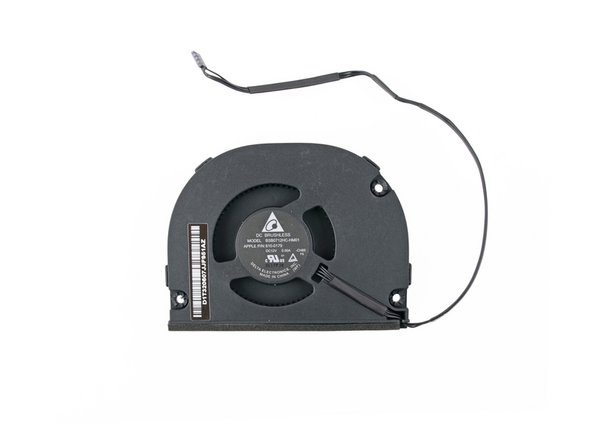


– Time to loosen things up! Grab your Torx screwdriver and remove the two screws holding the fan in place.
– The fan we’re dealing with is a DC brushless model labeled BSB0712HC-HM01, made by Delta Electronics.
– We’ll give the fan a quick blow-off to clear out dust, then peek underneath the metal casing to see what’s going on.
Step 13


– Let’s check out the power supply. Looks like we’ve got a standard 12V, 5A setup packed with chunky capacitors and coils.
– Delta Electronics is behind this one too, and they’ve dubbed it the ADP-60DFS—don’t mix it up with the wimpier models.
– Pro tip: keep your fingers dry and steer clear of the big black cylinder. 400 volts packs a punch you don’t want to feel.
Step 14

– Take a peek at this totally rad layout.
Success!
