Apex Tablet 7 Camera Replacement Guide
Duration: 45 minutes
Steps: 9 Steps
Ready to give your Apex Tablet 7 a little camera TLC? This guide is here to walk you through swapping out that pesky camera if it’s seen better days or just isn’t functioning right. Grab your replacement camera and let’s get started on removing the old one. It’s time to bring back those picture-perfect moments!
Step 1
– Grab your trusty Phillips #00 screwdriver and unscrew those two 2.70 mm screws on the side of the tablet where the buttons and headphone jack hang out (that’s the bottom side when you’re holding it upright).
Step 2
Heads up! When you’re taking off the back panel of your tablet, be super careful around the speaker. It’s hanging out in the lower right corner on the backside of the tablet. There are two delicate wires connecting the back panel to the device, and if you’re not cautious, you could accidentally disconnect them while removing the back. So, take your time and be gentle!
– This connection is highlighted in red in the images.
Step 3
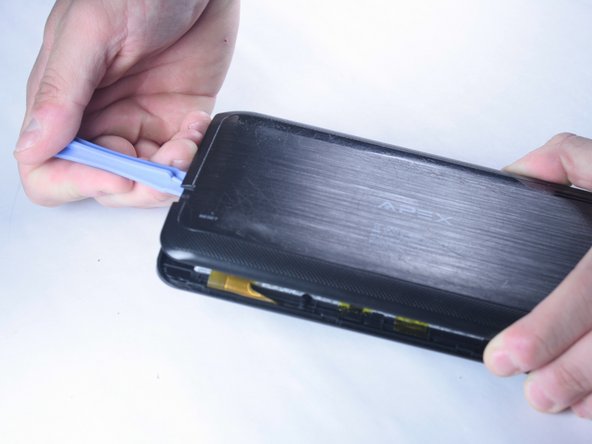
– Gently slide a trusty plastic opening tool between the edge of the back panel and the top of your device. It’s like giving your gadget a little stretch!
– Now, glide that plastic tool along the sides of the tablet, keeping it nestled in the gap between the tablet and the back panel. This will help you create a nice opening, just like peeling back the lid on a surprise!
Step 4
– Gently press down with your hand to carefully pop off the back panel, making sure to be extra cautious around the speaker connection. You’ve got this!
Step 5
– Alright, the back panel is off! Now you’ve got a clear view of the tablet’s guts. Time to roll up those sleeves and start repairing or replacing parts.
Step 6
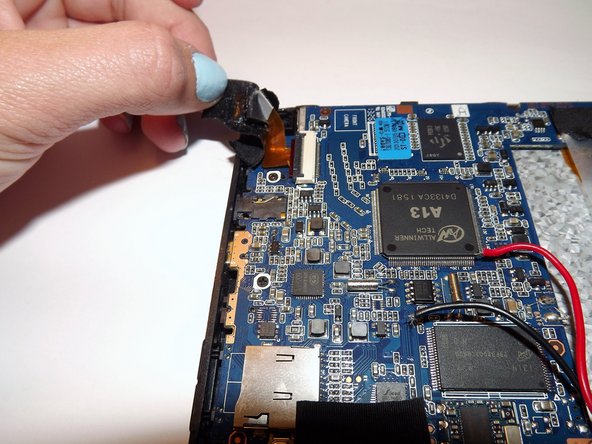
– Carefully peel off the black tape that’s covering the camera and circuit board. It’s attached to a foam block right behind the camera module, so just take it slow and steady.
Step 7
– Pop that black latch over the shiny gold cable to the upright position—it’s time to set that cable free!
Step 8
– Gently pull the cable out of the circuit, making sure to keep it straight as you go. No yanking needed, just a smooth, steady motion!
Step 9
– To place the new part and reassemble your device, just follow the steps in reverse. If you need help, you can always schedule a repair.
– Cancel: I didn’t finish this guide.
–
Success!


