Apple Pencil Teardown
Duration: 45 minutes
Steps: 13 Steps
Apple has always stuck to their guns, insisting that iPads are meant to be used without a stylus. So, when the iPad Pro came out with a $99 accessory—the Apple Pencil—we were naturally curious. What’s so great about this stylus? We’ve heard it’s packed with cool features, but what really has our attention is what’s inside that sleek white tube. Come along as we take a closer look! For more gadget breakdowns, be sure to follow us on Facebook, Instagram, or Twitter to stay in the loop!
Step 1


– Apple hasn’t shared all the details about this feature, but here’s what we do know: it uses Bluetooth 4.1, which means it can connect reliably and with less battery drain. It scans at twice the speed of finger inputs, making interactions quicker and smoother. Expect up to 12 hours of battery life to keep you going all day. Its compact size measures 175 mm (L) x 8.9 mm (D), so it fits comfortably in your hand. When it’s time to recharge, just use the Lightning connector. If you need help, you can always schedule a repair.
Step 2


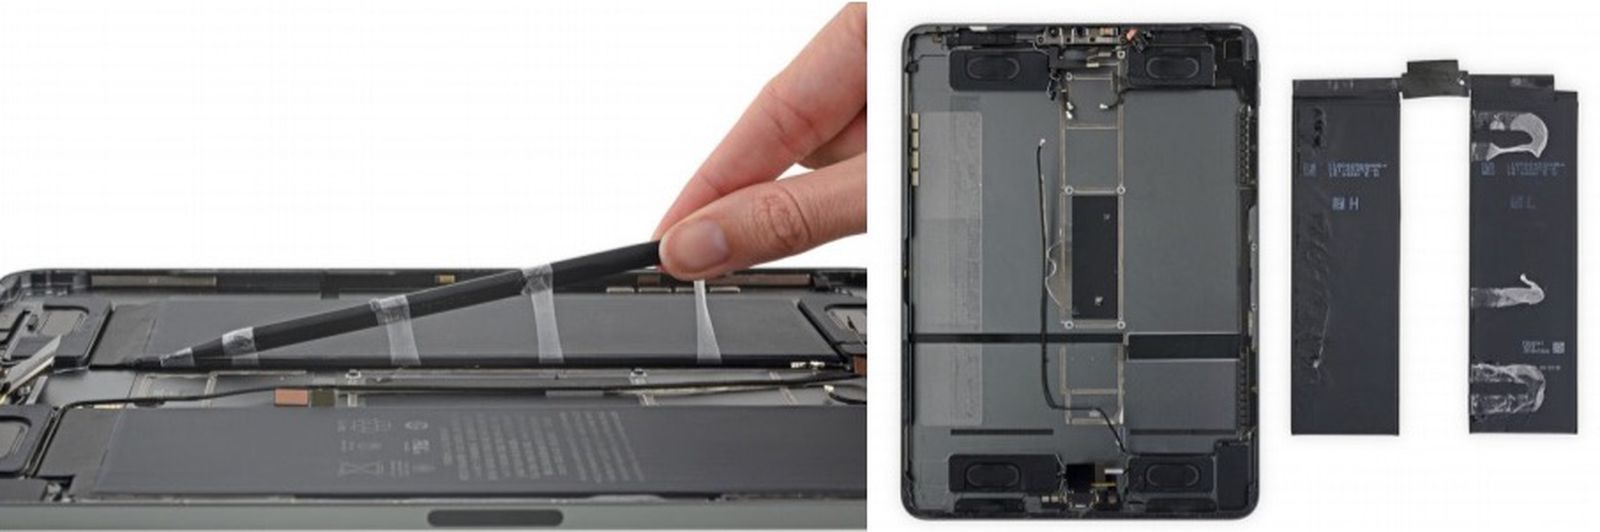
Opening it up and removing the battery? Super simple, no sweat.
Oh, and did we mention? It’s got an eraser too!
– Let’s dive into the world of styluses for a quick comparison. There are a few options out there that make it tough to choose.
– First up: the Microsoft Surface Pen (from the Surface Pro 4). It’s got that sleek, professional feel, and works great with Surface devices.
– Next, we have the original ‘iPad Pencil’ by 53. This one’s designed specifically for their Paper app, but it shares a lot of similarities with the new Apple Pencil, so you’re not missing out on the good stuff.
Step 3

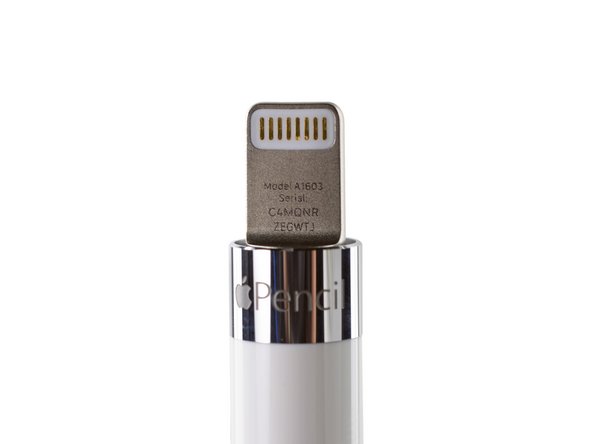

– Apple thoughtfully included a spare tip and a Lightning-to-Lightning adapter (a last-minute addition) to help you avoid the hassle of charging your Pencil directly from your iPad. The Lightning Connector cap snaps on with magnets, but don’t be surprised if most of these end up lost by next month. When you pop the cap off, you’ll see a fresh, never-before-seen model number: A1603. Welcome to the world, Pencil!
Step 4


This is probably linked to one of the two sensors in the tip, which helps the iPad Pro figure out the Pencil’s angle and orientation relative to the screen, so it can adjust the pen stroke with precision.
– Start by carefully removing the Pencil’s tip—it’s held on with a gentle twist. Once off, peek inside to see a tiny metal piece embedded deep within the tip—probably designed to get as close to the screen as possible. Inside an iPad Pro, the digitizer can gauge the distance from each emitter to the screen, allowing it to determine the Pencil’s angle relative to the device. If you need help along the way, you can always schedule a repair.
Step 5


Quick side note: they named this thing the Pencil, but skipped the eraser—missed opportunity or what?
– Time to get up close and personal with the Lightning Connector, so we bring in our trusty iOpener to warm things up a bit.
– Even after giving it some cozy time with the iOpener, the Lightning Connector assembly isn’t quite ready to give up. A little tug helps it break free from the shell.
– Well, it looks like we’ve had a bit of an oops moment… A flex cable might have taken a hit along the way.
– Hmm, this teardown may not be one of those where everything just magically falls back into place.
Tools Used

Step 6


So far, no battery punctures… we’re on a roll! Our operation skills are really starting to show.
– After carefully taking apart the top and bottom halves and not spotting any easy access points, we’re ready to tackle this head-on and get serious with the tools.
– As we slice through the plastic casing of the Bic Apple Pencil, we uncover an ink cartridge nestled inside a metal shell.
Step 7


Good news—this part is straightforward and requires no special files. We’ve got everything we need right here. Just follow the steps, and you’ll be all set in no time. If you need extra help, you can always schedule a repair.
– Phew! That was quite the task! After sweeping away the plastic dust and taking a well-deserved burrito break, let’s take a moment to admire our handiwork: a case-free Pencil.
– A quick peek inside the shiny metal cylinder reveals a wee tri-point screw—just like those found on the Apple Watch.
– Right beneath that tiny screw, we spot some even tinier contacts, likely meant for Apple’s internal testing.
Step 8


When it comes to keeping score: the Microsoft Surface Pen runs on a replaceable AAAA battery. These batteries typically pack a punch of around 0.4 to 0.9 Wh, so you can keep your stylus powered up and ready to go.
– With a bit more cutting and some gentle prying—oh, and a fun chat about laser cutters—we finally make it through a second layer, and this time it’s metal!
– Our efforts reward us with the antenna and battery assembly. Turns out there’s no graphite hiding inside this Pencil.
– This little powerhouse, a 3.82 V, 0.329 Wh lithium-ion battery, packs only about 5% of the charge you’d find in an iPhone 6s battery.
Step 9


This tiny circuit board is cleverly folded in half to maximize space efficiency. Nice and neat!
– Once the metal casing is removed, gently lift away the antenna, which sports the classic Apple black and gold look. Next, take a closer look at that ribbon cable you cut earlier—it connects the Lightning port to the battery and has a few battery charging ICs along its path. As you explore further, you’ll spot more chips on the other side. At this point, it’s time to remove the battery and move on to the more intricate parts, like the tiny logic board. If you need help along the way, you can always schedule a repair.
Step 10
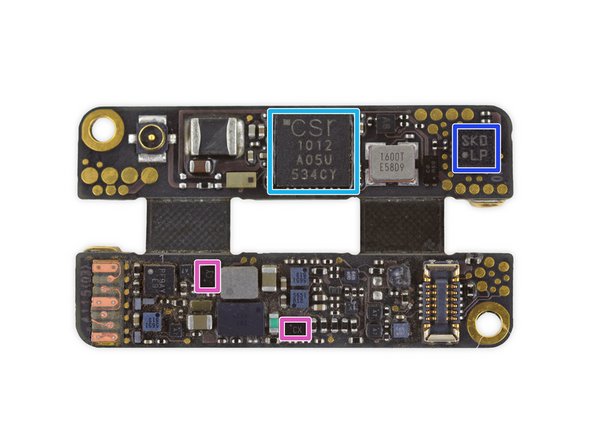

– Think of this tiny component as the brain behind the scenes—no, it’s not an ant’s logic board, but at just 1.0 gram, it’s definitely the lightest we’ve come across. Now that the heavy lifting is done, let’s take a peek at what makes this Pencil so clever: the STMicroelectronics STML151UCY6 ultra-low-power 32-bit RISC ARM Cortex-M3 microcontroller, the STMLS05 5-channel PMOS load switches, the STM32L052T8 32-bit ARM Cortex-M0+ microcontroller with 64 KB of flash, the Maxim MAX11290 24-bit delta-sigma A/D converter (probably), the Cambridge Silicon Radio CSR1012A05 Bluetooth smart IC, the Bosch BMA282 accelerometer, and the Maxim MAX44284 high-precision current-sense amplifier. This array of tiny tech marvels is what keeps everything functioning smoothly and smartly. If you need help, you can always schedule a repair.
Step 11


– Let’s take a peek inside the metal casing to carefully remove the pen nib and see how its sensor magic works. Next, gently lift one of the tiny circuit boards — these are some of the smallest we’ve encountered — and you’ll notice a set of three matching checkmarks. Three on the end of the pen assembly, and three on the tiny board itself. Chances are, this little chip holds the secret to how everything functions. If we’re making an educated guess, these components probably sense pressure by detecting movement between two parts. The chip reads 8529043 343S00008-A1, which is likely a custom controller from STMicroelectronics for the nib. If you’re ever unsure or need help, you can always schedule a repair.
Step 12


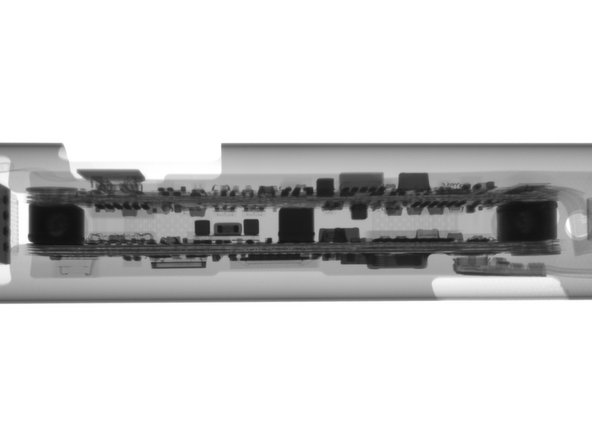
– Further disassembling the tip isn’t really practical, but that’s okay—our friends at Creative Electron have got us covered with some slick X-ray imaging. We also took a peek at the tiny folded logic board, along with the Lightning Connector and its cap. Check out that tiny spring-loaded tip and the two emitters hidden inside the shaft—pretty neat, right? If you need help with any of this, you can always schedule a repair.
Luckily, this was caught when the Pencil was still in one piece, so the connector is neatly soldered onto its little ribbon cable. It’s a satisfying sight—at least until you need to get in there for repairs. Keep calm and follow the steps carefully. If you need help, you can always schedule a repair.
Step 13


– Apple Pencil Repairability Score: 1 out of 10 (with 10 being easiest).
– Good news: you can swap out the pen nib and the cap if they wear out or disappear into the couch cushions.
– Cracking this pencil open without wrecking it? Not happening. It’s definitely not designed with repairs in mind.
– Layers of tough plastic and metal keep all the internals locked up tight. Getting them out in one piece is like trying to get toothpaste back in the tube.
– The battery lasts up to 12 hours, but when it calls it quits, there’s no easy way to replace it—so the pencil itself is on borrowed time. If you run into trouble, you can always schedule a repair.
Success!