Apple Watch SE 1st Gen GPS NFC Replacement
Duration: 45 minutes
Steps: 17 Steps
Got a question or spotted something interesting? Drop your thoughts in the comments—I'm here to chat and keep this guide in tip-top shape!
NFC (near field communication) is the magic that lets your Apple Watch use Apple Pay. You’d think swapping out a busted NFC chip would be a breeze, right? Not so much. When you replace a broken screen, you might notice that Apple Pay stops working because the NFC chip is paired to your watch, and swapping chips can mess with that connection. To make things trickier, the NFC chip lives on the back of the screen—one of the most common parts to break! Some folks keep Apple Pay working by separating the glass digitizer and refurbishing the OLED screen underneath, but let’s be real: most of us don’t have a mini-factory in our garage. This guide will walk you through options that don’t require fancy equipment. If you have questions or want to point something out, drop a comment—I’m all ears and happy to help!
Step 1


- Before diving into repairs, make sure to unplug your watch from the charger and power it down. Trust us, it’ll make everything smoother!
- If your touchscreen’s on strike and you can’t power off the watch the usual way, no worries! Use this backup method to turn it off and get on with your fix.
Step 2


- The space between the screen and the watch body is super slim, so grab a sharp blade for the job. Check out these warnings before you jump in.
Keep your fingers clear of the knife—think of it as giving your digits some personal space. If you're feeling cautious, slip on a sturdy glove, like a leather or gardening glove, to keep those fingers safe. Be gentle with your pressure—no need to turn the knife into a slip 'n slide, which could cut you or damage your device. And don't forget eye protection—because sometimes, glass and blades like to send tiny shards flying. Stay sharp and safe out there—if you need help, you can always schedule a repair.
Take off or snap on the watch band if it helps you get a better grip while working your repair magic.
Step 3

You might need to warm up the iOpener again and give it a few more rounds to loosen that stubborn display adhesive. Keep repeating until it softens up enough to work with. If you need help along the way, you can always schedule a repair.
- Grab your iOpener, hair dryer, or heat gun, and warm up the front of your watch—this helps loosen up that stubborn display adhesive.
- Let the heat do its thing for at least two minutes to make sure the screen gets nice and warm and the adhesive softens up.
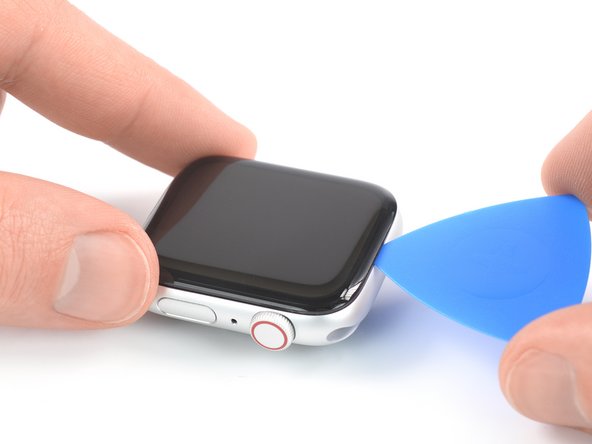
Step 4
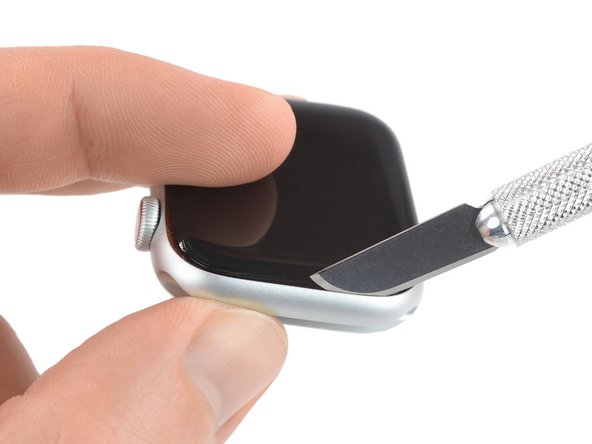
- Let's get this repair started! Begin by carefully inserting the edge of a curved blade into the narrow gap between the display and the outer case, starting from the short side of the display, closest to the digital crown.
- Now, press the blade firmly straight down into the gap to ensure it's securely in place.
- Once you've got the blade inserted, gently tilt it to pry the display open slightly - you're making great progress!
Step 5


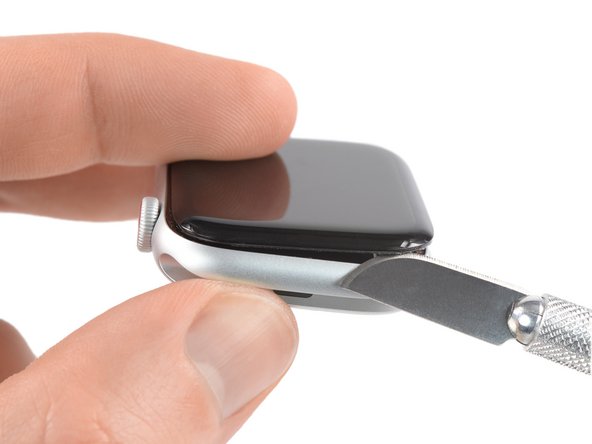
- Gently insert an opening pick into the gap you've created to get things started.
- Carefully slide that pick along the short edge of the watch to peel away the adhesive and free it up.
Step 6


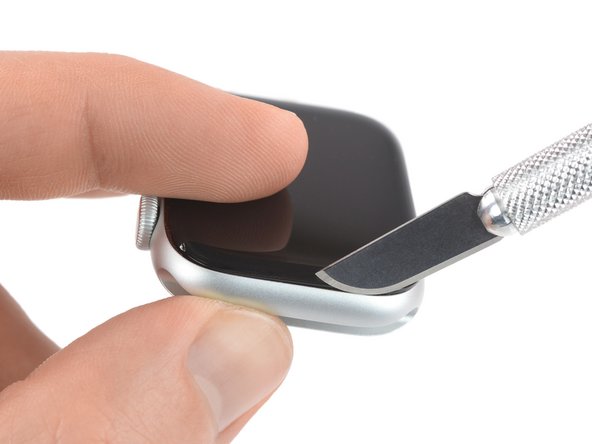
When working close to the crown, keep your opening pick shallow—no deeper than 1/16 inch (about 2 mm)—to avoid any surprises!
- Gently guide the opening pick around the corner and along the lengthy edge where the crown hangs out to break that display adhesive free. If you need help, you can always schedule a repair.
Step 7


- Gently glide the opening pick around the corner to slice through the last bit of adhesive on the short edge that's farthest from the crown. Keep it smooth and steady!
Step 8


Keep it shallow! When working around the crown, don’t slide the pick in more than 1/16th of an inch (about 2 mm).
- Set your watch down on a nice, flat surface, and grab that opening pick to cut through any stubborn adhesive that's still hanging on.
- Gently slide an opening pick underneath the display edge opposite the watch crown. You're doing great!
Step 9

Hold up! The display is still hooked up to the watch—so no pulling it off just yet.
- Place the opening pick onto the short edge of the watch, right next to the crown. Then, gently twist the pick to help loosen the display from the watch case.
Step 10


Be gentle when folding the display to avoid putting too much pressure on those delicate display cables. Keep it cool and steady—your device will thank you.
- Gently lift the display and guide it toward the short edge that's opposite the crown.
- Swing the display up until it's standing tall, like opening the world’s tiniest door.
Step 11

- Gently lift the watch screen away from the device, taking it slow and steady—no need to rush greatness!
- Patience is your friend here, so chill and enjoy the process.
- Unplug the three ribbon cables attached to the screen, one at a time.
Step 12

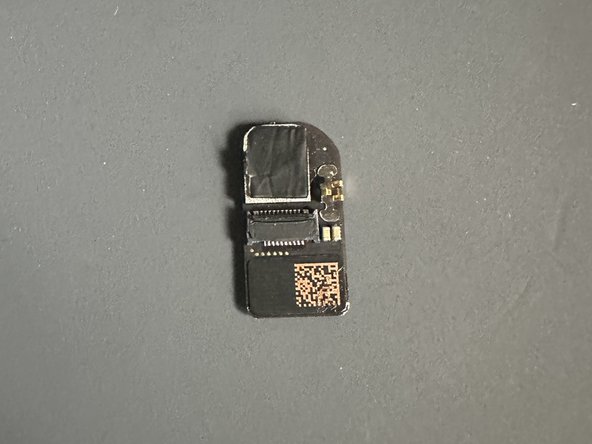

- Time to get this chip loose! Use a heat gun to warm up the adhesive - it's stuck on there pretty tight.
- Now it's time to bring in the big guns - use a Jimmy or razor blade to carefully pry the chip loose. Take your time, we don't want any accidents!
- Just a heads up, this chip is held in place by some sticky adhesive and two tiny solder points. No big deal, just be gentle!
- *Important reminder: don't overdo it with the heat, or you might end up damaging that beautiful screen. We just want to loosen things up a bit, not start a fire*
Tools Used

Step 13
- Carefully pluck out the NFC chip from the new screen you’re about to use. This is the cozy little spot where your NFC from the old screen will find its new home.
Step 14

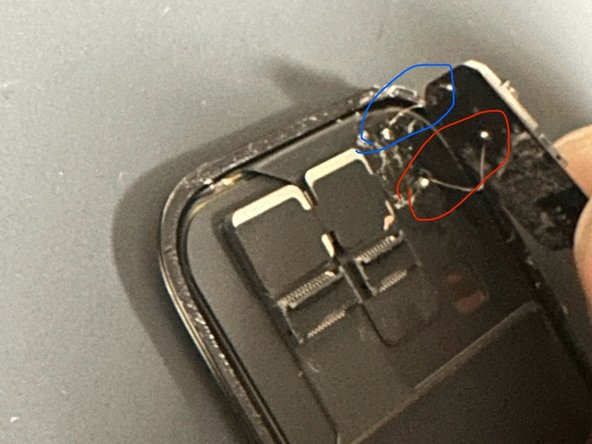
- Carefully extract the NFC chip from your old screen and attach two 0.02mm jumper cables to each solder point, making sure they connect to their matching spots.
- You don't need a mountain of solder here—just a dab will do to keep those connections nice and snug.
Step 15


- Hook those ribbon cables from the back of your watch to the screen, then power up your device.
- Give your watch a spin by trying out Apple Pay.
- **Heads up: My watch needed a factory reset to get Apple Pay working again. If you’re having trouble, try resetting your device and double-check those solder joints. If things still aren’t working, you can always schedule a repair.**
Step 16

- After you've confirmed that Apple Pay is up and running like a champ, it's time to sprinkle a tiny bit of green soldering resin on those solder connections. This will keep everything nice and secure, making sure nothing accidentally touches other wires.
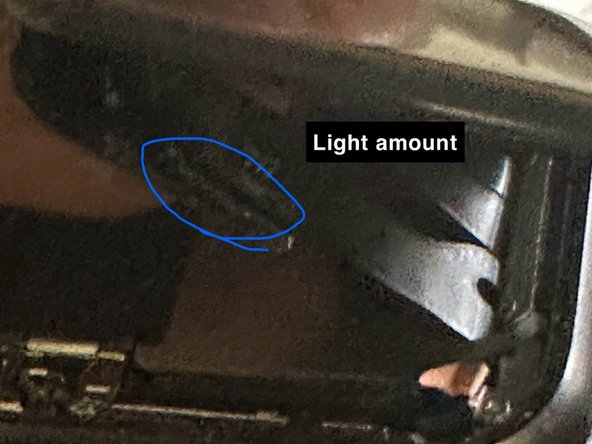
- Next up, grab some T-7000 adhesive and apply it to the spot marked 'light amount' – that's where the old adhesive used to be. Carefully reattach it to the Apple Watch screen and hang tight while the adhesive dries. This will keep the NFC chip snugly in place!
Step 17

- Now it's time to secure the NFC chip and get your watch screen back in place. Apply some T-7000 adhesive to the edges and carefully reinstall the screen. You're making great progress!