
Apple Watch Series 2 Battery Replacement
Duration: 45 minutes
Steps: 12 Steps
Ready to swap out that old, tired battery in your Apple Watch Series 2? Let’s get it done! If your battery has started to swell, be sure to take extra care and follow safety precautions. If you're not feeling confident about the repair, you can always schedule a repair for a professional touch.
Step 1


If your screen is acting up and won't let you turn off the watch, no worries! Just follow this alternative method to power it down like a pro.
- Before you dive into the repair, make sure to remove your watch from the charger and power down the device. This keeps everything safe and stress-free. If you need a hand along the way, you can always schedule a repair.
Step 2

You might want to give that iOpener a little reheat love, or shift it around on the screen as it cools down, to make sure the screen gets nice and toasty for a smooth pry-off!
- Get your heat on! Use an iOpener (or grab a hair dryer or heat gun) to warm up the watch face until it's just a bit too hot to handle.
- Let the iOpener do its magic for at least a minute to loosen the adhesive that's holding the screen in place. This will make the removal process a whole lot easier.
Tools Used

Step 3


Keep those fingers out of the knife's way—if you're unsure, throw on a sturdy glove like the kind you’d use for gardening or shop work.
Take it easy with the pressure! Too much force could send the knife slipping, which might nick you or mess up your watch.
Pop on some eye protection. Sometimes the knife or glass can snap, and nobody wants surprise flying bits.
That screen is hugging the body tighter than a koala on espresso, so a slim, sharp blade is your ticket in. Peek at the warnings first—your future self will thank you.
Pop the band on or off as you please; it’s like switching grips on a game controller for the perfect repair combo.
Step 4


Keep that knife at bay—no deeper than 1/16th of an inch (~2 mm)! You're doing great, just a little nudge, not a plunge!
- Slide the edge of a curved blade into the slim gap between the display and the outer casing. Start at the shorter side of the display, right by the digital crown.
- Press down firmly into the gap, like you're giving it a little love tap.
- Once the blade is in, give it a gentle tilt to start prying the display open just a bit.
Step 5


Hold up—don’t swing the display all the way open or try to pull it off just yet.
- First, gently wiggle your curved blade into a small gap to create some space. Once you've got that little opening, take out the blade and slide in the thinner edge of your trusty opening tool.
- Now, go ahead and push that opening tool into the gap. Use your thumb as a handy pivot to nudge the display open just a bit more!
Step 6


Be careful not to damage the Force Touch gasket when prying under the edge of the display. If it splits or the layers separate, you'll need to replace it too.
Remember to insert the opening pick no more than 1/16th of an inch (~2 mm) to avoid any damage.
No worries if your Force Touch gasket is looking a bit worse for wear! Our screen and battery repair kits come with a shiny new replacement. You're in good hands!
- Gently slide an opening pick beneath the display and carefully detach the Force Touch gasket from it.
- Run the pick around the display to break the adhesive bond between the Force Touch gasket and the display.
Step 7


To keep those display cables in tip-top shape, hold off on opening the display all the way just yet!
- Crack that display open to about a 45° angle, then grab your tweezers and gently pull away the sticky adhesive hanging out between the screen and the Force Touch gasket.
- Carefully thread the adhesive around and behind those display cables to peel it all off—take your time and don’t rush the sticky stuff.
Tools Used

Step 8

- Grab your trusty Y000 driver and gently unscrew that Tri-point screw holding down the metal battery connector cover.
- Once it's free, just lift off the cover like a pro!
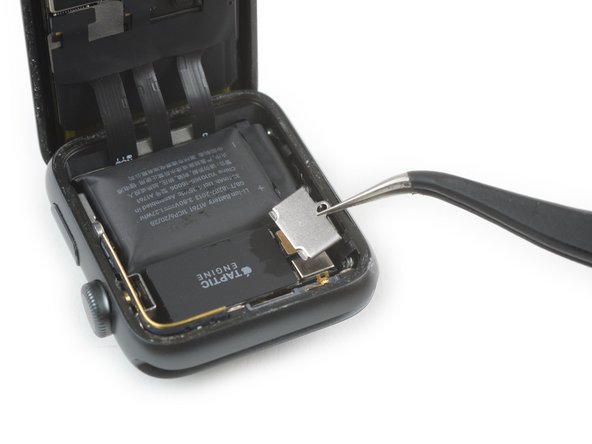
Step 9


- Gently lift the battery connector straight up using the edge of a pry tool—think of it as giving it a friendly nudge to disconnect. Then, bend the connector slightly upward to ensure it stays clear and doesn’t accidentally make contact again. If you need a hand with the process, you can always schedule a repair.
Step 10


- Now that you've cleared the way for the battery connector, gently slide the tip of your trusty pry tool under the battery connector plate, which is an important part of the battery.
- Carefully lift that battery connector plate up and out of its snug little home.
Step 11


Watch out for those display cables! We don't want them to get hurt while you're gently nudging the battery out.
Be super careful not to poke or squish the battery. A damaged battery can be a real drama queen and might cause a fire or even explode!
If you're feeling adventurous, give the top edge of the battery a gentle pry, right by the Taptic Engine. You've got this!
- Get ready to DIY like a pro! Take your scissors and trim one of your opening picks to roughly the width of the battery. Just be sure to smooth out any sharp edges.
- Now it's time to get a little tricky. Carefully insert the modified pick between the edge of the battery and the case, on the opposite side of the digital crown. Take your time and be gentle.
- Here comes the fun part! Use steady, consistent pressure to slowly pry the battery up, loosening it from the adhesive that's holding it in place on the system board. You got this!
Tools Used

Step 12

- First, carefully remove the battery. Then, peel off the protective liner to reveal the adhesive on your new battery before placing it in position. If you're working with a watch and need to install a new Force Touch sensor, follow the detailed guide linked in the conclusion below. For those just replacing the adhesive without swapping the sensor, see the adhesive replacement guide for tips on applying fresh adhesive and reassembling. If the existing adhesive still holds, you might try reusing it, or opt for a small piece of double-sided tape like Tesa 61395, or a dab of liquid glue such as E6000 to secure the battery. If you run into any snags, don’t hesitate to schedule a repair for extra help.


