Apple Watch Series 3 LTE Screen and Force Touch Gasket Replacement
Duration: 45 minutes
Steps: 9 Steps
Ready to jump into the world of tiny tech repairs? I got my hands on an Apple Watch and decided to give it a go after checking out a couple of videos and some detailed teardowns. Here’s how it all went down, so you’re set up for your own adventure.
Step 1


- Get your workspace ready—paper towels make a surprisingly great base for this kind of project.
- Tilt the watch until the crack catches the light, so you can really see that sneaky hairline break.
- Pop off the two watch bands by pressing the release button and sliding each strap out. Take note of which strap belongs on top and which goes on the bottom, so they don’t get swapped.
Step 2


- Grab your heat gun or the trusty iOpener tool and warm up the top of that watch! I recommend using the heat gun on a low setting, holding it 8-12 inches away, and gently waving it back and forth over the watch for about 60 seconds until the watch face feels nice and toasty.
- Remember, no need to go overboard with the heat – 60 seconds is just right! And just a friendly reminder: steer clear of any flammable materials while you're heating things up.
- Inspired by some great screen repair tutorials, I used a feeler gauge to slide down a bit and then gently horizontally to sneak under the edge of the OLED screen assembly.
- Starting from the side opposite the digital crown, take it slow and steady! Slide or roll that feeler gauge around the edge of the screen to loosen the adhesive. Once you've tackled one side, you can slip a pick in there to keep it open.
- Keep working your way around the screen until you've made it all the way around. Just a quick tip: don’t go too deep with the feeler gauge – stick to the edges!
Tools Used


Step 3
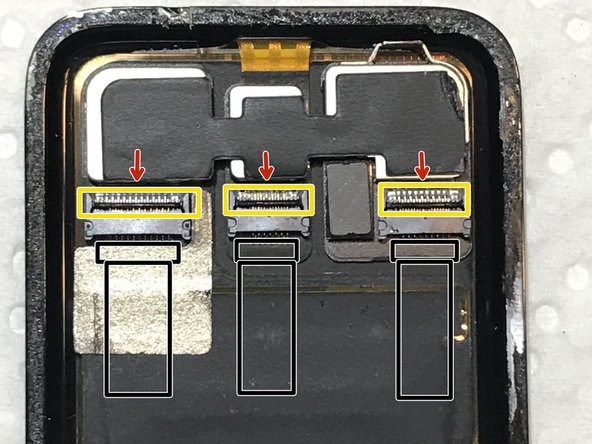


- Gently lift the display screen and you'll discover it's being held in place by three fragile ribbon cables. Feel free to fold the screen up to get a better look at these cables.
- The ribbon cable is secured to the connectors with a uniquely shaped piece of tape. Carefully peel that tape away from both the connectors and the ribbon cable, and place it on some waxed paper for safekeeping.
- I found it handy to sandwich the ribbon cable tape in waxed paper and keep a little weight on it until I was ready to put it back to use. If I had thought ahead, I would have just grabbed some replacement tape for a few bucks.
- Each cable is snugly held in a ZIF connector. You'll notice a small clip that lifts up and forward. Grab a spudger and gently slide it between the clip and the module, then carefully pop that clip up.
- With the ZIF clips open, gently pull each ribbon cable out from its connector and set the display screen aside for now.
Tools Used

Step 4


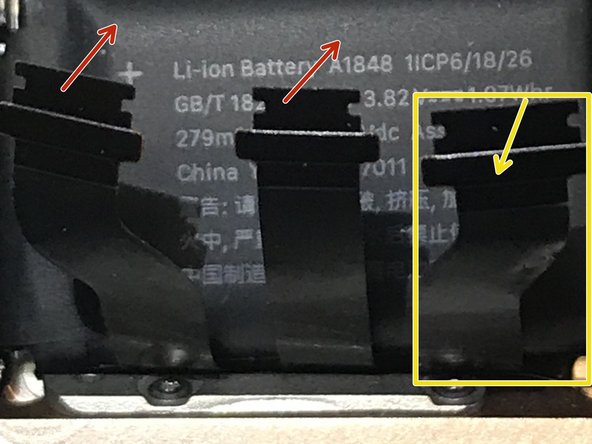
- Let's take a closer look at the gasket and see if it got damaged when we opened up the screen.
- The gasket seems a bit rough around the edges, so it's a good idea to remove it and take a closer look - it's better to be safe than sorry.
Step 5
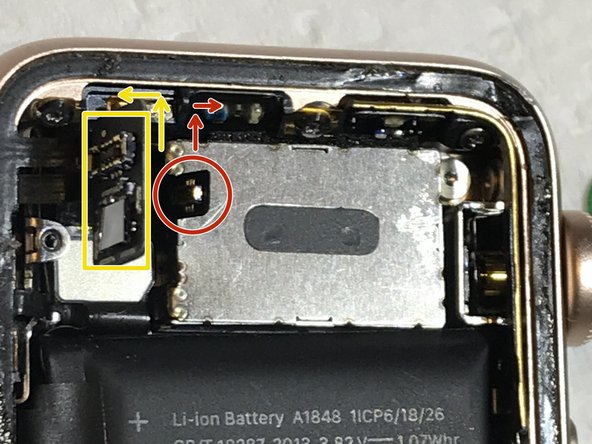


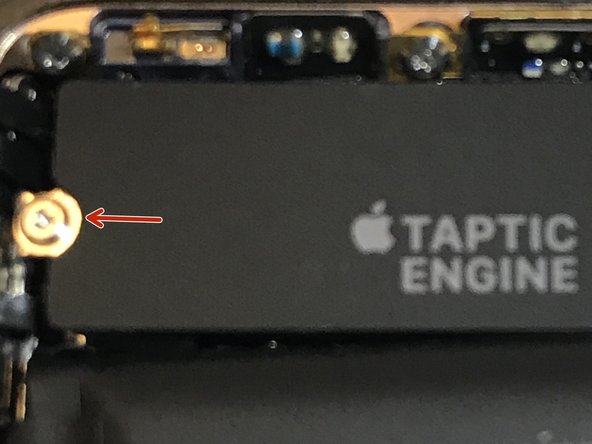
- First up, there’s a sneaky little Tri-Wing Y000 screw (that’s just 0.6 mm!) holding down an adhesive label on top of the Taptic Engine. This label is not just for show; it’s hiding the connector for the Force Touch Gasket. So, unscrew that and gently peel off the label. Don’t worry if it’s a bit stubborn – a little elbow grease will do the trick!
- Next, you’ll find a shiny gold connector perched on the force touch sensor module. Give it a gentle pop and lift that sensor module up. Easy peasy!
- Now, grab your tweezers and start pulling up the force touch sensor gasket. Begin on one side and carefully work your way around the watch until it lifts out. If you find yourself in a bind, remember, you can always schedule a repair!
Tools Used

Step 6


- Grab a bit of alcohol, some q-tips or a paper towel, and your trusty tweezers. Let's get that pesky adhesive residue off where the gasket used to chill.
- Once you've tidied up the gasket area, without peeling off those protective sheets just yet, place the gasket over the watch's perimeter to check how it fits. It's like a little dress rehearsal!
- The force touch gasket comes in a super handy removable plastic holder, making it easy to handle.
- Feeling good about the fit? Time to peel off the adhesive protective sheet from the underside, align the gasket with the watch, and gently set it down. You've got this!
- Give a little love by pressing down around the edges of the gasket where it sits in its groove. This helps the adhesive bond like a champ.
- Now, carefully remove the plastic holder from the gasket. Just a heads up, the upper adhesive protective sheet is still on, so no worries there!
Tools Used
Step 7

- Gently place the force touch gasket module into its cozy spot, which will be snuggly covered by the Taptic Engine label/cover.
- Reconnect that shiny gold connector back onto the force touch gasket module—it's like a little puzzle piece fitting right back in!
- Now, let's cover that taptic engine module with the label/cover, ensuring it fits perfectly over the force touch sensor module. You're doing great!
Step 8

- Take a good look at the new screen assembly to make sure it's the same size and has all the right parts, just like the original one.
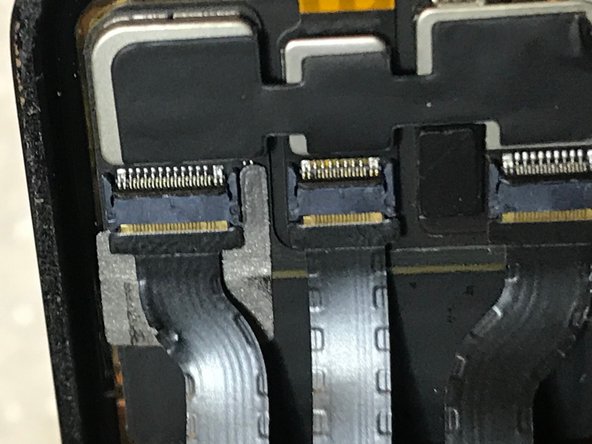
- Using a spudger or tweezers, gently pop open the three ZIF connector clips to make room for the ribbon cables to slide in and stay secure.
- Here's a little trick I found useful: cut two strips of Scotch tape and use them to temporarily hold two of the three ribbon cables up to the taptic engine, leaving only one cable connected at a time.
- Line up the ribbon cable and carefully insert it into its connector. Then, grab a spudger or tweezers to gently press down on each edge to nudge the connector forward and lock the cable into place. Close the ZIF latch by pulling it back toward the top of the connector.
- For some reason, the first cable slid in smoothly, but the middle and third cables? Not so much. I actually closed up the watch only to find the touch feature wasn’t working, so I had to pop it open again and reseat the cables.
- Once the first cable is in place, peel off the Scotch tape from the middle cable and repeat the process to seat it correctly, then close the ZIF latch. Finally, remove the last piece of tape and carefully insert the final cable into its connector, locking it into place with the ZIF latch.
Step 9


- Ready to put it all back together? Just work your way through the steps in reverse, and you’ll be set. If things get a little too wild, you can always schedule a repair.


