Apple Watch Series 4 Battery Replacement
Duration: 45 minutes
Steps: 19 Steps
Keep things cool: make sure your Apple Watch battery is under 25% before taking it apart.
Ready to swap out that tired or dead battery in your Apple Watch Series 4? This guide walks you through the process on the standard GPS-only model—cellular versions aren’t much different. For safety’s sake, it’s best to drain your battery below 25% before diving in. This helps prevent any thermal mishaps if the battery gets nicked. Got a swollen battery? Take extra precautions. During opening, you might damage the force touch gasket—if that happens, you'll want to replace it along with the display. When reassembling, don’t forget to get some fresh adhesive to hold everything in place. If you hit any snags, you can always schedule a repair with Salvation Repair.
Step 1


- Before you dive in, unplug your watch from the charger and turn it off for a smooth start.
- If a shattered touchscreen is getting in your way and you can't power down the usual way, try this alternative shutdown trick.
Step 2


Keep those fingers safe and sound! Make sure they're completely out of the knife's way. If you're feeling extra cautious, throw a heavy glove on your free hand - like a leather shop glove or a gardening glove - to keep it protected.
Easy does it! Don't press too hard, or you might end up with a slipped knife and a cut, or worse, damage to your device. Take your time and be gentle.
Safety first! Throw on some eye protection to avoid any flying debris if the knife or glass breaks. Better safe than sorry, right?
Feel free to slide on or take off the watch band to get better grip and control while you're working through the repair.
- Since the gap between the screen and the watch body is super slim, you'll need a sharp blade to carefully separate the two. Make sure to read the following warnings before you get started—this step requires a steady hand and caution to avoid damage.
Step 3

Give the iOpener a little love and heat it up again! You might need to do this a few times until the display adhesive decides to loosen up and cooperate.
- Grab your trusty iOpener (or if you're feeling crafty, a hair dryer or heat gun work just as well) and warm up the front of the watch to get that adhesive a little less clingy.
- Place the iOpener on the watch for at least two minutes—let that heat work its magic and make the screen nice and toasty, so the adhesive is ready to let go.
Tools Used

Step 4


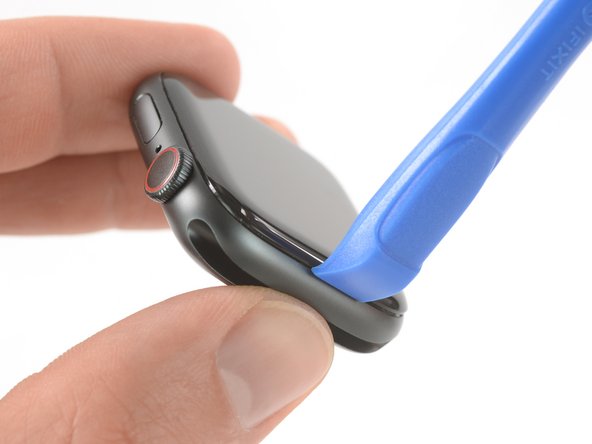
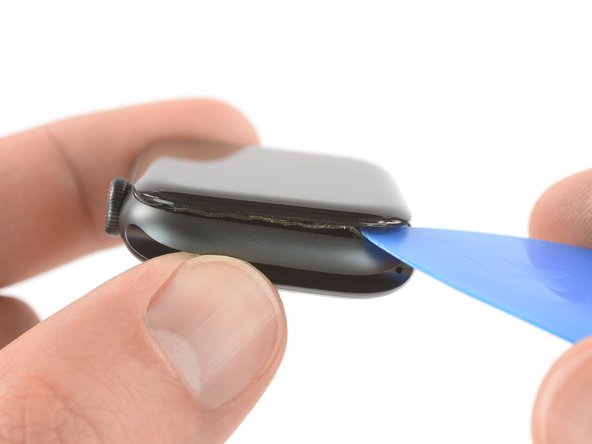
Hey there! Just a friendly reminder: keep that knife to a max depth of 1/16th of an inch (about 2 mm) to give the Force Touch sensor some space. We want to keep it happy and functioning!
- Hook the edge of a curved pry tool into the narrow gap between the display and the outer shell. Start from the short side near the digital crown for best leverage.
- Press down firmly and straight into the gap to get some initial separation.
- Once the tool's in, gently tilt it to nudge the display open just a bit more. Keep it gentle so you don't cause any cracks.
Step 5
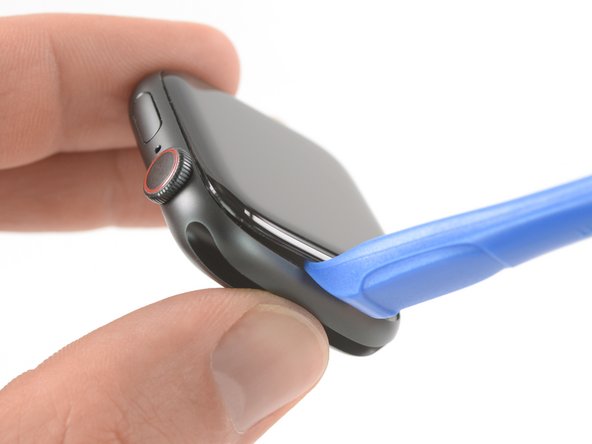
Hold up, don't try to fully open or detach the display just yet!
- Once you've created a small opening with the curved blade, swap out the blade for the thinner edge of an opening tool. Then, gently insert the tool into the gap, using your thumb as a lever to lift the display just a bit more. If you need help, you can always schedule a repair.
Step 6


- Sometimes the Force Touch sensor likes to play hide and seek by sticking to the display frame instead of the watch's body. No worries! Just slide an opening pick under the display and gently coax the Force Touch gasket away from the display.
- Now, take that pick and give it a little dance around the display to break free the adhesive that's holding the Force Touch gasket tight. You're doing great!
When working with the Force Touch gasket, gently pry around the edge of the display—think of it as a delicate dance. If the gasket splits or its layers come apart during removal, you'll want to replace the gasket itself. Also, keep your opening pick shallow—no more than 1/16th of an inch (~2 mm)—to avoid wounding other components. If things get tricky, remember you can always schedule a repair with Salvation Repair.
Step 7


Careful not to open the display too far—you don’t want to pull too hard on those display cables!
- Tilt the display open to about a 45° angle and grab your tweezers—time to carefully peel away that sticky adhesive between the screen and the Force Touch gasket.
- Work the adhesive around and behind the display cables until you’ve got it all off. If it’s being stubborn, feel free to cut it—you're going to swap it out anyway.
- When you’re putting everything back together, don’t forget to pause here and follow the Resealing Procedure.
Tools Used

Step 8


Be careful not to tug or pull on the display cables when flipping the screen back—gentle is the way to go to avoid any snags or damage.
Using a regular opening pick is a breeze for the 44mm version of the Apple Watch Series 4! But if you're rocking the 40mm version and find yourself short on space, no worries! Just grab some scissors and give your opening pick a little trim.
- Fold the screen back gently until you've got enough room to safely remove the battery. Take your time, you got this!
- Now it's time to get a little tricky - slide an opening pick between the battery and the Taptic Engine. Be careful, but don't worry if it takes a little maneuvering!
Step 9


Hey there! Just a friendly reminder to keep an eye on those display cables, especially the Force Touch cable that hugs the battery in one corner. We want to avoid any mishaps while you're gently lifting that battery out.
And remember, be super careful not to poke or squish that battery. A damaged one can be a real firecracker, and we definitely don't want that!
Hold up! Don't go yanking that battery out just yet. It's still connected to the watch assembly, so let’s take it slow and steady.
The battery's stuck down with some pretty chill adhesive, so it should come up without too much hassle. If it’s being stubborn, grab a heated iOpener and set it on the back of the watch for a couple minutes to help loosen things up.
- Glide the opening pick along the battery’s edge to break up the sticky stuff holding it down.
- Keep steady, gentle pressure as you carefully lift the battery, working it free from the adhesive underneath.
Tools Used
Step 10


- Time to get this battery out - carefully lift it up and tilt it to a 75° angle, easy does it!
- Now, use a pair of tweezers to gently peel off the black sticker covering the metal plate that shields the battery connector. You got this!
Tools Used
Step 11

- Time to give that Y000 screw (1.2 mm in length) the ol' heave-ho! Remove it with care and you're one step closer to your repair victory!
Step 12


- Grab your tweezers and gently lift off the metal plate that's hanging out over the battery connector.
Tools Used
Step 13


- Time to get this repair started! Use the pointed end of a spudger to carefully pry up and disconnect the battery flex cable. Remember to take your time and be gentle to avoid any damage.
Tools Used

Step 14


Avoid putting in a battery that's seen better days or looks a bit wonky—it's not just a bad idea, it's a safety no-no!
If you’re putting your old battery back in, you can stick with the original adhesive to hold it in place. Want a cleaner setup? Wipe away the old sticky stuff with some high-strength isopropyl alcohol and a lint-free cloth, then use a bit of double-sided tape (like Tesa 61395) or a tiny dab of liquid adhesive (like E6000) to keep things snug.
- Pop that battery out. It's time for a change!
- Before you place the new battery, peel off the protective liner so the adhesive can do its thing. Then, carefully set the new battery in its spot.
Step 15


To tackle that pesky adhesive along the edge where the display cables chill, simply fold down the display and gently pull it away from the frame. This will give you enough room to clean up and keep things tidy.
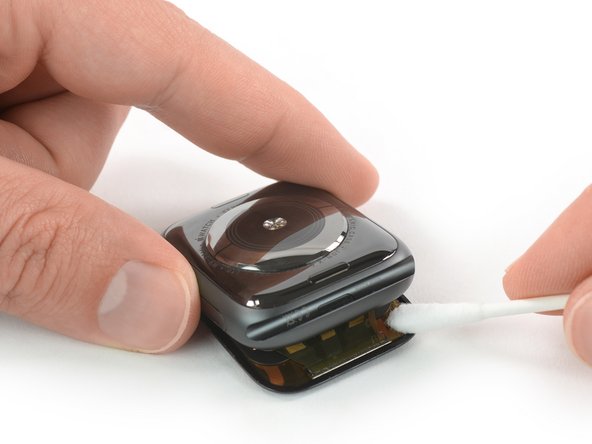
- Get ready to tackle the resealing process with these handy steps! First up, we need some replacement adhesive.
- Grab a Q-tip or a cleaning pad and dab it in some high isopropyl alcohol (over 99% works best). Now, gently wipe away any leftover adhesive lingering on the Force Touch gasket. You're doing great!
Step 16

- Turn your Apple Watch upside down so the display is resting flat and you can easily lift the case.
- Gently peel off any leftover adhesive from the back of the display to keep things neat and tidy.
Step 17

- Time to get this repair started! Use a pair of tweezers to carefully peel the replacement adhesive with the blue protective film off the backing paper. If you need help, you can always schedule a repair
Tools Used
Step 18


- Hold the new adhesive at a diagonal and carefully slide it over the display, keeping it nice and even.
- Place the adhesive right on top of the Force Touch gasket to make sure it sticks just right.
- Gently tilt the display forward a bit to line up the adhesive with the frame — it’s all about that perfect fit.
Step 19

Once you've got everything back together, follow the resealing guide to ensure your watch stays snug and secure. It’s the final step to keep it looking sharp and functioning perfectly. When in doubt, remember you can always schedule a repair if you need a hand.
- Ready to put your Apple Watch Series 4 back together? Just follow these steps in reverse to snap that battery back in place.
- Want your new battery to be at its best? Give it a good initial charge: top it off to 100% and keep it juiced for at least 2 extra hours. Use your watch until it calls it quits from low battery, then plug it back in without interruptions until it hits 100% again.
- Time to do your part for Mother Earth! Take your e-waste to an R2 or e-Stewards certified recycler.
- Things not going quite as smoothly as you expected? No worries! Swing by our Answers community for some troubleshooting vibes. If you’re feeling stuck, don’t hesitate to schedule a repair!