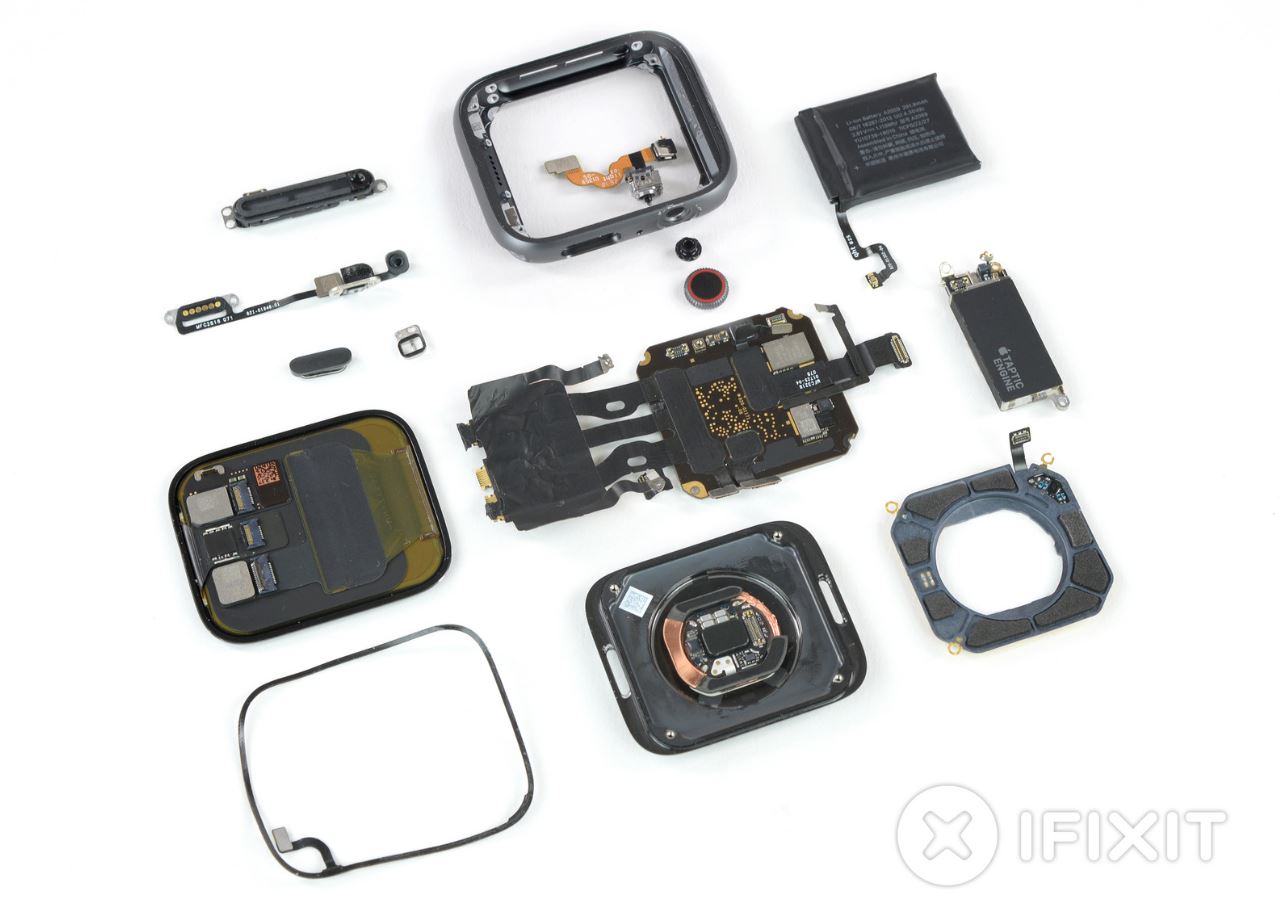
Apple Watch Series 4 Screen Replacement
Duration: 45 minutes
Steps: 24 Steps
Time to swap out that cracked or flickering display on your Apple Watch Series 4! Before diving in, make sure your watch is running watchOS 5 or newer, and your iPhone is on iOS 12 or later—this keeps pairing smooth sailing after the fix. Heads up: messing with the display could impact Apple Pay, so it's a good idea to remove your Apple Pay info beforehand and re-enter it once the new screen is in place. This guide is tailored for the standard GPS-only model, but if you've got the cellular/LTE version, the process is pretty similar. If you need a pro’s touch, you can always schedule a repair to get it done right.
Step 1


- First things first, take your watch off the charger and power it down. Trust us, it's much easier to work with when it's off!
- If your touchscreen is busted and won't let you turn the watch off, no worries! We've got you covered with a quick alternate method to power it down. You’ll be back in action in no time.
Step 2


Keep those fingers safe and clear of the knife at all times! If you're unsure, slide on a thick glove—leather shop gloves or gardening gloves will do the trick.
Don't go too hard on the pressure! Applying too much could make the knife slip and cause a cut, or even harm your device.
Protect your eyes! Glass might shatter or the knife could send tiny shards flying, so grab some safety glasses and keep your peepers safe.
Go ahead and clip or unclip that watch band whenever you feel like it! It’ll give you a better grip as you dive into your repair adventure.
- Since the space between the screen and the watch body is super tight, you'll want to grab a sharp blade to help you out. Make sure to check out the following warnings before diving in!
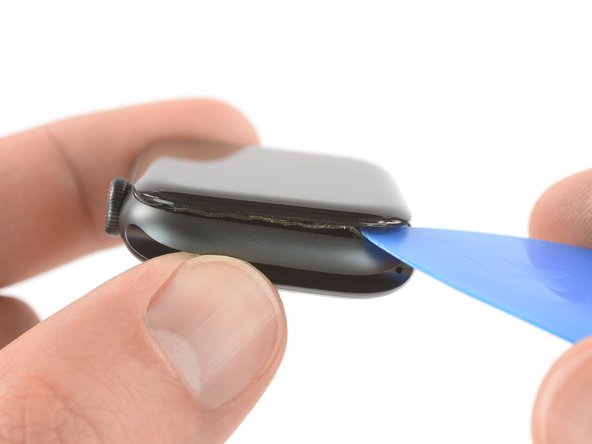
Step 3

You might need to warm up the iOpener again and give it a few more rounds on the adhesive until it loosens up enough to get the display free. Keep at it—patience is key, and if you need a hand, you can always schedule a repair.
- Grab an iOpener, hair dryer, or heat gun—whatever’s handy—and warm up the front of the watch to help loosen up that stubborn display adhesive.
- Let the heat sit on the watch for at least two minutes so the screen gets nice and toasty, making the adhesive easier to handle.
Tools Used

Step 4


Be careful not to insert the knife more than 1/16th of an inch (~2 mm) - you don't want to accidentally damage that fancy Force Touch sensor!
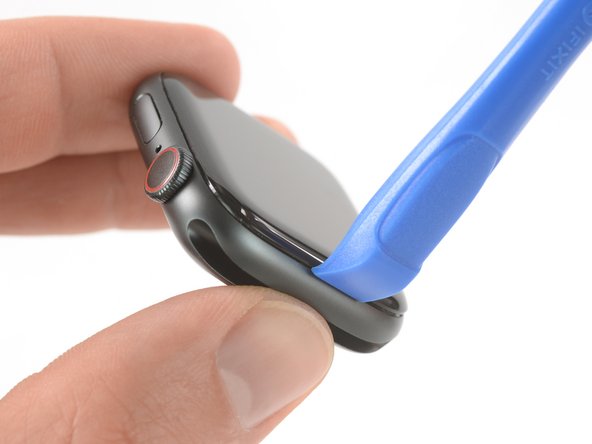
- Grab your curved blade and slide its edge into the slim gap between the display and the outer case. Start on the short side, right by the digital crown.
- Push the blade straight down into the gap with some steady pressure.
- Once the blade is in, give it a gentle twist to pop the display open just a bit.
Step 5
Hold your horses! We're not quite ready to pop off that display just yet.
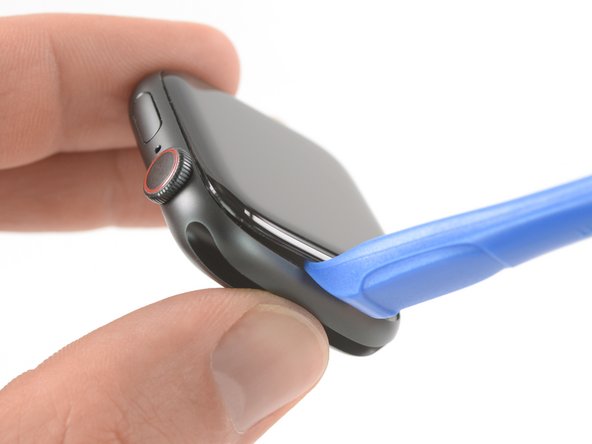
- After you've created a little opening with the curved blade, set it aside and slide the thinner edge of your trusty opening tool into that gap.
- Gently nudge the opening tool deeper into the gap, using your thumb as a lever to lift the display just a smidge more.
Step 6


Keep the Force Touch gasket in one piece by gently prying under the display’s edge—no Hulk moves here! If the gasket splits or its layers come apart, you’ll need to swap it out for a new one.
Slide your opening pick in just a tiny bit—no more than 1/16th of an inch (about 2 mm). Any deeper, and you risk poking parts you really don’t want to poke.
- Uh-oh! It seems like the Force Touch sensor might be playing peekaboo and sticking to the display frame instead of the watch's body. No worries! Just slide an opening pick under the display and gently coax that Force Touch gasket away from the display.
- Now, take that pick for a little stroll around the display, helping to free up the adhesive that's keeping the Force Touch gasket stuck. You're doing great!
Step 7


Take it easy on the display cables – don't open it all the way just yet.
- Tilt the display open to about a 45° angle, then grab some tweezers and peel off that sticky adhesive between the screen and the Force Touch gasket.
- Guide the adhesive around and behind the display cables to free it completely. Since you’ll be swapping it out anyway, don’t be shy about cutting it if that makes things easier.
- When putting your watch back together, be sure to revisit this step and follow up with the Resealing Procedure.
Tools Used

Step 8


- Gently bend the screen back just enough to give yourself some wiggle room to pop out the battery.
- Slide an opening pick between the battery and the Taptic Engine with a smooth motion.
Be careful not to tug or tension those display cables when you're folding the screen back. Keep it smooth and gentle—your device will thank you! If you need help, you can always schedule a repair.
A standard opening pick works well for the 44mm Apple Watch Series 4. If you're rocking the 40mm version and find limited space, try customizing your opening pick with scissors to make it fit just right. Need a hand? You can always schedule a repair.
Step 9


Watch out for those display cables and the Force Touch cable hanging out over the battery—give them some space when you’re prying out the battery.
Be gentle with the battery! Poking or bending it is a no-go, unless you’re aiming for the world’s smallest fireworks show.
Don’t yank the battery out just yet—it's still tethered to the rest of the watch. Patience, friend!
The adhesive keeping the battery snugly in place is a bit on the soft side. If you're having a tough time prying it out, don't sweat it! Just grab a heated iOpener and give the back of the watch a warm hug for about two minutes to help loosen that adhesive. You've got this!
- Glide the opening pick along the battery’s edge to start loosening that sticky adhesive.
- Keep a steady hand and gently lift the battery, working it free from the glue that’s holding it to the system board.
Tools Used
Step 10


- Gently lift that battery like it's a precious treasure, angling it at a cool 75°.
- Grab your trusty tweezers and peel off that black sticker from the metal plate covering the battery connector like a pro!
Tools Used
Step 11

- Unscrew the Y000 screw (1.2 mm in length) and set it aside—time to show that screw who's boss!
Step 12


- Grab a pair of tweezers and gently lift out the metal plate that’s hiding the battery connector. Easy does it—this step clears the way for what's next. If you need a hand, you can always schedule a repair.
Tools Used
Step 13


- Grab that trusty spudger and use its pointed end to gently lift and disconnect the battery flex cable. You've got this!
Tools Used

Step 14


Putting a bent or damaged battery back in is asking for trouble. Play it safe and grab a fresh one instead.
Now it's time to secure that battery! If you're reusing your old battery, you can stick with the existing adhesive - it's like giving it a second chance. But if you're feeling fancy, remove the old adhesive with some high-isopropyl alcohol and a lint-free cloth, then add a small piece of double-sided tape, like Tesa 61395, or a dab of liquid adhesive, like E6000. Easy peasy!
- First, let's get that battery out of there. Gently remove it and set it aside.
- Before placing your new battery, peel off the protective liner to reveal the sticky adhesive. This will help it stick in place just right.
Step 15


- Dab a bit of high-percentage isopropyl alcohol (99% or higher) onto a Q-tip and gently apply it to the black adhesive foil. Let it chill there for about two minutes to loosen up the stickiness.
- If you’re not feeling the alcohol method, you can warm things up by placing a heated iOpener on top of the screen for at least two minutes. This will help soften the adhesive and make your next steps way easier.
The black foil covering the display connectors is super delicate and tends to rip easily. To keep that tape in one piece while you peel it back, it’s best to use some high-quality isopropyl alcohol or an iOpener. This helps loosen things up without causing tears. Take your time, and if you need a hand, you can always schedule a repair.
Tools Used
Step 16

- Grab a pair of tweezers and gently peel back the tape that’s covering the three display cable connectors. Take your time—patience is key here! If you need a hand, you can always schedule a repair.
Tools Used
Step 17


- Grab a trusty pair of tweezers and gently lift open those three ZIF connectors located at the back of the screen. You've got this!
Tools Used
Step 18


- Grab your blunt nose tweezers and gently lift up the edges of the black foil that’s sticking the cable to the back of the screen. Go slow—no need to rush greatness!
Tools Used
Step 19


- Gently raise the watch body and slide a spudger under the display flex cable to free up any stubborn adhesive still hanging on.
Tools Used
Step 20


Keep a gentle grip on the display flex cable as you work—don’t just tug on the body of the watch, or you might end up with a snapped display cable. Slow and steady wins this round!
- Gently wiggle those display flex cables out of their ZIF connectors—don’t rush, they like to take their time.
- Now, split the watch assembly and the screen. Look at that! You’re making it look easy.
Step 21


- Here's how to lay down fresh adhesive before putting your watch back together.
- Moisten a Q-tip with a bit of high-grade isopropyl alcohol (over 99%), or grab a cleaning pad, and gently wipe away any stubborn leftover adhesive from the top of the Force Touch gasket.
Step 22

- Grab your tweezers and gently peel the blue-film replacement adhesive off the backing paper.
Tools Used
Step 23


- Grab that replacement adhesive and hold it at a fun angle to slide it over the display cable with ease!
- Next, place the replacement adhesive right on top of the Force Touch gasket like a pro.
Step 24

- To put your Apple Watch Series 4 back together, just reverse the steps above and reconnect the screen and battery.
- When you’re ready to say goodbye to any old parts, drop them off at an R2 or e-Stewards certified recycler.
- Stuck? Something not working quite right? Head over to our Answers community for some troubleshooting magic—or if you hit a wall, you can always schedule a repair.