Apple Watch Series 4 Teardown
Duration: 45 minutes
Steps: 15 Steps
Get ready to uncover the secrets of the latest Apple Watch! We're talking trainer, doctor, guardian, and more - all in one sleek device. Let's dive into this teardown and find out what makes it so lovable. For your daily dose of repair and teardown fun, follow us for regular updates: two to three Instagram posts a day, Facebook at lunch, a weekly newsletter, and the occasional tweet to satisfy your cravings.
Step 1

The Series 4 comes in two handy sizes: 40 mm with a display resolution of 324 × 394 pixels, and 44 mm featuring a sharper 368 × 448 pixel screen. Choose the size that fits your style and needs, and get ready to make your device like new.
- Ready to give your Apple Watch a boost? First, get comfortable and gather your tools—nothing fancy, just the essentials. Carefully lift the display from the body, taking care not to damage the delicate forces inside. The Retina OLED display with Force Touch is a beauty, so handle it gently. If you need a hand or run into a tricky part, remember, you can always schedule a repair. Once you've got it open, you'll see the custom-designed Apple 64-bit dual-core S4 SiP, along with the optional LTE and built-in GPS/GLONASS/Galileo/QZSS, NFC, Wi-Fi, and Bluetooth 5.0 modules—these are the brains and connectivity champs. Don't forget the upgraded sensors—accelerometer, gyroscope, heart sensors, microphone, speaker, barometric altimeter, and ambient light sensor—that keep your watch smart and responsive. If water's trying to be a party crasher, no worries—it's rated to resist up to 50 meters. And with WatchOS 5, your device is all set to stay current and perform smoothly. Proceed step-by-step, and if you hit a snag, help is just a click away.
Step 2


We can't wait to dive into the details of that ECG hardware!
- Let's take a closer look at these black squares - they may seem similar at first glance, but our experts at Salvation Repair have used X-rays to reveal some pretty significant differences on the inside.
- Right off the bat, our subject (on the left) has some notable differences from the Series 3 (on the right) - check out the brand new optical sensor on the back, surrounded by a shiny new electrode.
- Some other key differences from the older 42 mm version include rounded corners that give it a more modern squircle look, and a side button that's now flush with the case.
- When viewed from the side, the Series 4 is noticeably slimmer than the Series 3 - a whole 0.7 mm thinner, to be exact. However, it's actually a bit thicker than the original.
- It looks like a lot of that slimming down is thanks to the new display. If you're not feeling confident in your repair skills, don't worry - you can always schedule a repair with our expert technicians at Salvation Repair.
Step 3


- Let's take a closer look at the sleek, all-ceramic-and-sapphire-crystal back details:
- Inside one of the wrist band slots, you'll find a new model number, A2008—and in the other, the serial number, plus a small air vent hole for pressure equalization. Pretty cool, right?
- Time to get familiar with your Watch - check out the Series 4 features!
- Now, let's run through the impressive list of features, including water resistance up to 50 meters. Nice!
- Take a peek at the optical sensor, conveniently located right in the middle this time.
- And check out that big ring-shaped electrical sensor—that's a new addition!
Step 4


- Swing the iOpener back and forth to gently warm up and loosen the adhesive—your wristbands might sink in, but that's just part of the process. Say, 'Hey Siri, turn on DND,' to keep distractions at bay while you work. Carefully slide your blade under the edge of the shiny display—no need to rush, just stay steady and gentle to avoid any cracks. This method has been tried and true a few times now, though we’re still figuring out how much water resistance gets restored afterward. Once the cables are safely disconnected—you'll see the familiar trio of connectors—we can take a closer look at the display to assess what’s next.
Tools Used

Step 5


Chances are, the touch controller and NFC chips are tucked away right here. We'll let you know once we've got a confirmed sighting.
- Now that the screen is free, you can really appreciate those sleek new curves. The display packs in more pixels and stretches out to those smooth, rounded corners—think of it as the smartwatch’s answer to the iPhone X’s style.
- Flip it over and you’ll spot three chip packages: two are locked up tight, and the third is hiding its secrets under a shiny metal shield.
- The 44 mm version’s display now takes up a roomy 977 sq mm, up from the 740 sq mm on the older 42 mm Series 3. That’s a lot more screen for your buck.
- And for the 40 mm model, the display covers 759 sq mm, compared to just 563 sq mm on the previous 38 mm model. More screen, more fun!
Step 6


- On our way to the battery, we run into the tri-point screws—looks like Apple’s got a new favorite, and pentalobe is old news.
- We think we’ve disconnected the battery, but surprise! The battery’s still holding on, thanks to its flex cable. So, what did we just unplug?
- The battery flex cable has moved since the Series 3 days—it's now tucked underneath the battery and above the main board. Once you disconnect that, you’re good to go. Time to pop the battery out!
- Whatever that first connector was, it probably wasn’t too crucial... right?
Step 7


Here's a lightweight power pack, labeled A2059, with a capacity of 1.113 Wh (that's about 291.8 mAh at 3.81 V). Perfect for keeping your device energized and ready to go. If you need a hand with replacing or handling it, just schedule a repair.
- Here’s the built-in battery that’s keeping your Watch going—no winding necessary!
- Now, time to crunch the numbers on volume. A 0.7 mm thinner body but 2 mm taller? Let’s do some quick math…
- …And it looks like that’s just enough to power the battery for a solid 18 hours of runtime!
- Or it could be 1.12 Wh, depending on which part of the battery you're measuring from.
- In any case, that’s a drop of about 17% in capacity compared to the 1.34 Wh battery of the 42 mm Series 3 (though still more than the 1.07 Wh of the 38 mm model from our latest teardown).
Step 8


- After navigating the battery connector's tricky placement, we're ready to tackle the Force Touch gasket's new location.
- The flex connector has moved to the opposite corner and now features stacked twin cables, making it a more streamlined process.
- The Taptic engine looks similar to what we've seen before, but with a slightly more compact design. Let's take a closer look to understand how it works.
Step 9


Even the smaller engine packs a punch in this compact device—it takes up a good chunk of space that could have been used for a bigger battery. Apple clearly loves their tactile feedback!
- Meet the Taptic Engine—the gadget in charge of all the buzz and shakes. It’s officially called an electromagnetic oscillating linear actuator, but that sounds way less cool.
- This version is sleeker than its ancestors, trading bulk for extra length. Think long and lean, rather than short and stocky.
- Not every phone on the block uses this setup, especially if it’s running Android.
Step 10
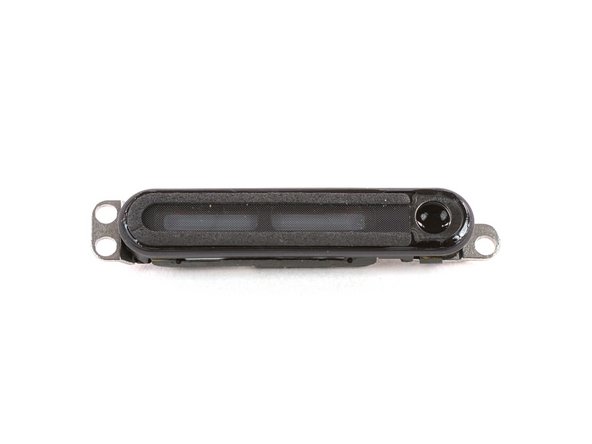

That little black "eye" next to the speaker might just be a barometric sensor, making clever use of the speaker grille's connection to the outside world. Gone are the days of needing a clunky hole in the chassis like in Series 3, which is a win for the design folks everywhere!
- Next, carefully remove the new noisemaker—it's claimed to be 50% louder, possibly making it a bit more challenging, but hey, progress! Now that the microphone has shifted closer to the digital crown, the speaker has some extra room to boost its volume. A silicone gasket keeps the speaker sealed, helping it push out water and keep things dry, just like last year's version. Update: Turns out there's a tiny tunnel from the air vent we saw in Step 3, passing through the chassis right into the sensor's path. That means it probably doesn't need extra help from the speaker grille, but it's still likely that the barometer benefits from it. If you need help, you can always schedule a repair.
Step 11


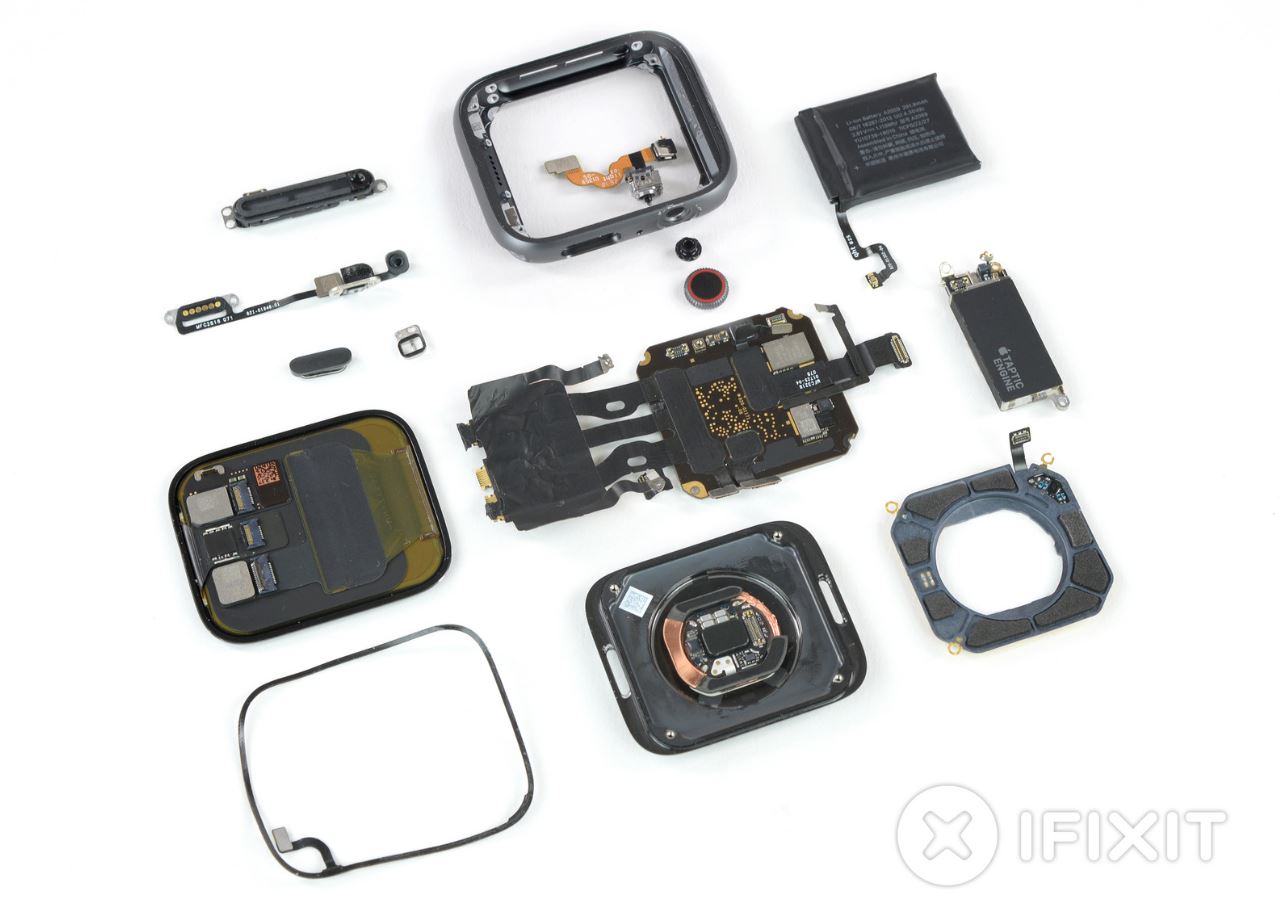
- Now we're down to the main event: the custom Apple S4 system-in-package.
- Great news—the S4 is just held in with screws, so it lifts out nice and easy. This is a big upgrade from the super-sticky SiPs Apple used to use.
- True to form, the package is wrapped in a tough resin shell, so it keeps most of its inner workings a mystery. But at least the radio frequency parts are still somewhat visible:
- Avago AFEM-8087 (most likely the front-end module)
- OU JQ
- YY MEH ECE (pretty sure this is a Bosch part—probably the upgraded accelerometer + gyro combo)
- Avago E827 I2033 0836
- ST Microelectronics ST33G1M2 32-bit MCU with ARM SecurCore SC300—this is the same eSIM chip you'll find in the previous Apple Watch and the iPhone XS line.
Step 12


- Let's dive in and take a closer look. As we attempt to remove the heart sensor array, the entire bottom part comes off. It turns out that accessing the device through the bottom case is indeed a viable option.
- We've spotted a magnet in the middle, which is used to hold the device in place on the charger, as well as the charging coil itself and some new silicon components.
- Under the S4 package, we've found a neat array of black pads. These might be used for heat dissipation, or perhaps they're just there to keep things comfortable and stress-free.
- The model numbers we've found are A88 AY10 and 18206 00D5.
- If you're feeling stuck or need some extra help, don't worry - our team at Salvation Repair is here to assist you. You can always schedule a repair if you need a hand.
Step 13


The Apple Watch works its magic as a Lead I ECG, which means it measures the electrical signals between your right and left arms. The first electrode is cozy on the back of the Watch, snug against your wrist. The second electrode? That's the crown, which you hold with the fingers of your opposite hand. Easy peasy!
- This shiny little donut isn’t just a snack—it's probably a sleek antenna, skipping the old-school brackets and gaskets you might remember from the past.
- And here’s the star of the show: new electrical heart sensors (ECG) that work alongside the optical ones, giving your device a full picture of your heart’s rhythm.
- These electrodes pick up tiny electrical signals as your heart beats, and the device processes that info to analyze your heart’s activity.
Step 14


- Time to explore that second electrode—the shiny new digital crown. We’ll remove some parts and quickly uncover the interesting bits. Grab your magnifying glass — we’re diving into micro-land. Inside, the golden cylinder shows tiny micro scratches, which help an optical encoder (the little black box on the ribbon cable) keep track of its rotation. The springy bracket behind the cylinder likely carries the electrical signal from your finger through to the watch, completing the ECG circuit. And that tiny switch behind the spring acts as the mechanical button for the crown. Plus, there's a gasket on the outside of the crown shaft to keep out dust and water. If you need help, you can always schedule a repair.
Step 15

- The first Apple Watch was a game-changer at launch, but let's be real, the updates have been pretty minor each year—until now.
- If this watch isn't getting your heart racing, maybe it's time for an epic double iPhone teardown?
- A huge shoutout to Creative Electron for their support! Now, there's just one thing left. Let’s get that drumroll going...
- Unlike the first Watch, which was a bit of a glue-fest, the Series 4 is designed with a lot more thought behind it.
- Apple enthusiast John Gruber likened this to the design leap we saw with the iPhone 4, and we might even stretch it to call it an iPhone 5: a device that really knows what it wants and aims to look just as sleek inside as it does outside.