
Apple Watch Series 5 Battery Replacement
Duration: 45 minutes
Steps: 13 Steps
Before you dive in, let your battery drain below 25% to avoid any accidental sparks.
Grab some fresh adhesive for putting things back together—your device will thank you later!
Ready to give your Apple Watch Series 5 a new lease on life with a fresh battery? This guide walks you through swapping out the battery—cellular/LTE and GPS-only versions are pretty much the same. If your battery looks a bit puffy, take it slow and be careful. For extra safety, run your battery down below 25% before you start. That way, if anything goes sideways, you’ll have peace of mind. Heads up: opening the watch could put the force touch gasket at risk, and if it gets damaged or the cable is cut, you’ll need to swap it out as well. Don’t forget some new adhesive for putting everything back together. If you ever feel in over your head, you can always schedule a repair with us at Salvation Repair.
Step 1


- Before diving into the repair, make sure to take your watch off the charger and shut it down to keep things safe and smooth.
- If your touchscreen is acting up and you can't turn off the watch normally, no worries—use this alternate method to power it down and get ready to fix it.
Step 2


Keep those fingers safe and sound! Make sure they’re nowhere near the knife. If you’re feeling a bit unsure, throw on a sturdy glove—think leather shop or gardening style!
Take it easy with the pressure! Too much might just make that knife slip and lead to an unwanted cut or even damage your watch.
Don’t forget your eye protection! Glass or knife bits can go flying, and we want to keep those peepers intact.
Pop on or off that watch band as you need to get a better grip and tackle those repairs like a pro!
- Since the gap between the screen and watch body is super slim, you'll need a sharp blade to get in there. Before you start, check out these tips and warnings so you don't run into trouble.
Step 3

If the display adhesive is being stubborn, give your iOpener a quick reheat and try again. Repeat this a few times and you'll get there!
- Grab an iOpener, or get creative with a hair dryer or heat gun, and gently warm up the face of the watch to help loosen that stubborn display adhesive.
- Keep the heat pad or tool on the watch for at least two minutes to really warm up the screen and soften the glue holding it in place—this makes the next steps way easier.
Tools Used

Step 4


Be gentle with the knife—just 1/16th of an inch (about 2 mm)—to keep that force touch sensor happy and undamaged.
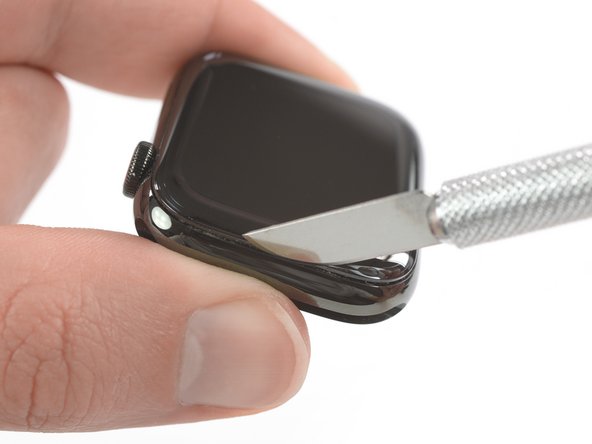
- Slip the tip of your curved blade into the small gap between the screen and the outer shell. Start on the short side near the digital crown.
- Press the blade straight down into the gap with a bit of oomph.
- Once the blade is in, give it a gentle twist to pop the display open just a bit.
Step 5


Hold up! Don’t pry the display all the way open or try to take it off just yet.
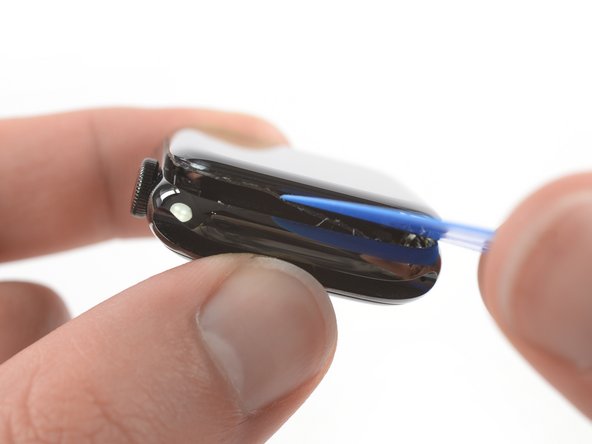
- Start by creating a small opening with the curved blade, then take it out and slip the thinner edge of an opening tool into that gap.
- Gently push the opening tool into the space, using your thumb as a pivot point to lift the display just a bit more. If you need a hand, remember you can always schedule a repair.
Step 6

Hey there! To keep that Force Touch gasket happy, gently pry around the edge of the display. If it decides to split or the layers get separated while you're lifting, don’t worry—you’ll just need a fresh gasket to keep things running smoothly.
And a quick tip: make sure your opening pick doesn’t dive deeper than 1/16th of an inch (~2 mm). We want to avoid any accidental damage to the other components inside!
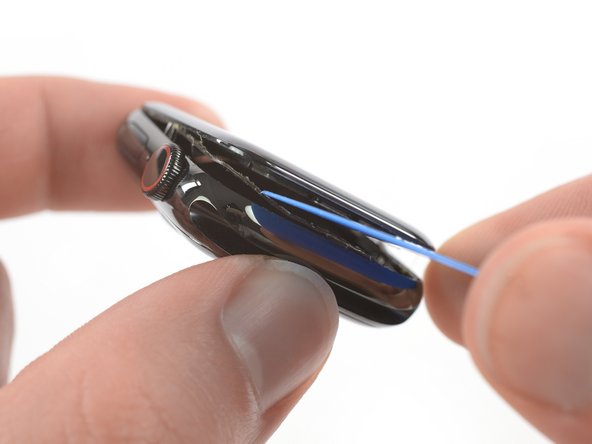
- Looks like the force touch sensor might be giving a little too much love to the display frame rather than the watch's body. No worries! Just slide an opening pick under the display and gently coax the Force Touch gasket away from the display.
- Now, take that pick and glide it around the display like a pro to break up the adhesive keeping the Force Touch gasket and display together. You're doing great!
Step 7


Be careful not to stress out the display cables when you're folding the screen back. Keep it chill and avoid any extra tension!
- Gently pry the display open - think of it as opening a book, and be careful not to apply too much pressure.
Step 8


A standard opening pick does the trick for the 44 mm version of the Apple Watch Series 5. But if you're rocking the 40 mm version and find yourself a bit tight on space, feel free to get creative and trim your opening pick with some scissors!
- Gently lift the screen to create enough room to reach the battery.
- Slip an opening pick between the battery and the Taptic Engine to loosen it up.
Step 9


Be super careful not to mess with those display cables, especially the force touch cable hiding out by the battery corner during the prying adventure!
Remember, no poking or squishing the battery! If it gets damaged, it could go boom or catch fire, and that's not the kind of excitement we want!
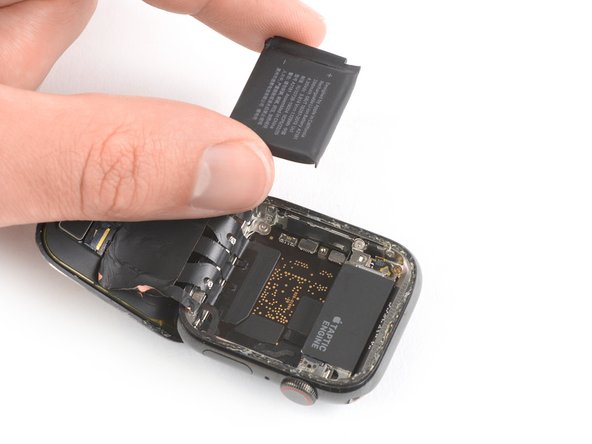
Hold off on fully removing the battery for now; it's still hanging out with the watch assembly.
The battery adhesive is on the softer side, but if the battery is being stubborn, try placing a heated iOpener on the back of the watch for a couple of minutes. This helps loosen things up and makes removal way easier.
- Gently glide that opening pick along the battery's edge to loosen up the adhesive.
- With a steady hand, apply consistent pressure to carefully lift the battery, making sure to separate it from the sticky stuff holding it to the mainboard.
Tools Used
Step 10

- Gently tilt the battery up to about a 75-degree angle—think of it like giving your battery a little stretch.
- Take out the tiny 1.1 mm Y000 screw. Don’t lose it; it’s a sneaky one!
Step 11


- Grab a trusty pair of tweezers and gently lift away the metal plate covering the battery connector. Just a light touch does the trick—no need to force it. If you want a pro to handle the tricky bits, you can always schedule a repair.
Tools Used

Step 12


- Grab the flat end of your trusty spudger and gently lift up to disconnect that battery flex cable like a pro!
Tools Used

Step 13

- If you can, power up your device and give your repair a test drive before sealing things up with adhesive.
- Make sure to secure that new battery with pre-cut adhesive or some trusty double-sided tape. Place the adhesive where the old stuff used to be, not directly on the battery. Give that new battery a good press to make it snug!
- Time to put your device back together! Just follow these steps in reverse. Don’t forget to clean the areas with isopropyl alcohol (>90%) and apply fresh adhesive where needed.
- For the best performance, calibrate your newly installed battery once you're all done.
- Got some e-waste? Be a hero and take it to an R2 or e-Stewards certified recycler.
- If things didn't go quite as planned, don't sweat it! Try some basic troubleshooting, or if you're stuck, feel free to reach out for help from our community.
Reinstalling a battery that's been through the wringer or looks a bit off? That's a no-go, my friend! It's not just a bad idea; it's a safety risk waiting to happen. Let's keep it safe and sound! If you need help, you can always schedule a repair.
If you're bringing back your trusty old battery during reassembly, feel free to stick with the existing adhesive to keep it snug and secure. If the old adhesive isn't up to the task, just grab some high isopropyl alcohol and a lint-free cloth to clean it off. Then, you can use a little piece of double-sided tape like Tesa 61395, or a tiny dab of liquid adhesive like E6000 to hold everything in place. You've got this!

