Apple Watch Series 6 Screen Replacement
Duration: 45 minutes
Steps: 26 Steps
Ready to swap out that cracked or glitchy Apple Watch Series 6 display? You’re in the right place. Heads up: changing the screen might mess with Apple Pay, so it’s smart to wipe your account info before you dig in, then set it up fresh once the new display’s in place. This guide walks you through the cellular/LTE model, but the GPS-only version is pretty much the same routine. Don’t forget—you’ll need new adhesive to stick everything back together when you’re done.
Step 1


Touchscreen totally busted and can’t shut down your watch? No worries—here’s a slick workaround to power it off without the usual tap-dance.
- First things first, make sure to pop your watch off the charger and power it down. Let's keep things safe while we dive into repairs!
Step 2


Keep those fingers safe and sound! Make sure they're far away from the knife. If you're feeling a bit unsure, throw on a sturdy glove, like a leather shop glove or a gardening glove, just to be extra cautious.
Watch out for that pressure! Too much might make the knife slip and could lead to some unexpected cuts or even damage your watch. So, take it easy!
Protect those peepers! That knife or glass could break, sending tiny pieces flying. So, grab some eye protection to keep yourself safe.
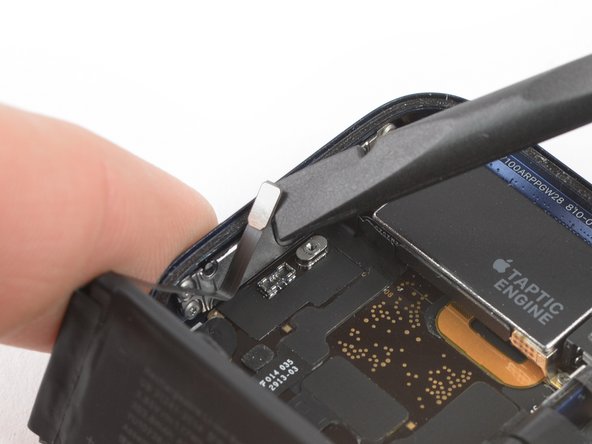
Pop off or snap on the watch band to make things easier while you work your magic on those repairs.
- Since the space between the screen and the watch body is super slim, you’ll need a sharp blade to get in there. Check out these warnings before you dive in—your hands (and the watch) will thank you.
Step 3

You might need to rewarm the iOpener and go through this step a few times until the display adhesive gets nice and soft. Keep at it—patience pays off!
- Grab an iOpener, or if you're feeling adventurous, a hair dryer or heat gun will do the trick—just warm up the face of the watch to loosen that stubborn display adhesive.
- Keep the heat source on the watch for at least two minutes. This will give the screen a warm hug, softening the adhesive and making your next move much easier.
Tools Used

Step 4


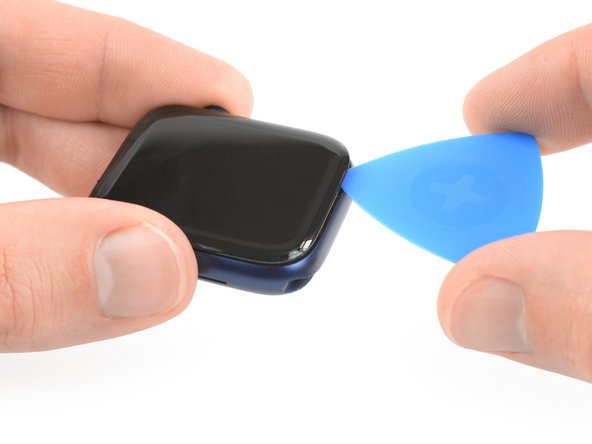
- Slide the curved blade’s tip into the skinny crease between the screen and the case—think of it as the tiny doorway to tech freedom. Begin on the short edge opposite the digital crown for the smoothest entry.
- Give the blade a confident straight push—no tap dancing, just a solid downward nudge.
- Once the blade has RSVP’d to the party, gently tilt it to coax the display open just a crack and let the fun begin.
Step 5


- Slide your trusty opening pick into the gap you just opened—like you’re sneaking into a VIP lounge.
- Glide the pick along the short edge, slicing the adhesive with the smooth confidence of a butter knife on toast.
Step 6


- Glide the opening pick around the corner and down the long edge opposite the watch crown—you're slicing through display adhesive like a pro chef tackling a stubborn cheese. Keep it smooth and steady!
Step 7


- Swing that opening pick around the corner near the crown and slice through the last bit of sticky stuff holding down the short edge of your watch.
Step 8


Be careful not to remove the display just yet, it's still hooked up to the watch assembly.
When slicing near the watch crown, take it easy and avoid cutting too close to the display cables. If you need to slice near the crown, keep your pick shallow, about 1/16th of an inch (~2 mm) deep, to avoid any damage.
- Set the watch on a flat surface and gently slide an opening pick to cut through any stubborn adhesive holding it together.
- Carefully slide an opening pick underneath the opposite edge of the display near the watch crown.
- Twist the opening pick slightly to loosen the display from the watch case, making it easier to lift off.
Step 9


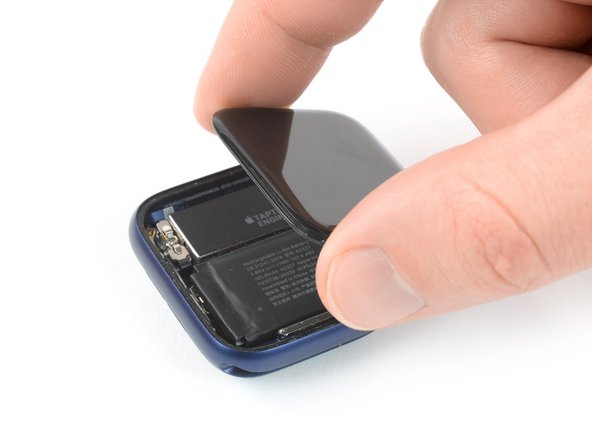
Watch out for those display cables—don't give them a workout when you swing the display over to the side.
- Gently lift up the display and guide it over toward the crown like you're opening a tiny, high-tech book.
- Flip the display up so it stands at attention—think of it as saluting your repair skills.
Step 10

- Grab an iOpener (or if you’re feeling adventurous, a hair dryer or heat gun) and gently warm up the back of the watch to soften that stubborn battery glue. Let the heat hang out there for at least two minutes.
Tools Used
Step 11

From here on out, the 40 mm watch plays by its own rules compared to the 44 mm sibling—just a tiny plot twist to keep things interesting.
- For a 40 mm watch battery replacement, just follow along with this step.
- If you're swapping out the battery on a 44 mm watch, keep it going with this step.
Step 12


Be careful not to poke or squish the battery! If it gets damaged, it could catch fire or even explode—so handle with care!
Hold off on fully removing the battery just yet. It’s still connected to the watch assembly, so take it easy for now.
Here’s the deal! These four simple steps will show you how to safely remove the battery from your 40 mm Apple Watch Series 6.
- Gently wiggle an opening pick into the gap between the battery and the Taptic Engine - it's like coaxing a stubborn sticker off a surface!
- Now, use some steady pressure to carefully pry the battery away from the adhesive holding it to the mainboard. Take your time, and it'll come loose in no time!
Step 13


The battery flex cable has enough length to let you position the battery outside the watch case, but be gentle—avoid putting stress on the cable when lifting the battery out of its spot.
- Gently lift and swing the battery out of its slot, like you're giving it a friendly nudge to say goodbye. Take your time—patience makes the job smoother. If you need a hand, remember you can always schedule a repair.
Step 14

- Grab the flat end of your spudger and gently pop up the battery connector. It’s like giving your device a little high-five before you get down to business.
Tools Used

Step 15

Avoid reinstalling a battery that's damaged or misshapen—it's a serious safety risk and not something you want to mess with.
Sticking with your old battery? You can use the leftover adhesive to keep it in place when putting things back together.
Or, for a fresh start, wipe away the old sticky stuff with some high-strength isopropyl alcohol and a lint-free cloth. Then slap on a little double-sided tape like Tesa 61395, or a dab of liquid glue like E6000, and you’re good to go.
- Take the battery out—give it a gentle lift and set it aside for now.
Step 16


- Begin by gently inserting an opening pick between the battery and the Taptic Engine. Apply steady, consistent pressure to carefully lift the battery, easing it away from the adhesive that holds it to the mainboard. Take your time—patience is key! If you need help, you can always schedule a repair.
Be careful not to poke or bend the battery—damaged batteries can ignite or blow up, and nobody wants that! Also, hold off on trying to remove the battery completely just yet; it’s still connected to the watch assembly. Take it slow and safe. If you need help, you can always schedule a repair.
Ready to swap out the battery on your 44 mm Apple Watch Series 6? Follow these four straightforward steps—think of it as a mini adventure in tech repair. If at any point you need a hand, remember you can always schedule a repair. Let's get that battery replaced and your watch back to full power!
Step 17


The battery flex cable is like a comfy leash—long enough to let the battery chill outside the case, but don’t yank it like you’re starting a lawnmower.
- Gently lift the battery out of its nook and set it aside, opposite the Taptic Engine. Keep it careful but confident—you're on your way to fixing this device. If you need help along the way, you can always schedule a repair.
Step 18

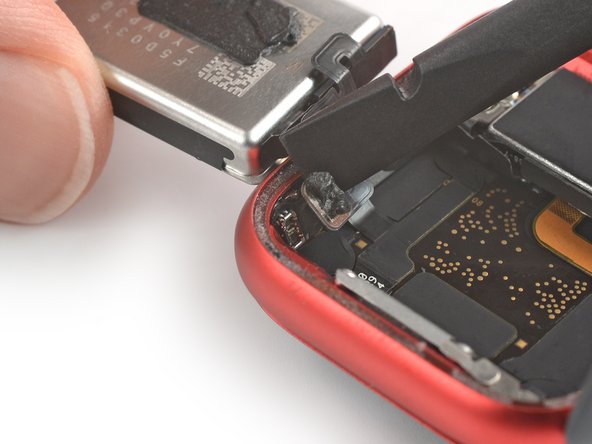
- Take off that single 1.2 mm-long tri point Y000 screw with a smile! It's your first step to making things better.
Step 19
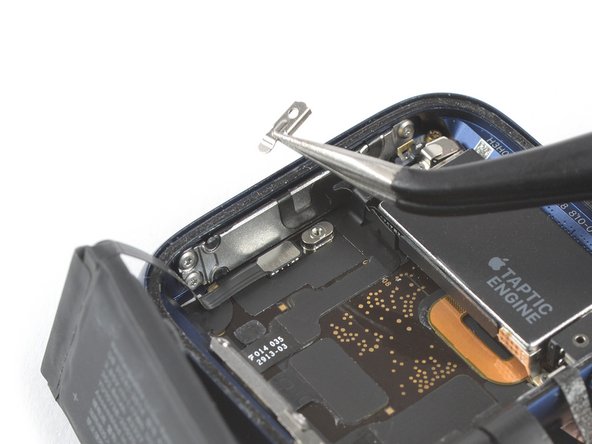

- Grab a trusty pair of tweezers and gently lift off the metal shield that’s keeping the battery connector cozy. You've got this!
Tools Used

Step 20

- Grab the flat end of a spudger and gently pry up to disconnect the battery connector. Keep things steady and patient—no rush. If you need a hand, you can always schedule a repair.
Tools Used
Step 21

Be careful not to reinstall a battery that's damaged or deformed - it's a safety hazard waiting to happen!
To make reassembly a breeze, you can reuse the existing adhesive to secure your old battery - easy peasy!
Or, if you're starting fresh, remove the old adhesive with some high-concentration isopropyl alcohol and a lint-free cloth. Then, grab a small piece of double-sided tape, like Tesa 61395, or a dab of liquid adhesive, such as E6000, to get the job done.
- Take out the battery and give your device a quick breather.
Step 22

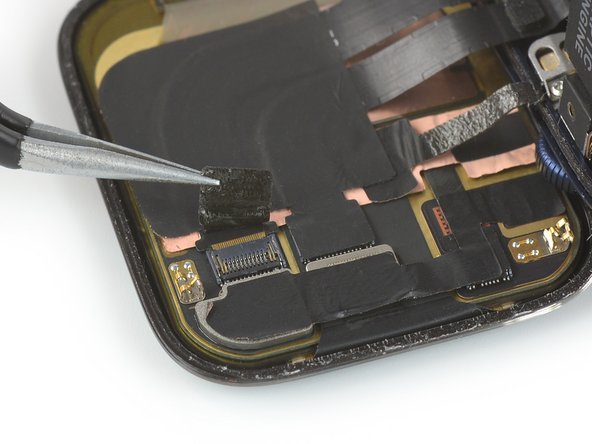
- Grab your trusty tweezers and gently lift off that black protective tape from both display connectors. You've got this!
Tools Used
Step 23

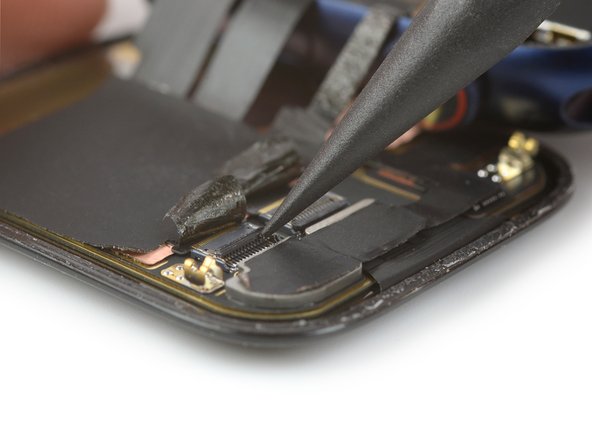
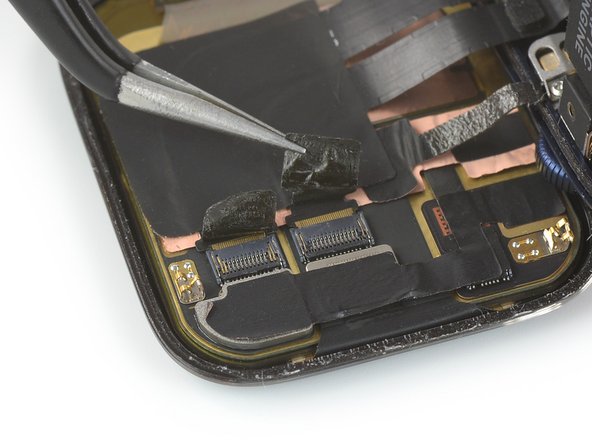
- Grab your trusty spudger (pointy end up!) and gently lift the locking bars on both ZIF connectors to free those display cables.
Tools Used
Step 24


- Grab a pair of tweezers and gently lift the edges of the sticker that holds the display and grounding cable to the back of the screen. Take your time—peel carefully to avoid any damage.
Tools Used
Step 25

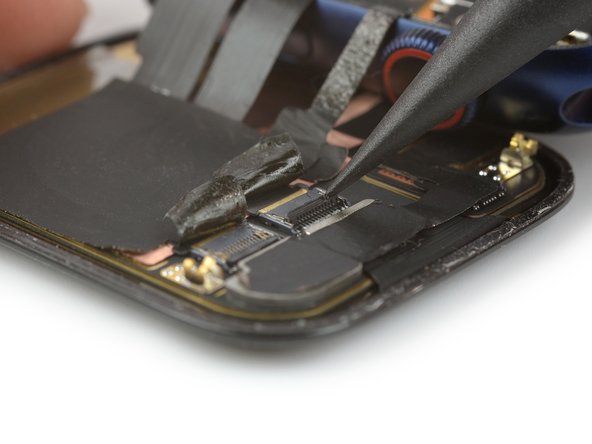
Hold off on yanking the watch assembly—pulling too hard might snap that delicate display cable. Take it easy to keep everything in one piece. If you need help, you can always schedule a repair.
- Grab your trusty tweezers and gently wiggle both display cables out of their ZIF connectors—like you’re unplugging a tiny disco party.
Tools Used
Step 26

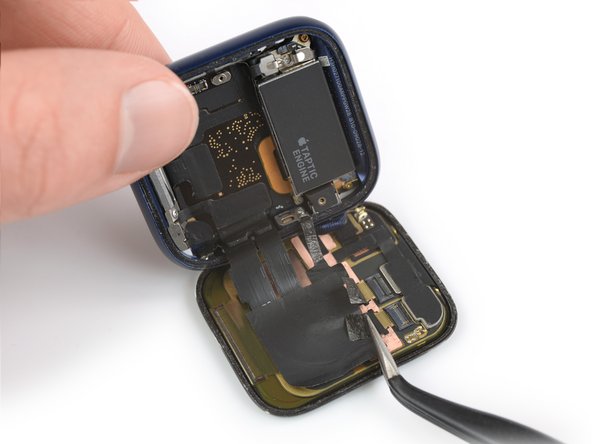
- Gently separate the watch assembly from the screen. Take your time, no rush—this part is important, so handle it with care.
Success!
To wrap things up, simply follow the steps in reverse to get that Apple Watch Series 6 back together, reattaching the screen and battery.
Before adding fresh adhesive, take a Q-tip with a dab of high isopropyl alcohol (90% or more) or a cleaning pad to gently wipe off any leftover sticky residue from the edges of the watch case and screen.
Don't forget to responsibly dispose of your old e-waste by taking it to an R2 or e-Stewards certified recycler.
If the repair didn't go as planned, no worries! You can always schedule a repair and we'll help you out.
