Apple Watch Series 7 Screen Replacement
Duration: 45 minutes
Steps: 28 Steps
Get ready to tackle that broken, cracked, or faulty screen on your Apple Watch Series 7! Good news: you can swap out the screen without having to disconnect the battery first. Just a heads up, though—doing so might mess with the NFC antenna in some cases. If you’re feeling a bit unsure about this repair, we suggest checking out the battery guide first, then jumping back to Step 23 here. Keep in mind that replacing the display could throw a wrench in your Apple Pay setup. To keep things smooth, it’s a smart move to wipe your Apple Pay info before diving into the replacement, and then re-enter it once the new display is in place. This guide walks you through the process for the cellular/LTE version of the watch, but don’t worry, the GPS-only version is pretty similar. Oh, and don’t forget to grab some replacement adhesive to stick everything back together when you’re done!
Step 1


If your touchscreen is acting up and you can’t turn off the watch, don’t worry! Just follow this alternative method to power it down.
– Alright, first things first—pop your watch off the charger and power it down before diving into the repair. Trust me, your watch will thank you!
Step 2


Keep your fingers safe and sound by steering clear of the knife. If you’re feeling uncertain, throw on a sturdy glove—like a leather shop glove or a gardening glove—for that extra layer of protection.
Watch out for too much pressure! You don’t want that knife to go rogue and slip, which could lead to an ouch moment or even damage your watch.
Don’t forget the eye protection! Those knives and glass can be a bit unpredictable, and you don’t want to be dodging flying pieces.
Feel free to pop on or take off the watch band as needed to give yourself a bit more wiggle room while tackling those repairs!
– The space between the screen and the watch body is pretty tight, so you’ll need a sharp blade to gently separate them. Take your time and read through the following warnings carefully before diving in.
Step 3

You can use a hair dryer, heat gun, or hot plate, but watch out for overheating your watch—the display and internal battery can be a bit sensitive to heat. Keep it cool, folks!
You might need to give the iOpener a little extra love and reheat it a few times until that display adhesive gets nice and soft. Patience is key!
– Grab an iOpener and give your screen some love—heat it up for a solid two minutes to loosen that pesky adhesive holding everything together.


Step 4


Heads up! Those sharp tools can be a little too friendly with your watch housing if you’re not careful. Take a deep breath, slow and steady wins the race, and avoid any unwanted scratches!
Just a little reminder: the Apple Watch Series 7 has a plastic bezel on the back. If you plan on reusing that display, go easy on the pressure with your knife. Too much force might just say ‘see ya’ to the bezel and the screen!
– Slide a curved blade into the slim gap where the screen meets the outer case. Start on the short side of the display, opposite the digital crown—it’s like finding the sweet spot!
– Gently twist the blade to nudge the display open just a little, creating a cool new gap between the screen and the watch body. Easy peasy, you’ve got this!
Step 5


– Slide an opening pick into the gap you’ve created.
– Gently glide the opening pick along the short edge of the watch to cut through the adhesive.
Step 6


– Gently glide the opening pick around the corner and along the long edge opposite the watch crown to carefully cut through the display adhesive.
Step 7


Hold off on yanking the display—it’s still tethered to the watch assembly!
– Gently glide the opening pick around the corner to cut through the last bit of adhesive on the short edge of the watch, right next to the crown. You’re doing great!
Step 8


Take it easy when folding the display to the side—let’s not put any unnecessary strain on those delicate display cables!
– Gently lift the display and give it a little tug towards the watch crown.
– Swing the display open like a pro, positioning it upwards.
Step 9

You can also use a hair dryer, heat gun, or hot plate, but don’t get carried away with the heat—remember, your watch’s display and internal battery are not fans of overheating.
– Grab your trusty iOpener and give it some love on the back of your Apple Watch! Let it hang out there for at least two minutes to help loosen the adhesive that’s holding the battery in place. You’re doing great!
Step 10

At this stage, the battery removal process for the 41 mm watch takes a slightly different path than the 45 mm version.
– Got a 41 mm watch and ready to swap the battery? Awesome! Keep cruising with this step.
– Rocking a 45 mm watch instead? No worries—just stay on track with this step and you’ll be golden.
Step 11


Be careful not to poke or bend the battery with your tool—poking or bending it could release nasty chemicals or even start a fire. Yikes!
Hold off on yanking that battery out just yet—it’s still tethered to the motherboard, so let’s play it cool for now.
Get ready to power down! The following six steps will walk you through the process of safely removing the battery from your 41 mm Apple Watch Series 7. Don’t worry, it’s easier than you think!
– Slide an opening pick between the watch body and the long side of the battery to get things started.
– Keep it steady and apply smooth pressure as you gently lift the battery out—slow and steady wins the race!
Step 12


The battery flex cable is long enough to let you gently place the battery outside the watch housing. Just remember to be kind to that cable—no sharp bends or strains when lifting the battery out of its cozy spot!
– Gently lift the battery out of its cozy spot and set it down next to the watch body, ready for the next step!
Step 13


Just peel the tape off the connector gently—no need to go all the way! If you do, you might find yourself replacing it during reassembly. Keep it cool and take your time!
– Grab your trusty tweezers and carefully lift off that black protective tape from the ZIF connector like a pro.
Tools Used


Step 15


As you put everything back together, remember to gently push that cable all the way into the ZIF connector before you lock it in place. Don’t forget to reapply the black tape over the connector to keep the battery cable snug, or swap it out for a fresh one. If you skip this step, the battery cable might just decide to take a little vacation, and then your watch will be as lifeless as a rock!
– Grab a trusty pair of tweezers and gently wiggle the battery cable out of its cozy home in the battery ZIF connector. You’ve got this!
Tools Used
Step 16

Hey, if your battery is looking bent outta shape or busted, ditch it! Using a damaged battery is a no-go for safety. Swap it out for a fresh new one instead.
– Take out the battery, folks! It’s time for a little makeover.
– If you’re planning to give your old battery a second chance, feel free to use the existing adhesive to stick it back in during reassembly. It’s like recycling, but for batteries!
– For a shiny new battery, grab some pre-cut adhesive or double-sided tape. Just a tip: apply that fresh adhesive where the old stuff used to be inside the device, not directly on the battery. Give that new battery a snug hug and press it down firmly. It’s all about that perfect fit!
Step 17


Be careful not to puncture or bend the battery with your tool – it’s a safety thing! A damaged battery can leak chemicals or even cause a fire, and we want you to stay safe.
Don’t try to remove the battery just yet, it’s still connected to the motherboard. Let’s take it one step at a time.
Get ready to tackle the task of removing the battery from your 45 mm Apple Watch Series 7 with these six simple steps!
– Slide an opening pick between the watch body and the long edge of the battery, just like slipping a note under a door.
– Apply gentle, steady pressure and carefully lift the battery up, as if you’re coaxing a shy puppy out from under the couch.
Step 18


The battery flex cable is plenty long to let you move the battery outside the watch housing. Just be gentle, champ—don’t twist or crease the cable too sharply when lifting the battery from its nook.
– Gently lift the battery out of its cozy spot and set it down next to the watch body, ready for the next step!
Step 19

– Grab your trusty Tri-Point Y000 screwdriver and unscrew that 1.1 mm teeny-weeny little marvel holding the battery connector bracket in place. You’ve got this!
Step 20


– Grab a pair of tweezers and gently remove the battery connector bracket. Easy does it!
Tools Used
Step 21


– Grab your trusty spudger and pop that battery connector loose by gently prying it straight up from its socket. Easy peasy!
Tools Used
Step 22

If your battery looks a bit wonky or has taken a hit, it’s time to say goodbye! Using a damaged battery can be a real safety no-no. Grab a fresh one and keep your device happy and healthy!
– Pop out that battery like a pro.
– When putting things back together, grab some fresh adhesive (if needed) after giving the relevant spots a good clean with some isopropyl alcohol (make sure it’s over 90%).
– Reusing the old battery? No problem. Just stick with the existing adhesive to keep it snug during reassembly.
– If you’re replacing the battery, use pre-cut adhesive or double-sided tape to secure it in place. Here’s the trick: apply the adhesive to the spots where the old stuff was—not directly onto the battery. Then, press that new battery firmly into its cozy new home.
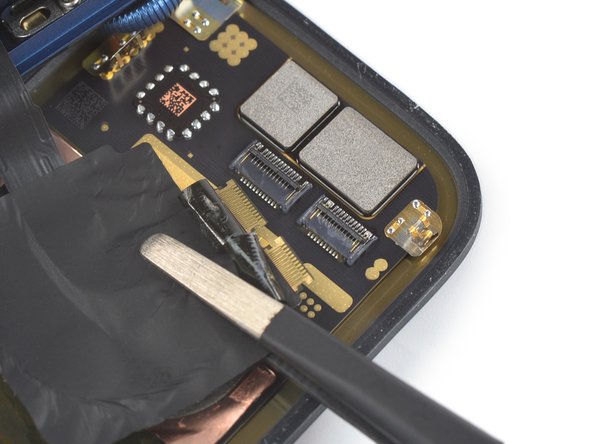
Step 23

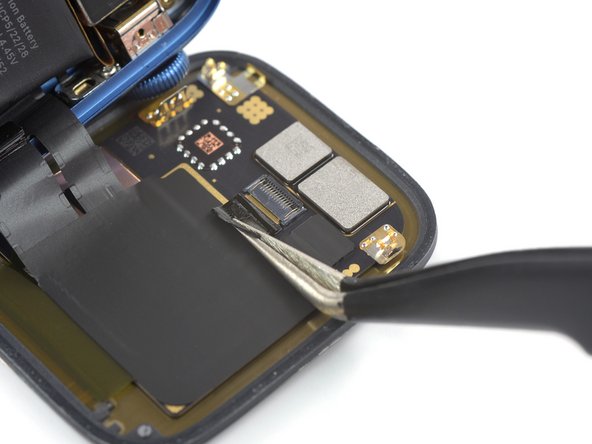
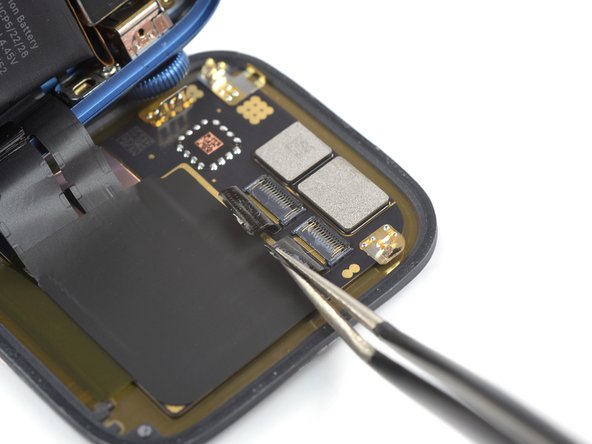
– Grab your trusty tweezers and gently lift that black protective tape off the display connectors—no rush, take it slow and steady!
– When piecing it all back together, it’s the perfect moment to fire up your watch and make sure everything’s running smoothly. Once you’re sure it’s good to go, don’t forget to fully power it down before diving back into the assembly process.
Tools Used

Step 25

You can use a hair dryer, heat gun, or hot plate, but tread carefully—nobody wants to turn their phone into a baked potato! Both the display and internal battery are sensitive to heat, so keep it cool while you work your magic.
– Grab your iOpener, give it a quick warm-up, and park it on the screen for a solid two minutes—time to relax while it works its magic loosening up that protective tape on the back.
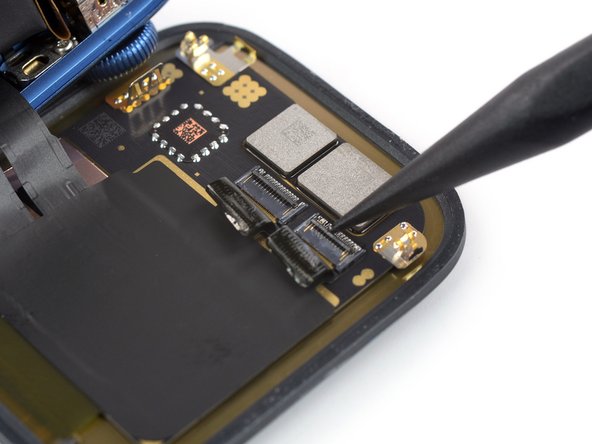
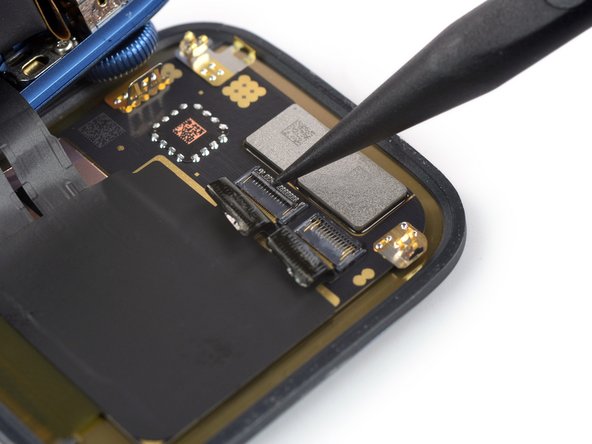
Step 26


– Gently slide an opening pick under the display cables to free them from the screen. You’ve got this!
Step 27

Gently does it! Yanking on the watch assembly might lead to display cables getting stretched or snapped.
If the old tape is still in good shape, feel free to give it another go during reassembly. If it’s looking a bit worn out, don’t hesitate to swap it out for some fresh tape. You’ve got this!
– Grab your trusty tweezers and gently wiggle those display cables out of the ZIF connectors. Easy does it—you’re practically a tech wizard now!
Tools Used
Step 28

– Give your device a test drive before sealing it up with new adhesive—make sure everything’s running smoothly!
– Reassembling is a breeze—just follow these steps backwards to put everything back together.
– Got old parts or e-waste? Do the planet a favor and recycle them responsibly with an R2 or e-Stewards certified recycler.
– Feeling a little stuck? Don’t sweat it—our Answers community is here to help you troubleshoot and get back on track.
– If things feel a bit overwhelming, you can always schedule a repair and let us lend a hand!
Success!