ASUS Transformer Book Flip TP500LA Trackpad Replacement
Duration: 45 minutes
Steps: 7 Steps
If your cursor is acting up or your mouse clicks are going unnoticed, it might be time to give the trackpad a fresh start. Follow these straightforward steps to replace the trackpad in the ASUS Transformer Book Flip TP500LA and get back to smooth sailing. If you need help along the way, you can always schedule a repair.
Step 1


– Start by grabbing your Phillips #0 screwdriver and removing the ten 10 mm screws that keep the back case of your computer snugly in place. Don’t forget to keep those screws safe—once they’ve been removed, you’ll be one step closer to accessing the internals. If you need help along the way, you can always schedule a repair.
Step 2


– Grab your trusty spudger and gently slide it between the back case and the computer. Easy does it.
– Take your time and carefully work your way around the edges, popping those clips loose to fully separate the back case from the computer.
– Now, with a little finesse, gently lift off the back case. You’re almost there!
Tools Used

Step 3


– Take your trusty heavy-duty spudger and slip it under the ZIF connector. Flip that tiny retaining flap up—easy does it!
– Now, grab the blue tab and give it a gentle pull to slide the ribbon out.
Tools Used
Step 4


– First, take out those three 5 mm Phillips #0 screws. They’ll come out pretty easily with the right tool!
– Next, remove the single 6 mm Phillips #0 screw. It’s the last one standing, so make sure to get it out without a hitch!
Step 5


The black 8-pin connector on the motherboard is a bit delicate, so take your time and be extra cautious when removing the white 8-pin connector. A little care goes a long way!
– Grab your trusty heavy-duty spudger and gently wiggle the white 8-pin connector away from the motherboard—no need to muscle it, just a little nudge does the trick.
– Carefully pull the connector out, keeping it smooth and steady. Patience pays off here!
Tools Used
Step 6

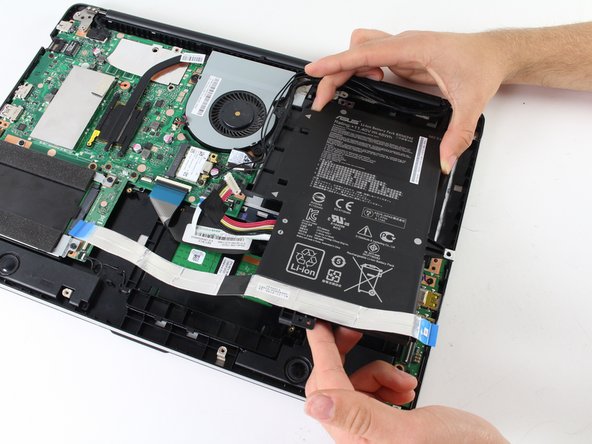
– Grab your trusty blue plastic opening tool and gently pop those three black wires loose from the battery.
– Now, with the wires out of the way, just slide the battery right out of the computer—easy does it!
Step 7


The trackpad is tucked into a small cutout on the side opposite the fan—think of it as a cozy little nook waiting to be uncovered. Just a gentle lift and a bit of patience will reveal it. If you need a hand along the way, you can always schedule a repair.
– Gently lift the trackpad out of the device. Take your time – it’s not in a rush, and neither should you be.
Success!
