Asus ZenFone 2 Antenna Replacement Guide: DIY Step-by-Step
Duration: 45 minutes
Steps: 5 Steps
Alright, let’s dive into this! Swapping out the antenna is a piece of cake! All you need is a JIS size 00 screwdriver and a trusty prying tool. Just a heads-up: those screws at the back of your phone are tiny, so it’s a great idea to use a mat or some paper to keep them all in one spot and avoid any runaway screws!
Step 1
– Gently use your fingernail to pop the back cover off from the indicated spot. As you work your fingernail under the back cover, slide it around the phone’s edges until the cover comes off.
Step 2
The black screw near the camera and flash is hiding under a sticker, but don’t let that fool you—it’s a breeze to remove. Just press your screwdriver through the sticker like it’s not even there, and you’re golden!
– Let’s get started! Use your trusty JIS size 00 screwdriver to whip out those thirteen black screws and that one shiny silver screw from the back of your phone.
– Just a heads up, the black screws are 2.8 mm long, while our silver friend measures in at 5.5 mm.
Step 3
Peeling back those parts of the inner backing that are stuck with double-sided tape? Easy peasy! Just slide that plastic opening tool underneath and gently lift. Voila!
– Grab a plastic opening tool and gently coax off the inner phone backing. You’ve got this!
Step 4
Keep an eye on where the speaker unit is sitting so you can pop it back in its cozy home when it’s time to reassemble!
– Wowee, look at you go! It’s time to free the speakeasy! Carefully remove the back panel, and your phone will reveal the secret speaker hiding in the back. Once you’ve cleared that, the speaker should shimmy on out into your awaiting hands. Now that was boss, wasn’t it?
Step 5
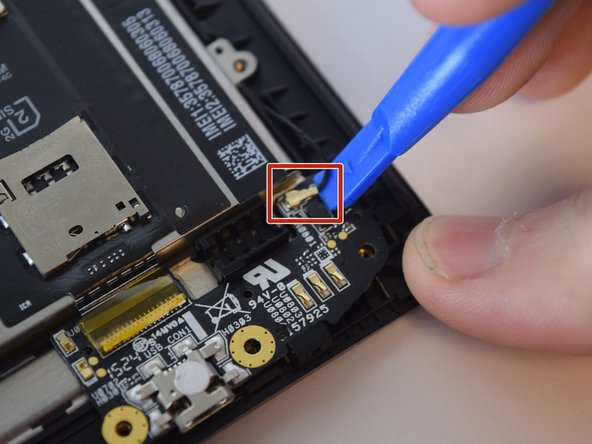
Those antenna connections are delicate, like a ballerina’s toes! Be sure to lift them gently from underneath the cable, just like the picture shows.
– Put your device back together by retracing your steps—just like a treasure hunt, but with less sand.
– Change your mind? No problem! Just hit cancel and move on.
– If things get tricky, remember, you can always schedule a repair.
Success!


