Asus ZenFone 2 Motherboard Replacement Guide – DIY Tutorial
Duration: 45 minutes
Steps: 15 Steps
Swapping out the motherboard isn’t a quick task, so be prepared for a bit of a time commitment. Before you dive in, make sure to disconnect the entire antenna and remove the battery. You’ve got this!
Step 1
– Let’s get that back cover off! Use your trusty fingernail to gently lift the phone’s back cover at the marked spot. Once you have a little space, slide your finger along the edges, and just like that, the cover will pop right off! If you need help, you can always schedule a repair.
Step 2
The black screw near the camera and flash is hiding under a sticker, but don’t let that fool you—it’s a breeze to remove. Just poke your screwdriver through the sticker like it’s not even there, and you’re golden. Easy peasy!
– Let’s get this party started! Grab your trusty JIS size 00 screwdriver and gently unscrew those thirteen black screws along with that lone silver screw from the back of your phone.
– Just a little detail: the black screws are 2.8 mm long—like tiny soldiers ready to serve your tech repair. The silver screw, on the other hand, is the special 5.5 mm commander, so make sure to keep them separate!
Step 3
To loosen the inner backing, which is snugly held in place by two strips of double-sided tape, simply slide the plastic opening tool underneath and give it a gentle lift. It’s easier than it sounds!
– So, you’re ready to jump into the world of phone repair? Let’s unleash your inner tech-savvy hero and start by gently prying off that phone back cover with a trusty plastic opening tool. It’s like saying ‘adventure’ to a kid, only instead of a treasure hunt, you’ll uncover the inner workings of your device. Remember, be patient and gentle – we wouldn’t want any damage to that phone of yours. If you need help, you can always schedule a repair
Step 4
Keep track of where the speaker unit goes so you can pop it back in just right when it’s time to reassemble. You’ve got this!
– Gently pop the speaker out from the back of your phone! Once you’ve removed the inner back, it should slide right out since there’s nothing holding it in place. Easy peasy!
Step 5
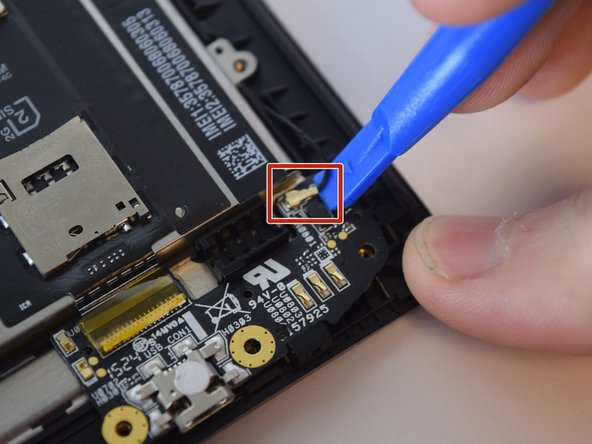
Hey, those antenna connections are delicate little things. Be sure to lift from underneath the cable, like you’re giving it a gentle hug. You’ve got this!
– Grab your trusty plastic opening tool and gently lift both ends of the antenna. Easy does it!
– With care, detach the antenna wire from the plastic keepers along the side. Make a note of where they sit—your future self will thank you when reassembling!
Step 6
– Using your handy-dandy plastic opening tool, gently lift up the yellow tab to unlock the ribbon cable connecting the battery to the circuit board. It’s like giving the battery a little high-five!
Step 7
– Grab your trusty plastic opening tool and gently wiggle it to coax the vibration motor out of its cozy little mount. Easy does it!
Step 8
– Carefully lift the circuit board out of the phone by pulling it gently from the bottom. It’s easier than it sounds; just take your time and it will pop out nicely!
Step 9
– Grab your trusty plastic opening tool and gently nudge those ribbon cables away from their connectors. No need to rush, just give them a soft pry up and they’ll be free in no time!
Step 10
Handle those delicate tabs on the left and right side of the battery with care – we don’t want them to take a vacation from their home!
Step 11
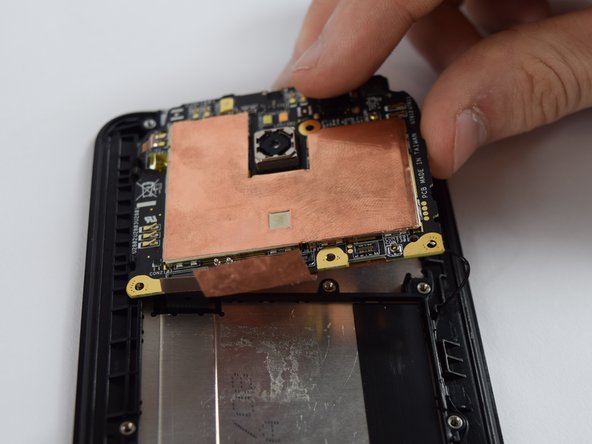
Watch out for that copper sheet! We don’t want any unintentional paper tearing here.
– Grab your trusty plastic opening tool and gently nudge the copper heat strip away from the phone’s body. Start by inserting the tool into one of the upper corners of the copper sheet and smoothly glide it along the edges. You’re doing great!
Step 12
– Grab your trusty plastic opening tool and gently disconnect the ribbon cable shown in the image. You’ve got this!
Step 13
– Grab your trusty plastic opening tool and gently slide it under the display cable on the side of the motherboard. With a little finesse, pull outward to disconnect it. Easy peasy!
Step 14
Watch out for those little black plastic retainers! They’re your best buds when it comes to securing the motherboard, so handle them with care to keep everything snug and cozy.
– Hey there! So, to free that motherboard, you’ll want to have a little fun. Look for those four black retainers, two on each magical side, and let them know it’s time to party! With a cool plastic opening tool, gently nudge it under one top corner of the motherboard, and slowly, but surely, lift upward. It’s like a fun little game of pop-the-motherboard-out! Don’t worry, you’re doing great. If you ever need help, you can always schedule a repair.
Step 15
With one side of the motherboard free from those pesky black plastic retainers, it should glide right out with ease!
– After you’ve popped out one side of the motherboard from those pesky black plastic retainers, go ahead and gently lift the entire motherboard out of your phone. You’ve got this!
Success!
