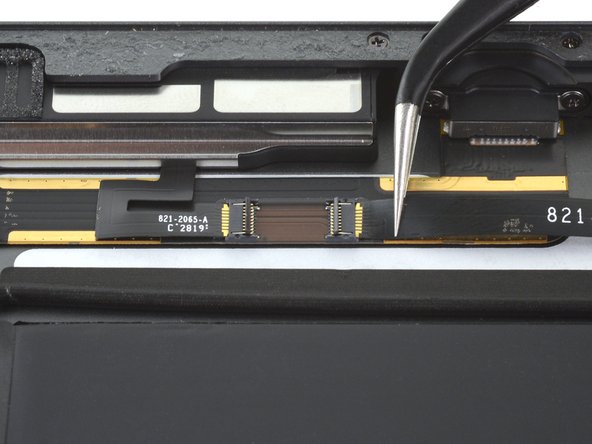
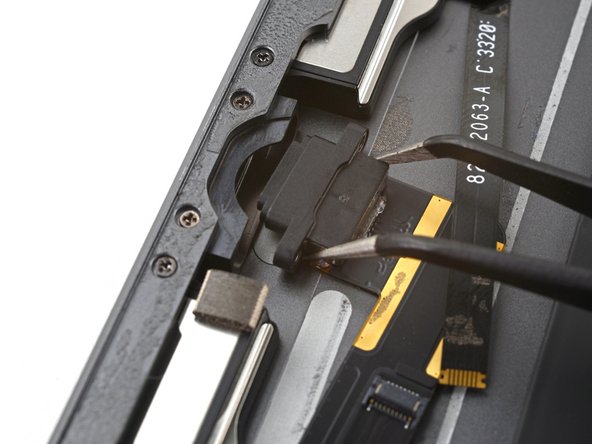
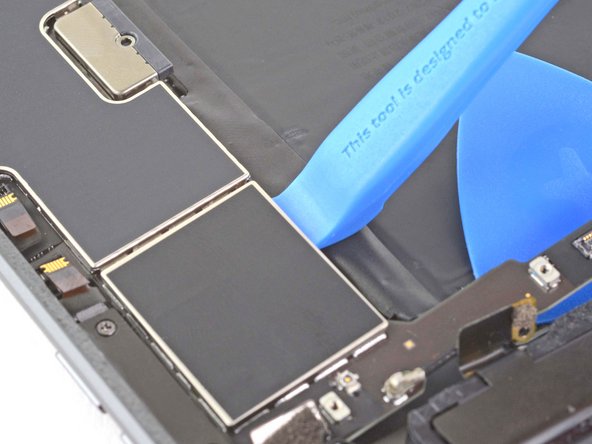
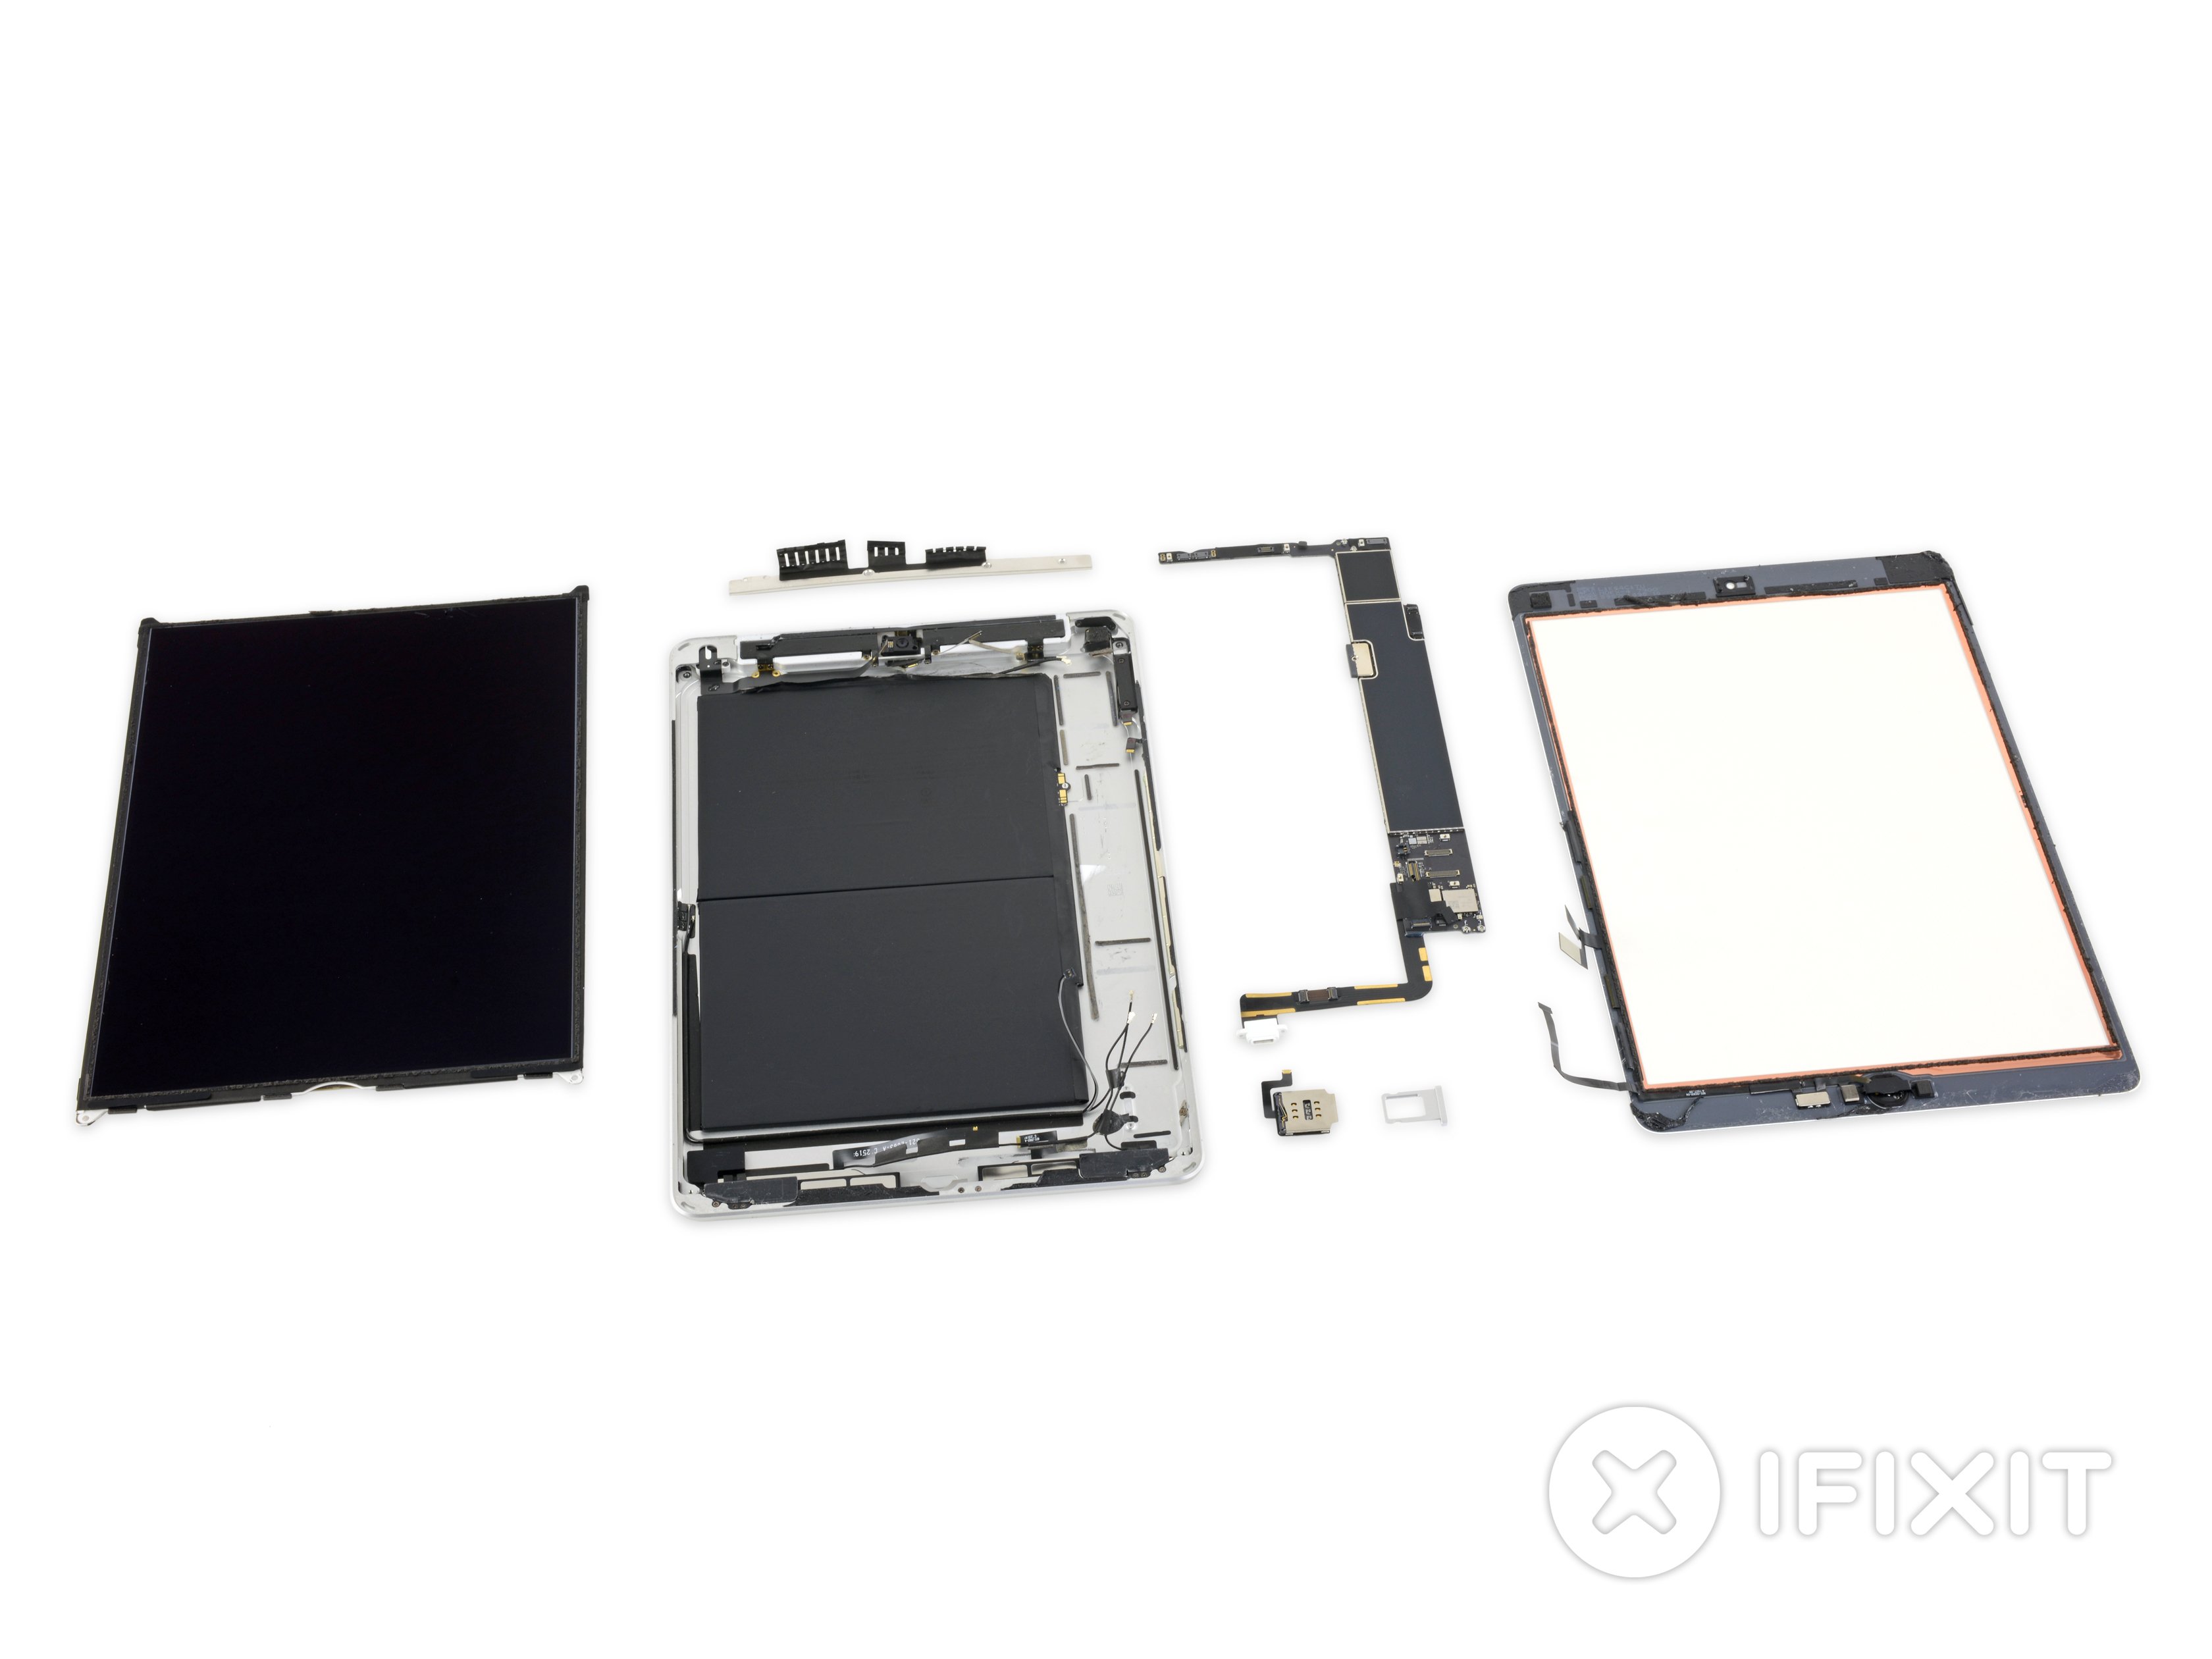
iPad 8 LTE Left Speaker Replacement

Duration: 45 minutes
Steps: 62 Steps

Follow this guide to swap out the left speaker in your iPad 8 LTE. Heads up: this is only for the LTE model—if you’ve got the Wi-Fi version, check out the alternate guide. When it comes to isolating the battery with a battery blocker, take it slow and steady; those battery contacts are fragile and can bend or break, which is a no-go. If you decide to skip isolating the battery, steer clear of metal tools unless you absolutely have to use them for screws, to avoid shorting the battery or messing up delicate circuits. Some steps here borrow from earlier models, so while there are minor differences, the overall process stays pretty much the same.

Step 1

– Warm up an iOpener and stick it on the device’s left edge for a solid two minutes to loosen things up.

Tools Used
  1. iOpeneriPad 8 LTE Left Speaker Replacement

Step 2

– As you let that adhesive take its sweet time loosening up, keep an eye out for these sensitive spots that are a bit prying-shy:

– Front camera

– Antennas

– Display cables

Step 3

– Give the blue handle a little tug backward to unlock the Anti-Clamp’s arms. It’s like a gentle pull, no force needed!

– Place something under your iPad so it stays perfectly level between the suction cups. We want this setup to be steady as a rock.

– Position the suction cups along the left edge—one at the top and one at the bottom. Make sure they’re about in the middle, but don’t stress the details.

– Keep the bottom of the Anti-Clamp secure, then press down on the top cup with a solid, steady push to create the suction. You got this!

Step 4

– Grab the blue handle and pull it forward to lock those arms in place.

– Rotate the handle clockwise a full 360 degrees, or keep going until the suction cups start to stretch out a bit.

– Keep an eye on the suction cups—they should stay perfectly aligned. If they start to drift, just loosen them a touch and straighten those arms back up.

Step 5

– Hang tight for a minute to let that adhesive chill out and create a cozy opening gap.

– If your screen isn’t warming up enough, feel free to give it a little love with a hair dryer along the left edge of the iPad.

– Slide an opening pick under the digitizer once the Anti-Clamp has made a nice gap for you.

– No need to worry about the next step—just skip it!

Step 6

– Once the screen feels comfortably warm, attach the suction handle near the left edge of the screen, as close to the edge as you can get.

– Gently lift the screen with the suction handle to open up a small gap between the digitizer and the frame.

– Slip an opening pick into that gap you just made, and start easing it between the digitizer and the frame.

Step 7

– Pop a second opening pick into the gap you just made.

– Gently slide that pick down toward the bottom-left corner to loosen up the adhesive.

– Keep the pick wedged in the bottom-left corner so the adhesive doesn’t sneak back together.

Step 8

– If the opening pick starts sticking to the adhesive, simply ‘roll’ the pick along the iPad’s side to keep separating that stubborn glue.

Step 9

– Gently slide the first opening pick towards the top-left corner of your device to break the adhesive’s grip.

– Keep that pick in place at the top-left corner to stop the adhesive from getting cozy again.

Step 10

– Warm up your trusty iOpener and give it a cozy spot on the top edge of your device for a solid two minutes. Let’s get that thing nice and toasty!

Tools Used
  1. iOpeneriPad 8 LTE Left Speaker Replacement

Step 11

– Gently work the pick around the top-left corner of your device to break the adhesive seal. Take it slow, you’ve got this!

Step 12

– Gently glide the opening pick along the top edge of your device, stopping just shy of the front camera. You’ve got this!

Step 13

– Gently pull the pick out so only the tip is left nestled between the digitizer and the frame.

– Slide the pick just above the front camera to loosen up that stubborn adhesive.

– Leave the pick resting near the right side of the front camera as you move on to the next step.

Step 14

– Pop the pick back in and slide it up towards the top-right corner of the device. This will completely separate the stubborn adhesive.

– Leave the pick in the top-right corner for now to stop the adhesive from re-sticking, giving you a breather before the next step.

Step 15

– Warm up an iOpener and place it on the right side of your device for a solid two minutes to get things nice and toasty.

Tools Used
  1. iOpeneriPad 8 LTE Left Speaker Replacement

Step 16

– Gently glide the pick around the top-right corner of your device to break free that pesky adhesive.

Step 17

– Grab a new opening pick and slide it right into the heart of the iPad’s right edge.

Step 18

– Warm up an iOpener and stick it on the bottom edge of your device for a solid two minutes to loosen things up.

Tools Used
  1. iOpeneriPad 8 LTE Left Speaker Replacement

Step 19

– Gently slide the bottom-left pick down to the bottom-left corner to loosen the adhesive.

– Keep the pick in place at the corner before moving on to the next step.

Step 20

– Pop a new opening pick into that little gap you just made at the bottom edge of your iPad.

– Gently slide the pick over the antenna, but stop just shy of the home button.

– Keep that pick hanging out to the left of the home button before you move on.

Step 21

– Slide an opening pick into that little gap you just made. You’re doing great!

– Now, gently glide the pick under the home button and towards the bottom-right corner. Just the tip should be nestled between the digitizer and the frame—you’re almost there!

Step 22

– Slide the pick in gently towards the home button to peel away that stubborn bottom adhesive. It should separate smoothly, no sweat!

– Leave the pick snugly on the right side of the home button before moving on to the next step.

Step 23

– Warm up an iOpener and stick it on the right edge of your device for a solid two minutes to get things loosened up.

Tools Used
  1. iOpeneriPad 8 LTE Left Speaker Replacement

Step 24

– Give those two opening picks a twist at the left corners of your iPad to gently lift the digitizer a bit, while waving goodbye to the last bits of adhesive. You’re doing great!

Step 25

– Gently lift the left edge of the digitizer to help loosen the adhesive along the right edge of the iPad. Keep it steady and take your time—you’ve got this!

Step 26

– While holding the digitizer steady, carefully insert an opening pick between the two display cables to gently break free the last bit of adhesive.

Step 27

– Once you’ve successfully peeled off all the sticky bits, gently flip the digitizer open like a book, and lay it down flat, parallel to the iPad.

– When you’re putting things back together, make sure to tidy up any leftover adhesive on the frame—and the digitizer if you’re reusing it—using some isopropyl alcohol. Then, swap out the old adhesive for fresh strips or pre-cut adhesive cards.

– Be cautious with the display cables during reassembly. Ensure they’re folded neatly under the LCD screen to avoid any unwanted damage.

Step 28

– Grab some tweezers or just use your fingers to peel away any tape that’s covering those pesky LCD screws. Let’s get those screws exposed and ready for action!

Tools Used
  1. TweezersiPad 8 LTE Left Speaker Replacement

Step 29

– Grab your trusty Phillips screwdriver and get ready to tackle those four 4.3 mm screws holding the LCD screen in place. You’ve got this!

Step 30

– Slide a spudger between the frame and the top-right corner of the LCD.

– Gently wiggle the spudger to loosen the adhesive without rushing.

Tools Used
  1. SpudgeriPad 8 LTE Left Speaker Replacement

Step 31

– Now, let’s tackle the top-left section of the LCD—just like we did before!

Step 32

– Gently use the flat end of a spudger to nudge the LCD out of its slot just enough so you can get a good grip with your fingers.

– Carefully flip the LCD over like turning a page in a book, lifting near the camera and rotating it over the home button side of the frame.

– Place the LCD down on a clean, soft, lint-free surface to safely access the display cables.

Tools Used
  1. SpudgeriPad 8 LTE Left Speaker Replacement

Step 33

– Grab your trusty Phillips screwdriver and carefully take out the 2.3 mm-long screw that’s holding the battery connector snugly to the logic board. You’ve got this!

Step 34

Step 35

– Carefully slide the battery blocker underneath the logic board’s battery connector, angling it about 35 degrees. Think of it like a mini-surfboard under a connector, just at a cool angle.

– Once it’s in place, leave the battery blocker where it is while you continue working. It’s your trusty sidekick now, no need to move it around!

Tools Used
  1. Battery BlockeriPad 8 LTE Left Speaker Replacement

Step 36

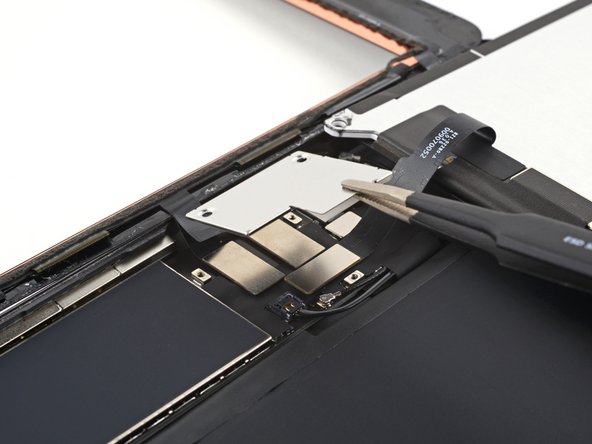
– Grab your Phillips screwdriver and carefully unscrew the three tiny 1.4 mm screws holding down the display cable bracket. Keep them safe!

Step 37

– Carefully use tweezers or your fingers to lift and remove the display cable bracket.

Tools Used
  1. TweezersiPad 8 LTE Left Speaker Replacement

Step 38

– Grab the flat end of your trusty spudger and gently pry up the LCD cable press connector to disconnect it.

– To reattach those press connectors, start by carefully aligning one side and pressing down until you hear a satisfying click, then repeat on the other side.

– Avoid pressing down on the center. If the connector’s off-kilter, the pins could bend, and that’s a one-way ticket to permanent damage.

Tools Used
  1. SpudgeriPad 8 LTE Left Speaker Replacement

Step 39

– Carefully lift the LCD off and gently lay it face down on a clean, soft surface free from any lint. Treat it like you’re placing it on a cozy bed – just a little extra care goes a long way!

Step 40

– Grab your trusty tweezers and gently peel away the tape that’s cozying up to the home button cable ZIF connector. You’re doing great!

Tools Used
  1. TweezersiPad 8 LTE Left Speaker Replacement

Step 41

– Grab a spudger, an opening tool, or even your fingernail, and gently flip up the tiny hinged locking flap on the home button cable ZIF connector.

Tools Used
  1. SpudgeriPad 8 LTE Left Speaker Replacement

Step 42

– Grab your trusty pair of tweezers and gently pull the home button ribbon cable straight out of the ZIF connector. Just a little wiggle, and it’ll pop right out. No rush, you’ve got this!

Tools Used
  1. TweezersiPad 8 LTE Left Speaker Replacement

Step 43

– Grab your trusty spudger and use the flat end to gently pry up and disconnect those two digitizer cable press connectors. You’re doing great!

Tools Used
  1. SpudgeriPad 8 LTE Left Speaker Replacement

Step 44

– Grab that trusty flat end of your spudger and gently lift up the vibration isolator nestled right below the SIM card reader. Easy peasy!

– Now, go ahead and remove the vibration isolator. You’re doing great!

Tools Used
  1. SpudgeriPad 8 LTE Left Speaker Replacement

Step 45

– Grab a pair of tweezers and carefully peel the home button cable away from the back case. Take your time, it’ll pop off smoothly!

Tools Used
  1. TweezersiPad 8 LTE Left Speaker Replacement

Step 46

– First things first, let’s get that front panel assembly off. It’s time to break free!

– If your new display is acting a little quirky with ‘ghost’ or ‘phantom’ touches, don’t fret! A simple fix is to add a thin layer of insulating tape, like Kapton (polyimide) tape, to the highlighted spots on the back of the panel. And good news! Our replacement digitizers usually come with the right insulation, so you might not need to add any tape at all.

– As you start putting things back together, make sure to clear away any leftover adhesive from the iPad. Grab some high concentration isopropyl alcohol (90% or greater) and a lint-free cloth to clean those glued areas. This step is key for ensuring the new adhesive sticks like a champ.

– Once that’s done, give your iPad a quick functionality test. Then, apply those pre-cut adhesive strips to the back of the display using our handy display adhesive application guide before sealing it all up tight.

Step 47

– Gently use the tip of a spudger, an opening tool, or even your fingernail to lift the tiny, hinged locking flap on the SIM card reader cable’s ZIF connector. Easy does it!

Tools Used
  1. SpudgeriPad 8 LTE Left Speaker Replacement

Step 48

– Grab your trusty tweezers and gently wiggle that SIM card reader cable straight out of the ZIF connector. Nice and easy!

Tools Used
  1. TweezersiPad 8 LTE Left Speaker Replacement

Step 49

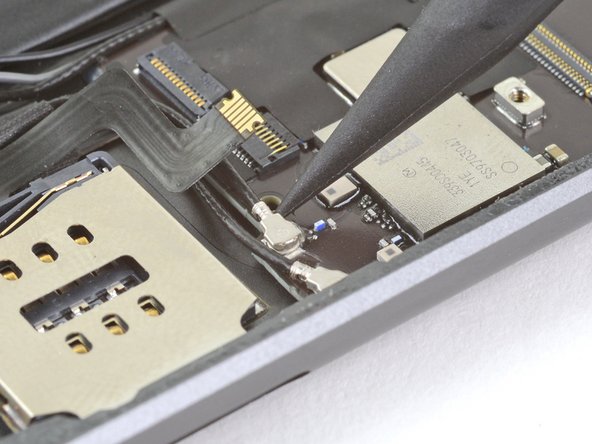
– Slide the pointed end of a spudger under the left antenna cable and gently lift it straight up to disconnect it. You’ve got this!

Tools Used
  1. SpudgeriPad 8 LTE Left Speaker Replacement

Step 50

– Lift the left antenna cable away from the back case with care.

Step 51

– Gently continue peeling the left antenna cable off the rear case, following the bottom edge of your iPad. Take it slow and steady – no need to rush here!

Step 52

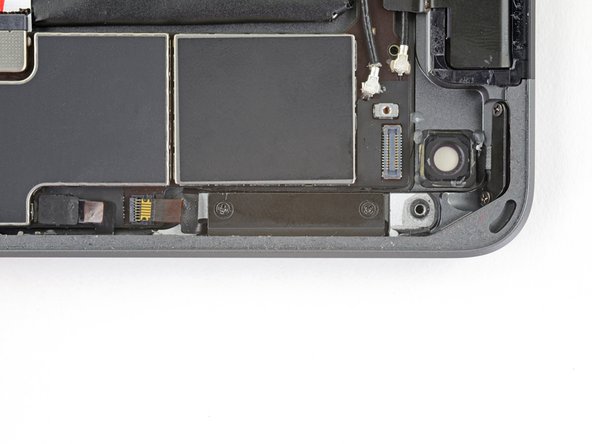
– Gently slide the flat end of your spudger under the vibration isolator in the bottom left corner of the iPad to lift it up.

– Grab your tweezers and carefully pull out the vibration isolator from its spot.

Tools Used
  1. TweezersiPad 8 LTE Left Speaker Replacement
  2. SpudgeriPad 8 LTE Left Speaker Replacement

Step 53

– Grab a Phillips screwdriver and remove the three screws holding that right antenna in place.

– One 2.3 mm screw, just chilling there, ready to come out.

– Two 1.4 mm screws, a little shorter but still ready to go.

Step 54

– Gently slide an opening pick between the speaker enclosure and the bracket. Take it slow, there’s no rush!

– Move the pick toward the charging port to cut through that sticky adhesive. Easy does it!

– Now, gently push the bracket away from the speaker to lift it off the tape underneath. A little wiggle and it should pop right off.

Step 55

– Place an opening pick gently between the antenna and speaker assembly, like you’re making room for a surprise gift!

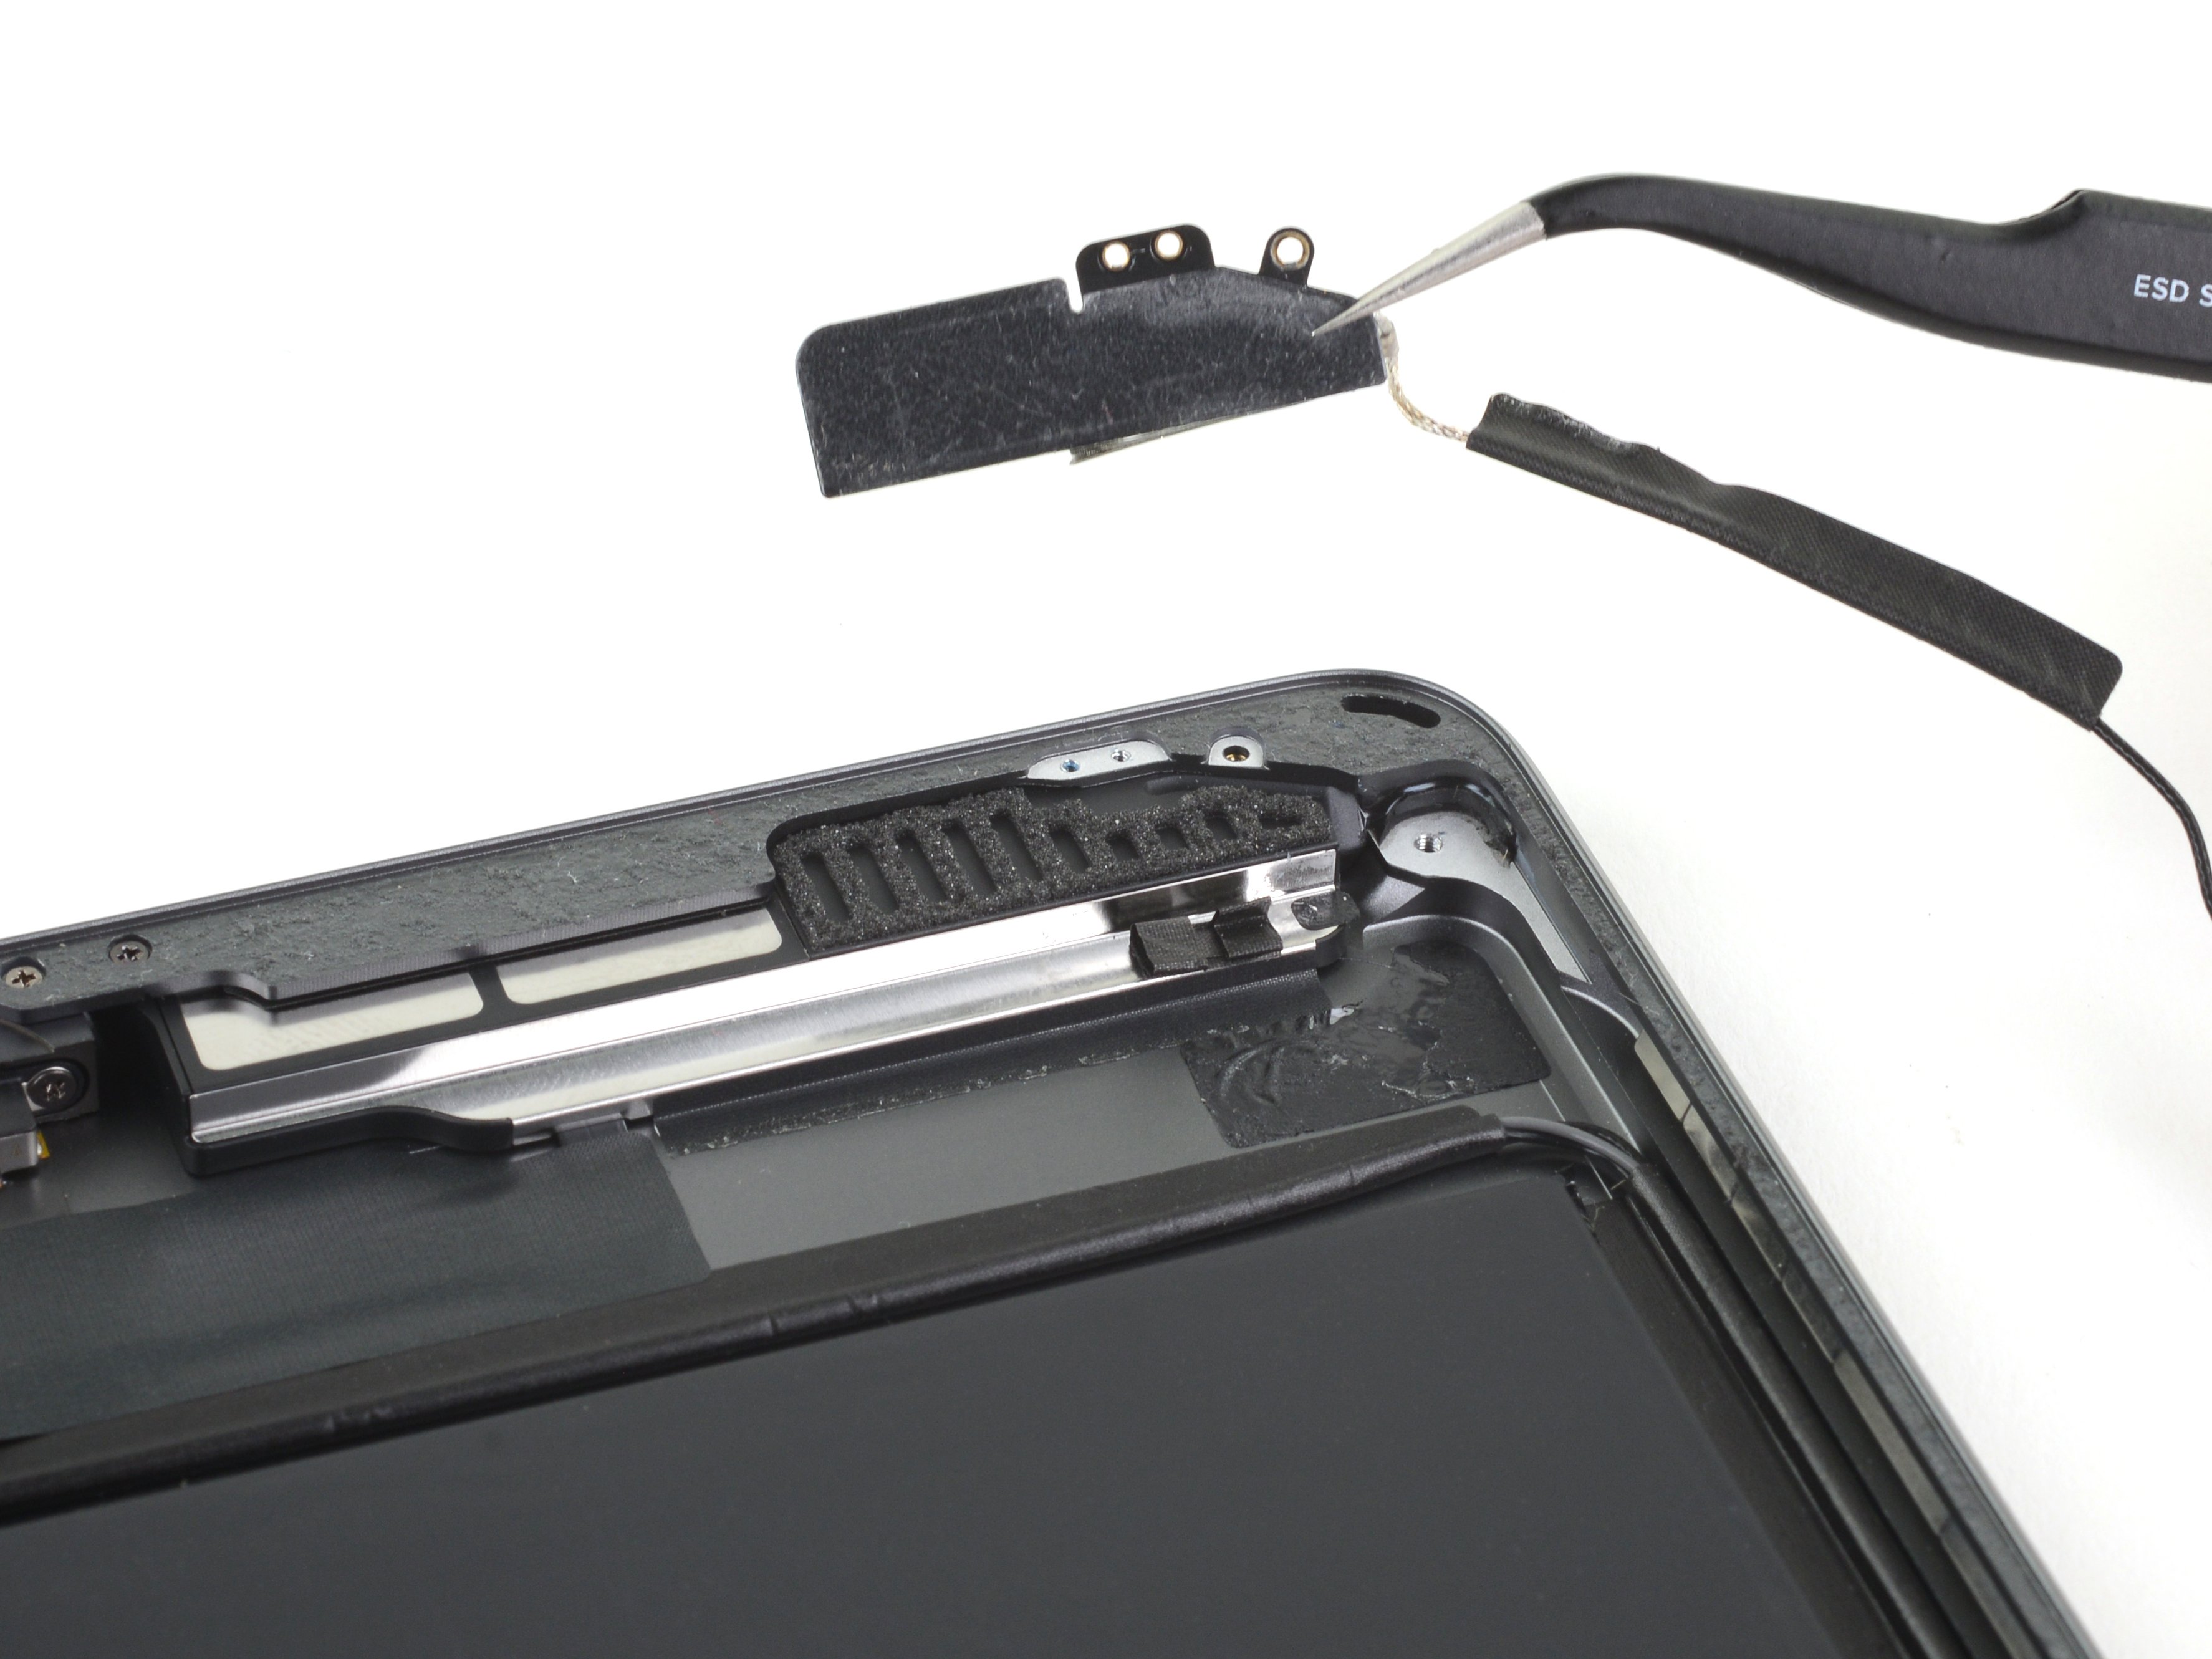
– Slide that pick under the antenna to carefully slice through the foam adhesive, just like butter.

– Use your trusty tweezers, or if you’re feeling extra, your fingers, to lift off the left antenna and give it a little wiggle out.

Tools Used
  1. TweezersiPad 8 LTE Left Speaker Replacement

Step 56

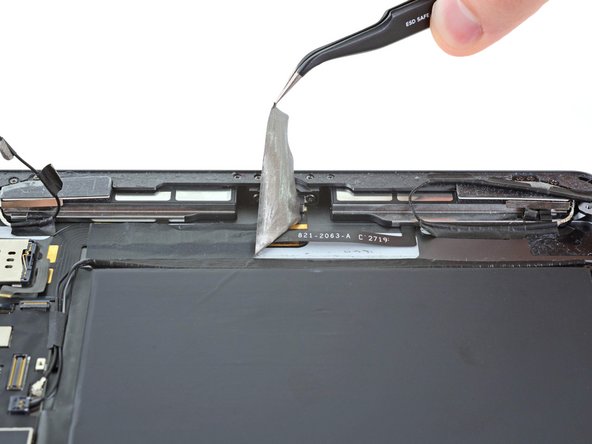
– Grab a pair of tweezers or use your trusty fingernail to carefully lift the tape that’s keeping the speaker connectors snug. It’s like unwrapping a little surprise!

Tools Used
  1. TweezersiPad 8 LTE Left Speaker Replacement

Step 57

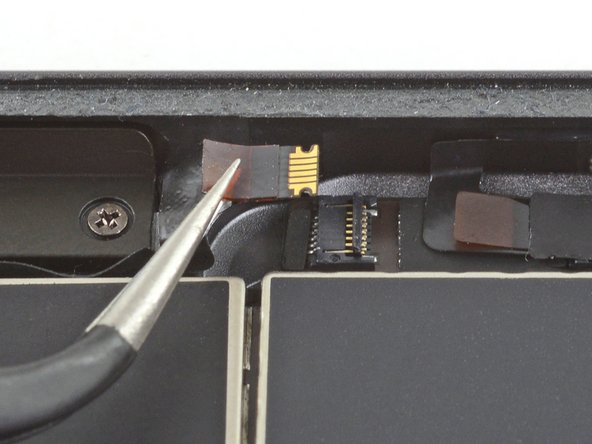
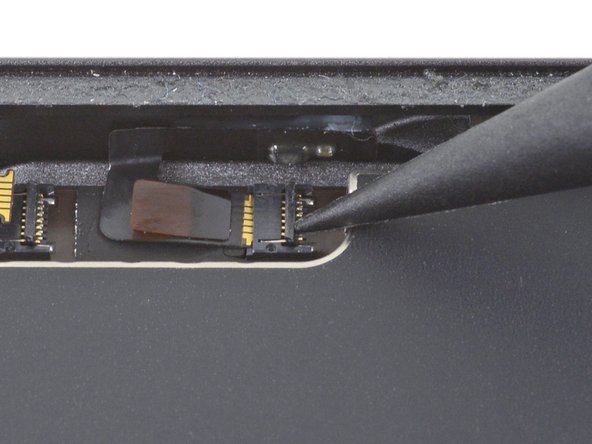
– Grab your spudger, opening tool, or just your trusty fingernail, and gently lift up the small, hinged locking flap on the left speaker cable ZIF connector. A little wiggle should do the trick!

Tools Used
  1. SpudgeriPad 8 LTE Left Speaker Replacement

Step 58

– Grab your trusty tweezers and gently wiggle the left speaker cable straight out of the ZIF connector like a pro.

Tools Used
  1. TweezersiPad 8 LTE Left Speaker Replacement

Step 59

– Grab your Phillips screwdriver and twist out the 2.3 mm screw holding the left speaker in place.

Step 60

– Gently peel off the tape that’s holding the speaker in place on the back case.

Step 61

– Slide the flat end of your spudger into the groove of the speaker housing, right by the corner of the rear case.

– Gently nudge the speaker away from the rear case.

– Carefully push the speaker out from under the little shelf on the rear case.

Tools Used
  1. SpudgeriPad 8 LTE Left Speaker Replacement

Step 62

– Carefully take out the left speaker.

Success!
Reassemble your device by following these steps in reverse order.
Got e-waste? Make sure to drop it off at an R2 or e-Stewards certified recycler.
Something not going quite as expected? No worries! Try basic troubleshooting, or head over to our iPad 8 Answers community for extra help.

iPad 8 LTE Left Bluetooth and Wi-Fi Antenna Replacement

Duration: 45 minutes
Steps: 55 Steps

Follow this guide to swap out the left Bluetooth and Wi-Fi antenna in an iPad 8 LTE model. Heads up: this is for the LTE version only—if you have the Wi-Fi model, check out the separate instructions. Take extra care when disconnecting the battery using a battery blocker, as the contacts are fragile and can be easily bent or broken, causing permanent damage. If you decide to skip isolating the battery, avoid metal tools unless absolutely necessary (like loosening screws) to prevent short circuits and protect delicate components. Some pictures might be from a slightly different model, but don’t worry, they won’t throw you off the track.

Step 1

– Warm up that iOpener and give it a cozy spot on the left edge of your device for a solid two minutes.

Tools Used
  1. iOpeneriPad 8 LTE Left Bluetooth and  Wi-Fi Antenna Replacement

Step 2

– While the adhesive is softening, keep an eye out for these tricky spots that don’t like being poked:

– Front camera

– Antennas

– Display cables

Step 3

– Gently slide the blue handle back to release the Anti-Clamp’s arms.

– Place your iPad on something stable, making sure it sits flat between the suction cups.

– Position the suction cups about halfway down the left edge—one on the top and the other on the bottom.

– Hold the Anti-Clamp steady with one hand and give a firm press on the top suction cup to create a good seal.

Step 4

– Give that blue handle a gentle tug forward to lock those arms in place.

– Now, twist that handle a full 360 degrees or until you feel those cups starting to stretch – it’s like a mini workout for your hands!

– Keep an eye on those suction cups; they should stay in perfect harmony. If they start to dance out of alignment, just loosen them a bit and guide those arms back to their happy place.

Step 5

– Hold tight for a minute to let the adhesive loosen up and create a little gap to work with.

– If the screen isn’t warming up enough, grab a hair dryer and gently heat along the left edge of the iPad to help things along.

– When the Anti-Clamp opens up a nice gap, slide an opening pick under the digitizer to start prying it open.

– Skip the next step.

Step 6

– When the screen feels warm to the touch, grab your trusty suction handle and stick it on the left edge of the screen, as close to the edge as you can get.

– Gently lift the screen with the suction handle just enough to create a tiny gap between the digitizer and the frame.

– Slide an opening pick into the little gap you’ve made between the digitizer and the frame.

Step 7

– Pop a second opening pick into that lovely gap you just made.

– Gently slide the pick over to the bottom-left corner of the device to break that adhesive seal.

– Keep that pick snugly in the bottom-left corner to ward off any adhesive re-sealing attempts!

Step 8

– If your opening pick gets stuck in the adhesive, try gently rolling it along the edge of the iPad to keep that adhesive separation moving smoothly.

Step 9

– Gently slide your first opening pick toward the top-left corner to start loosening that stubborn adhesive.

– Keep the pick wedged in the top-left corner so the adhesive doesn’t sneak back and seal itself.

Step 10

– Warm up an iOpener and place it on the top edge of your device for two minutes. Let’s get that heat working its magic!

Tools Used
  1. iOpeneriPad 8 LTE Left Bluetooth and  Wi-Fi Antenna Replacement

Step 11

– Gently twist the pick around the top-left corner to loosen that stubborn adhesive.

Step 12

– Gently slide that trusty opening pick along the top edge of your device, but hold up just before you hit the front camera. We don’t want any accidental selfies!

Step 13

– Gently pull the pick out until just the tip is nestled between the digitizer and the frame.

– Slide the pick above the front camera to break that sticky adhesive seal.

– Keep the pick close to the right side of the front camera as you move forward.

Step 14

– Slide that pick back in and glide it over to the top-right corner of your device to totally break free from the adhesive’s grip.

– Keep that pick in the top-right corner to make sure the adhesive doesn’t decide to rejoin the party.

Step 15

– Warm up that iOpener and give it a cozy two-minute hug on the right edge of your device.

Tools Used
  1. iOpeneriPad 8 LTE Left Bluetooth and  Wi-Fi Antenna Replacement

Step 16

– Gently twist the pick around the top-right corner to loosen up that stubborn adhesive like a pro.

Step 17

– Grab a fresh opening pick and slide it right into the center of the iPad’s right edge like a pro!

Step 18

– Warm up an iOpener and stick it to the bottom edge of your device for a solid two minutes to get things nice and toasty.

Tools Used
  1. iOpeneriPad 8 LTE Left Bluetooth and  Wi-Fi Antenna Replacement

Step 19

– Gently slide the bottom-left pick into the corner to break the adhesive seal. You’ve got this!

– Keep that pick snug in the corner as you gear up for the next step. You’re doing great!

Step 20

– Slide a shiny new opening pick into the little gap you just made at the bottom edge of your iPad.

– Gently glide the pick over the antenna, but hold up just shy of the home button.

– Make sure to leave the pick to the left of the home button as you move on to the next step.

Step 21

– Slide an opening pick into that little gap you just made. You’ve got this!

– Gently wiggle the pick under the home button and glide it towards the bottom-right corner. Just the tip should be nestled between the digitizer and the frame. Easy peasy!

Step 22

– Slide the pick back in and gently wiggle it toward the home button to fully loosen that stubborn bottom adhesive.

– Rest the pick just to the right of the home button before moving on to the next step.

Step 23

– Warm up your trusty iOpener and give it a cozy two-minute hug on the right edge of your device.

Tools Used
  1. iOpeneriPad 8 LTE Left Bluetooth and  Wi-Fi Antenna Replacement

Step 24

– Gently twist the two opening picks in the left corners of your iPad to lift the digitizer just a bit, helping to break free the last stubborn bits of adhesive along the way. Keep it cool and steady, you’re doing great!

Step 25

– Gently lift the left side of the digitizer to peel away more of that stubborn adhesive along the right edge of your iPad. Patience is key!

Step 26

– As you hold the digitizer steady, gently slip an opening pick between the two display cables to break free that last bit of adhesive. You’ve got this!

Step 27

– After carefully loosening all the adhesive, gently open the digitizer like a book and lay it flat next to the iPad.

– When putting everything back together, wipe away any leftover adhesive from the frame—and from the digitizer if you’re reusing it—using some isopropyl alcohol. Then, swap in fresh adhesive strips or pre-cut adhesive cards to keep things secure.

– Keep an eye on those delicate display cables as you reassemble; make sure they’re neatly folded under the LCD screen to avoid any accidental damage.

Step 28

– Grab some tweezers or just your fingers and gently peel away any tape that’s hiding those LCD screws. Let’s get to the good stuff!

Tools Used
  1. TweezersiPad 8 LTE Left Bluetooth and  Wi-Fi Antenna Replacement

Step 29

– Grab your Phillips screwdriver and unscrew the four 4.3mm screws holding the LCD screen in place. Nice and easy, just give it a twist and you’ll be good to go!

Step 30

– Slide a spudger gently between the frame and the top-right corner of the LCD.

– Carefully nudge the spudger to loosen the adhesive bit by bit.

Tools Used
  1. SpudgeriPad 8 LTE Left Bluetooth and  Wi-Fi Antenna Replacement

Step 31

– Now, let’s tackle the top-left section of the LCD just like we did before!

Step 32

– Grab that trusty spudger and gently nudge the LCD out of its snug little home just enough so you can get a good grip on it with your fingers.

– Now, flip the LCD like you’re turning a page in your favorite book, lifting it near the camera and flipping it over toward the home button end of the frame.

– Place the LCD down on a tidy, soft, lint-free surface so you can easily access those display cables.

Tools Used
  1. SpudgeriPad 8 LTE Left Bluetooth and  Wi-Fi Antenna Replacement

Step 33

– Grab your trusty Phillips screwdriver and let’s get to work! Unscrew that 2.3 mm-long screw holding the battery connector down to the logic board. You’ve got this!

Step 34

Step 35

– Gently slide the battery blocker under the logic board’s battery connector at a cool 35-degree angle, like you’re tucking in a cozy blanket.

– Keep that battery blocker in position while you tackle the rest of the repair!

Tools Used
  1. Battery BlockeriPad 8 LTE Left Bluetooth and  Wi-Fi Antenna Replacement

Step 36

– Grab your trusty Phillips screwdriver and carefully take out the three 1.4 mm screws holding down the display cable bracket. Easy does it!

Step 37

– Grab your trusty tweezers or simply use your fingers to gently lift off the display cable bracket.

Tools Used
  1. TweezersiPad 8 LTE Left Bluetooth and  Wi-Fi Antenna Replacement

Step 38

– Grab your trusty spudger and gently pry up to disconnect that LCD cable press connector. You’ve got this!

– When it’s time to re-attach those press connectors, just align it carefully and give one side a little push until you hear that satisfying click. Then, do the same for the other side!

– Just a friendly reminder: avoid pressing down in the middle. If things get a bit off-kilter, you might bend the pins, and nobody wants that kind of drama!

Tools Used
  1. SpudgeriPad 8 LTE Left Bluetooth and  Wi-Fi Antenna Replacement

Step 39

– Carefully lift off the LCD and lay it screen-side down on a clean, soft, lint-free surface to keep it safe and sound.

Step 40

– Grab some tweezers and carefully lift the tape that’s keeping the home button cable ZIF connector under wraps.

Tools Used
  1. TweezersiPad 8 LTE Left Bluetooth and  Wi-Fi Antenna Replacement

Step 41

– Grab a spudger, an opening tool, or even your fingernail and gently flip up the tiny hinged locking flap on the home button cable ZIF connector. You’ve got this!

Tools Used
  1. SpudgeriPad 8 LTE Left Bluetooth and  Wi-Fi Antenna Replacement

Step 42

– Grab your trusty tweezers and gently wiggle the home button ribbon cable free from the ZIF connector, pulling it straight out like a pro!

Tools Used
  1. TweezersiPad 8 LTE Left Bluetooth and  Wi-Fi Antenna Replacement

Step 43

– Gently slide the flat end of your spudger under the two digitizer cable press connectors to lift and unplug them without any drama.

Tools Used
  1. SpudgeriPad 8 LTE Left Bluetooth and  Wi-Fi Antenna Replacement

Step 44

– Gently slide the flat end of your spudger under the vibration isolator sitting just below the SIM card reader to lift it up.

– Take out the vibration isolator carefully.

Tools Used
  1. SpudgeriPad 8 LTE Left Bluetooth and  Wi-Fi Antenna Replacement

Step 45

– Grab a trusty pair of tweezers and gently coax the home button cable away from the rear case. You’ve got this!

Tools Used
  1. TweezersiPad 8 LTE Left Bluetooth and  Wi-Fi Antenna Replacement

Step 46

– Take off the front panel assembly carefully.

– If your new display starts acting up with ‘ghost’ or ‘phantom’ touches, don’t panic! Adding a super thin layer of insulating tape like Kapton (polyimide) tape to the marked spots on the back of the panel usually does the trick. Replacement digitizers come with this insulation already, so you probably won’t need extra tape.

– When putting everything back together, make sure to scrape off any leftover adhesive from the iPad. Then, clean those sticky spots with high-strength isopropyl alcohol (90% or above) and a lint-free cloth. This preps the surface perfectly for fresh adhesive and helps everything stick like it should.

– Give your iPad a full test to make sure all functions are working, then apply pre-cut adhesive strips to the back of the display using the display adhesive application guide before sealing it up tight.

Step 47

– Gently nudge that little hinged locking flap on the SIM card reader cable ZIF connector up with the tip of a spudger, an opening tool, or even your trusty fingernail. You’ve got this!

Tools Used
  1. SpudgeriPad 8 LTE Left Bluetooth and  Wi-Fi Antenna Replacement

Step 48

– Grab your trusty tweezers and gently wiggle that SIM card reader cable right out of the ZIF connector. Easy does it!

Tools Used
  1. TweezersiPad 8 LTE Left Bluetooth and  Wi-Fi Antenna Replacement

Step 49

– Slide the sharp end of a spudger underneath the left antenna cable and gently lift it straight up to disconnect. You’ve got this!

Tools Used
  1. SpudgeriPad 8 LTE Left Bluetooth and  Wi-Fi Antenna Replacement

Step 50

– Gently lift the left antenna cable away from the back casing, giving it a little room to breathe.

Step 51

– Keep peeling that left antenna cable off the rear case, making your way along the bottom edge of the iPad. You’re doing great!

Step 52

– Grab your spudger and gently use the flat end to lift the vibration isolator from the bottom left corner of the iPad.

– Now, carefully pick up the vibration isolator using a pair of tweezers. Easy does it!

Tools Used
  1. SpudgeriPad 8 LTE Left Bluetooth and  Wi-Fi Antenna Replacement
  2. TweezersiPad 8 LTE Left Bluetooth and  Wi-Fi Antenna Replacement

Step 53

– Grab your Phillips screwdriver and loosen the three screws holding down the right antenna.

– One screw measuring 2.3 mm long

– Two screws each 1.4 mm long

Step 54

– Gently slide an opening pick between the speaker enclosure and the bracket—easy does it!

– Work the pick toward the charging port, slicing through the adhesive like a pro.

– Nudge the bracket away from the speaker to free it from the tape hiding underneath.

Step 55

– Carefully slide an opening pick between the antenna and the speaker assembly.

– Gently glide the pick under the antenna to slice through the foam adhesive like a champ.

– Grab some tweezers or just your fingers to lift the left antenna out with ease.

Tools Used
  1. TweezersiPad 8 LTE Left Bluetooth and  Wi-Fi Antenna Replacement

Success!
Time to put everything back together! Just follow these steps in reverse order and you’ll be good to go.
Got some old tech lying around? Don’t toss it! Drop it off at an R2 or e-Stewards certified recycler.
If things didn’t go as planned, no worries! Try some basic troubleshooting or head over to the iPad 8 Answers community for a hand.
Remember, if you get stuck, you can always schedule a repair.

iPad 8 LTE LCD Replacement

Duration: 45 minutes
Steps: 46 Steps

Follow this guide to swap out the LCD on your iPad 8. Unlike the latest iPads and most smartphones, the glass digitizer and LCD on the iPad 8 are separate parts—not fused together. Heads up: this guide is for the LTE version only. For the Wi-Fi model, check here. When you disconnect the battery using a battery blocker, take it slow and steady—those battery contacts are delicate and can bend or break easily, causing permanent damage. If you decide to skip isolating the battery, be extra careful with metal tools—only use them when absolutely necessary, like to remove screws—to avoid shorting the battery or harming sensitive circuits. Some photos might show a slightly different model, but don’t worry, the steps remain the same.

Step 1

– Warm up an iOpener and stick it on the left side of your device for a solid two minutes to loosen things up.

Tools Used
  1. iOpeneriPad 8 LTE LCD Replacement

Step 2

– As you let the adhesive take its time to loosen up, keep an eye out for these delicate spots that need some extra love while prying:

– Front camera

– Antennas

– Display cables

Step 3

– Slide the blue handle backward to unlock the Anti-Clamp’s arms.

– Set something underneath your iPad so it sits evenly between the suction cups.

– Place the suction cups near the center of the left edge—one towards the top and one near the bottom.

– Keep the bottom of the Anti-Clamp steady while pressing down firmly on the top cup to create suction.

Step 4

– Slide the blue handle forward to lock those arms in place.

– Give the handle a full 360-degree clockwise spin, or keep turning until the suction cups start to stretch out.

– Keep an eye on the suction cups — they should stay lined up. If they start to wander off, just loosen them a bit and realign the arms before moving on.

Step 5

– Take a breather for about a minute to let the adhesive loosen up and create a nice little gap.

– If your screen feels more like a chilly breeze than warm toast, grab a hair dryer and gently warm up the left edge of the iPad.

– Once the Anti-Clamp has done its magic and opened up a decent gap, slide an opening pick under the digitizer.

– Go ahead and skip this step.

Step 6

– When the screen feels warm to the touch, grab your trusty suction handle and stick it right on the left edge of the screen, as close to the edge as you can get.

– Gently lift the screen using the suction handle to wiggle open a tiny gap between the digitizer and the frame.

– Slide an opening pick into that gap between the digitizer and the frame to keep things moving.

Step 7

– Pop in a second opening pick where you made that first little gap.

– Gently slide the pick towards the bottom-left corner to help loosen up that sticky adhesive.

– Leave the pick hanging out in that corner so the adhesive doesn’t sneak back together on you.

Step 8

– If your opening pick gets a bit clingy with the adhesive, just give it a smooth ‘roll’ along the iPad’s edge to keep the separation groove going.

Step 9

– Gently slide the first opening pick towards the top-left corner of the device to break through the adhesive. Go slow and steady—you’ve got this!

– Once you’re in there, leave the pick in the top-left corner. This will keep the adhesive from sealing itself back up, making your life a whole lot easier.

Step 10

– Warm up an iOpener and place it on the top edge of your device, letting it sit for a couple of minutes to soften things up.

Tools Used
  1. iOpeneriPad 8 LTE LCD Replacement

Step 11

– Gently twist the pick around the top-left corner to loosen that adhesive grip.

Step 12

– Gently slide the opening pick along the top edge of your device, making sure to stop just before you get to the front camera. Take it slow, we don’t want any accidental bumps!

Step 13

– Gently pull the pick out until just the tip is nestled between the digitizer and the frame.

– Slide that pick above the front camera to break free the adhesive holding things together.

– Keep the pick close to the right side of the front camera as you move on to the next step.

Step 14

– Pop the pick back in and gently slide it up towards the top-right corner to fully free the top adhesive.

– Keep the pick wedged in that corner so the adhesive doesn’t sneak back together.

Step 15

– Grab your trusty iOpener and warm it up. Then, press it gently against the right edge of your device for a solid two minutes. This little heat-up session will help loosen things up so the next steps are smoother. Keep it steady, and you’re on the right track!

Tools Used
  1. iOpeneriPad 8 LTE LCD Replacement

Step 16

– Gently rotate the pick around the top-right corner of your device to break the adhesive seal. Take your time, and it should come apart easily!

Step 17

– Grab a new opening pick and gently slide it into the middle of the iPad’s right edge like you’re unlocking a treasure chest!

Step 18

– Warm up an iOpener and place it on the bottom edge of your device for about two minutes. Let it work its magic and soften things up for the next step.

Tools Used
  1. iOpeneriPad 8 LTE LCD Replacement

Step 19

– Gently slide the pick down to the bottom-left corner to loosen up that stubborn adhesive.

– Keep the pick wedged in the corner before moving on to the next move.

Step 20

– Pop a new opening pick into the gap you just made along the bottom edge of the iPad.

– Gently slide the pick over the antenna, stopping right before you hit the home button.

– Keep the pick resting to the left of the home button before moving on to the next step.

Step 21

– Gently slide an opening pick into that little gap you’ve made. You’re doing great!

– Now, carefully maneuver the pick under the home button, gliding it toward the bottom-right corner. Just the tip should be nestled between the digitizer and the frame—keep it cool and steady!

Step 22

– Pop that pick back in place and gently slide it towards the home button to fully break free the bottom adhesive.

– Leave the pick hanging out just to the right of the home button, ready for the next move.

Step 23

– Warm up an iOpener and gently press it against the right edge of your device for about two minutes. Give it a little time to work its magic and loosen things up.

Tools Used
  1. iOpeneriPad 8 LTE LCD Replacement

Step 24

– Gently twist the two opening picks at the left corners of the iPad to nudge the digitizer up a bit, breaking the last bits of adhesive holding it down.

Step 25

– Gently lift the left edge of the digitizer, working your way up to loosen the adhesive along the right edge of the iPad.

Step 26

– Gently support the digitizer, then carefully slide an opening pick between the display cables to release the last bit of adhesive. A little patience here goes a long way!

Step 27

– Once you’ve successfully separated all that sticky adhesive, swing open the digitizer like it’s a book and lay it beside the iPad, just chilling out.

– As you put everything back together, give that frame a little TLC by cleaning up any leftover adhesive—don’t forget to check the digitizer if you’re reusing it! A splash of isopropyl alcohol will do wonders. When it’s time to stick it all back, use our handy adhesive strips or pre-cut adhesive cards.

– Keep an eye on those display cables when you’re reassembling! Make sure they’re neatly tucked under the LCD screen, so they don’t get squished and cause any trouble.

Step 28

– Grab a pair of tweezers and gently lift off the tape covering the home button cable ZIF connector. Take your time – you’re doing great!

Tools Used
  1. TweezersiPad 8 LTE LCD Replacement

Step 29

– Grab a spudger, an opening tool, or even your trusty fingernail and gently lift up that tiny, hinged locking flap on the home button cable ZIF connector. It’s like a little flap party waiting to happen—just make sure to keep it nice and controlled!

Tools Used
  1. SpudgeriPad 8 LTE LCD Replacement

Step 30

– Grab a trusty pair of tweezers and gently pull the home button ribbon cable straight out of the ZIF connector. You’ve got this!

Tools Used
  1. TweezersiPad 8 LTE LCD Replacement

Step 31

– Gently use the flat end of a spudger to lift and disconnect those two digitizer cable press connectors. You’ve got this!

Tools Used
  1. SpudgeriPad 8 LTE LCD Replacement

Step 32

– Grab your trusty spudger and gently work the flat end underneath the vibration isolator that’s hanging out under the SIM card reader. It’s like giving it a little lift!

– Once it’s popped up, go ahead and remove the vibration isolator. You’re making great progress!

Tools Used
  1. SpudgeriPad 8 LTE LCD Replacement

Step 33

– Grab a pair of tweezers and gently lift the home button cable off the rear case. Take it slow—no need to rush here!

Tools Used
  1. TweezersiPad 8 LTE LCD Replacement

Step 34

– Start by removing the front panel assembly. It’s a bit like peeling off a sticker, but with a bit more precision!

– If your new display is giving you trouble with ‘ghost’ or ‘phantom’ touch inputs, don’t panic! Just add a layer of thin insulating tape (like Kapton tape) to the marked areas on the back of the panel. But don’t worry, most replacement digitizers come with the right insulation already in place, so you might not need to do anything extra.

– Before you put everything back together, take a moment to clean off any leftover adhesive from the iPad. Grab some high-concentration isopropyl alcohol (90% or higher) and a lint-free cloth to scrub down those glued areas. This little step helps prep the iPad for fresh adhesive and ensures everything sticks just right.

– Now, test your iPad’s functions to make sure everything is working. After that, use the display adhesive strips and follow our guide to apply them to the back of the display. Once that’s done, you’re almost there—just seal it up and enjoy your newly fixed device!

Step 35

– Grab some tweezers or just use your fingers, and peel away any tape hiding those LCD screws. It’s like unwrapping a gift, but with a little tech twist!

Tools Used
  1. TweezersiPad 8 LTE LCD Replacement

Step 36

– Grab your trusty Phillips screwdriver and unscrew the four 4.3mm screws that are keeping the LCD screen in place.

Step 37

– Slide a spudger gently between the frame and the top-right corner of the LCD.

– Slowly pry apart with the spudger to break the adhesive seal.

Tools Used
  1. SpudgeriPad 8 LTE LCD Replacement

Step 38

– Go ahead and do the same thing for the top-left corner of the LCD.

Step 39

– Grab your trusty spudger and gently pry the LCD out of its cozy spot just enough to get a grip with your fingers.

– Now, flip that LCD like you’re turning a page in your favorite book, lifting from the camera side and rotating it over to the home button end of the frame.

– Place the LCD down on a clean, soft, lint-free surface so you can easily access those display cables without a hitch.

Tools Used
  1. SpudgeriPad 8 LTE LCD Replacement

Step 40

– Grab your Phillips screwdriver and carefully remove the 2.3 mm screw holding the battery connector to the logic board. Keep it safe!

Step 41

Step 42

– Gently slide the battery blocker under the logic board’s battery connector at about a 35-degree angle—smooth moves only!

– Keep that blocker right where it is while you carry on with the next steps.

Tools Used
  1. Battery BlockeriPad 8 LTE LCD Replacement

Step 43

– Grab your trusty Phillips screwdriver and take out those three tiny screws, each just 1.4 mm long, that are holding the display cable bracket in place. You’ve got this!

Step 44

– Grab your tweezers or use your fingers to carefully pop off the display cable bracket. It’s like a gentle tug, but make sure you’re steady!

Tools Used
  1. TweezersiPad 8 LTE LCD Replacement

Step 45

– Grab the flat end of a spudger and gently pry up to disconnect the LCD cable press connector.

– To put those press connectors back in place, carefully line one side up, give it a little press until you hear a satisfying click, then repeat on the other side.

– Avoid pressing down in the middle. If it’s not aligned just right, you might bend the pins, and that could lead to some serious damage.

Tools Used
  1. SpudgeriPad 8 LTE LCD Replacement

Step 46

– Time to put it all back together! Just follow these steps in reverse and you’ll be good to go.

– Got some old tech lying around? Don’t forget to drop it off at an R2 or e-Stewards certified recycler.

– Feeling stuck? No worries! Dive into some basic troubleshooting or reach out to our iPad 8 Answers community for a helping hand.

Success!
Ready to put everything back together? Just follow the steps in reverse, and you’ll be good to go!
Got some e-waste? Be a hero and take it to an R2 or e-Stewards certified recycler.
Not going as smoothly as you hoped? Don’t worry, try some basic troubleshooting, or if you’re still stuck, feel free to schedule a repair for a little extra help.

iPad 8 LTE Home Button Assembly Replacement

Duration: 45 minutes
Steps: 54 Steps

Ready to swap out the home button assembly in your iPad 8 LTE? This guide’s designed just for the LTE version, so if you’re working with the Wi-Fi model, be sure to check out the other guide. Just a heads up, replacing the home button means the Touch ID sensor won’t work anymore since it’s paired with the logic board. When you’re isolating the battery, take extra care with the battery blocker. The battery contacts can be pretty delicate and break easily, which could cause some serious, irreversible damage. If you decide to skip isolating the battery, be super cautious with metal tools—only use them when absolutely necessary, like when you’re removing screws. This helps avoid any accidental short circuits or damage to sensitive components. Some of the photos in this guide may feature a slightly different model, but don’t worry, they won’t mess with the steps. If things get tricky or you just want some pro help, feel free to schedule a repair.

Step 1

– Warm up an iOpener and stick it onto the left edge of your device for a solid two minutes to loosen things up.

Tools Used
  1. iOpeneriPad 8 LTE Home Button Assembly Replacement

Step 2

– While you’re giving the adhesive some time to chill and loosen up, keep an eye out for these delicate spots that don’t appreciate being pried too hard:

– Front camera

– Antennas

– Display cables

Step 3

– Give that blue handle a gentle tug back to release the Anti-Clamp’s arms and let the magic begin!

– Nestle your iPad on a surface so it sits comfortably between the suction cups—like it’s getting a cozy hug.

– Set those suction cups near the center of the left edge—one on top and one on the bottom, nice and snug.

– Keep the bottom of the Anti-Clamp steady and give the top cup a firm press to create a perfect seal.

Step 4

– Grab that blue handle and pull it forward to lock the arms in place.

– Give the handle a full 360-degree clockwise twist, or keep turning until the suction cups start to stretch nicely.

– Keep an eye on the suction cups so they stay lined up. If they start to drift out of sync, just loosen them a bit and realign the arms before continuing.

Step 5

– Hold tight for a minute to give that adhesive a little time to let go and open up a gap.

– If your screen’s not warming up enough, try using a hair dryer to gently heat the left edge of the iPad.

– Once the Anti-Clamp has created a big enough gap, slide an opening pick under the digitizer.

– Feel free to skip the next step, you’ve got this!

Step 6

– After the screen feels warm to the touch, stick a suction handle near the left edge, as close to the border as you can get.

– Gently lift the screen using the suction handle to create a tiny gap between the digitizer and the frame.

– Slide an opening pick into the gap between the digitizer and the frame to keep things moving.

Step 7

– Pop a second opening pick into the gap you just made.

– Gently slide that pick down to the bottom-left corner to loosen up the adhesive.

– Keep the pick wedged there so the adhesive doesn’t snap back together.

Step 8

– If your opening pick gets a bit clingy with the adhesive, just give it a little ‘roll’ along the side of the iPad to keep on breaking that adhesive loose.

Step 9

– Gently slide your first opening pick up towards the top-left corner to loosen that stubborn adhesive.

– Keep the pick wedged there so the adhesive doesn’t sneak back and stick together again.

Step 10

– Warm up that iOpener and stick it to the top edge of your device for a solid two minutes.

Tools Used
  1. iOpeneriPad 8 LTE Home Button Assembly Replacement

Step 11

– Gently twist the pick around the top-left corner to loosen up that stubborn adhesive and get things moving.

Step 12

– Gently slide the opening pick along the top edge of the device, making sure to stop just before you get to the front camera.

Step 13

– Gently pull the pick out until just the tip is sitting between the digitizer and the frame.

– Slide the pick above the front camera, carefully separating the adhesive as you go.

– Keep the pick close to the right side of the front camera for the next steps.

Step 14

– Slide the pick back in and gently glide it toward the device’s top-right corner to fully loosen that stubborn adhesive.

– Keep the pick planted in the top-right corner to stop the adhesive from sneaking back together.

Step 15

– Warm up your iOpener and let it rest on the right edge of your device for a couple of minutes. This will give it a nice, gentle heat-up to get the job done.

Tools Used
  1. iOpeneriPad 8 LTE Home Button Assembly Replacement

Step 16

– Gently slide the pick around the top-right corner of your device to loosen up that stubborn adhesive.

Step 17

– Pop in a fresh opening pick and gently slide it halfway along the right edge of your iPad.

Step 18

– Warm up an iOpener and press it against the bottom edge of your device for a solid two minutes to loosen things up.

Tools Used
  1. iOpeneriPad 8 LTE Home Button Assembly Replacement

Step 19

– Gently slide that bottom-left pick into the corner to break free from the adhesive’s grip.

– Keep the pick snug in the corner while you gear up for the next step.

Step 20

– Pop a fresh opening pick into that gap you just made at the bottom edge of your iPad.

– Gently glide the pick over the antenna, but hold up right before you reach the home button.

– Keep the pick resting to the left of the home button before you move on.

Step 21

– Pop an opening pick into that sneaky little gap you’ve just created.

– Now, slide the pick under the home button and glide it towards the bottom-right corner, ensuring that only the tip is nestled between the digitizer and the frame.

Step 22

– Slide the pick back in and glide it toward the home button to fully break free of that stubborn bottom adhesive.

– Before moving on, keep the pick snugly positioned to the right of the home button.

Step 23

– Warm up an iOpener and stick it to the right edge of your device for a cozy two minutes.

Tools Used
  1. iOpeneriPad 8 LTE Home Button Assembly Replacement

Step 24

– Gently twist the opening picks into the left corners of the iPad to nudge the digitizer up a bit, while you cleverly tackle the last of that pesky adhesive.

Step 25

– Gently lift the left edge of the digitizer upward to loosen the adhesive along the right side of your iPad.

Step 26

– Keep a steady hand on the digitizer while you gently slide an opening pick between the two display cables to carefully loosen the last bit of adhesive.

Step 27

– After you’ve cleverly peeled away all that sticky stuff, think of the digitizer as a book and gently swing it open, laying it down flat next to the iPad.

– When you’re putting everything back together, give the leftover adhesive on the frame—and on the digitizer if you’re reusing it—a little scrub with isopropyl alcohol. Don’t forget to use our adhesive strips or pre-cut adhesive cards to keep things nice and secure.

– Keep an eye on those display cables as you wrap up the reassembly. Make sure they’re tucked away neatly underneath the LCD screen to avoid any mishaps!

Step 28

– Grab some tweezers or use your fingers to gently peel away any tape hiding the LCD screws. It’s a small step, but it’ll make the next one much easier!

Tools Used
  1. TweezersiPad 8 LTE Home Button Assembly Replacement

Step 29

– Grab your Phillips screwdriver and unscrew the four 4.3 mm screws holding the LCD screen in place. A little twist here, and you’re on your way!

Step 30

– Gently slide a spudger into the gap between the frame and the top-right corner of the LCD.

– Take your time and pry carefully with the spudger to peel away the adhesive.

Tools Used
  1. SpudgeriPad 8 LTE Home Button Assembly Replacement

Step 31

– Now, do the same thing for the top-left corner of the LCD. You got this!

Step 32

– Take the flat side of your spudger and gently ease the LCD out of its snug little home, just enough to get a good grip with your fingers.

– Now, carefully flip the LCD like you’re turning a page of a book—start from the side near the camera and smoothly rotate it over towards the home button end of the frame.

– Place the LCD on a clean, soft surface that’s free of lint, so you can get to the display cables without a hitch.

Tools Used
  1. SpudgeriPad 8 LTE Home Button Assembly Replacement

Step 33

– Grab your trusty Phillips screwdriver and carefully remove the 2.3mm screw that’s holding the battery connector in place on the logic board.

Step 34

Step 35

– Gently slide that battery blocker right under the logic board’s battery connector at a slick 35-degree angle.

– Keep that battery blocker right where it is while you tackle the next steps!

Tools Used
  1. Battery BlockeriPad 8 LTE Home Button Assembly Replacement

Step 36

– Grab your trusty Phillips screwdriver and let’s get to work! Carefully unscrew those three 1.4 mm-long screws holding down the display cable bracket. You’ve got this!

Step 37

– Grab some tweezers or your trusty fingers and carefully lift off the display cable bracket. It’s a simple step, but be gentle, and you’ll be good to go!

Tools Used
  1. TweezersiPad 8 LTE Home Button Assembly Replacement

Step 38

– Grab that trusty spudger and gently slide the flat end underneath to lift and disconnect the LCD cable press connector. You’re doing great!

– When it’s time to reconnect those press connectors, take a moment to line things up just right. Press down on one side until you hear that satisfying click, then do the same for the other side. Easy peasy!

– Just a quick tip: avoid pressing down in the center. If things get a bit wonky and the connector isn’t aligned, the pins might bend, and we definitely don’t want that. Keep it smooth and steady!

Tools Used
  1. SpudgeriPad 8 LTE Home Button Assembly Replacement

Step 39

– Take out the LCD with care and place it face down on a nice, clean, soft, lint-free spot. You’ve got this!

Step 40

– Grab your trusty tweezers and gently peel away the tape that’s keeping the home button cable ZIF connector covered. You’ve got this!

Tools Used
  1. TweezersiPad 8 LTE Home Button Assembly Replacement

Step 41

– Grab a spudger, opening tool, or even your fingernail to gently flip up the tiny hinged locking flap on the home button cable’s ZIF connector.

Tools Used
  1. SpudgeriPad 8 LTE Home Button Assembly Replacement

Step 42

– Grab a trusty pair of tweezers and gently pull the home button ribbon cable straight out from that ZIF connector. You’ve got this!

Tools Used
  1. TweezersiPad 8 LTE Home Button Assembly Replacement

Step 43

– Gently slide the flat end of your spudger under the two digitizer cable press connectors and lift them up to unplug—easy does it!

Tools Used
  1. SpudgeriPad 8 LTE Home Button Assembly Replacement

Step 44

– Gently slide the flat end of your spudger under the vibration isolator right below the SIM card reader to lift it up.

– Carefully take out the vibration isolator.

Tools Used
  1. SpudgeriPad 8 LTE Home Button Assembly Replacement

Step 45

– Grab your tweezers and gently lift the home button cable away from the rear case like you’re carefully peeling off a sticker.

Tools Used
  1. TweezersiPad 8 LTE Home Button Assembly Replacement

Step 46

– Take off the front panel assembly carefully.

– If your new display starts acting up with random or phantom touches, a thin strip of insulating tape like Kapton (polyimide) tape applied to the highlighted spots on the back of the panel usually does the trick. Replacement digitizers come with the right insulation already, so you probably won’t need to add tape.

– When putting everything back together, make sure to scrape off any leftover adhesive from the iPad and clean the sticky areas with high-concentration (90% or higher) isopropyl alcohol and a lint-free cloth. This preps the surface for fresh adhesive and helps everything stick nice and tight.

– Give your iPad a quick test run, then stick on the pre-cut adhesive strips to the back of the display following the display adhesive application guide before sealing it up.

Step 47

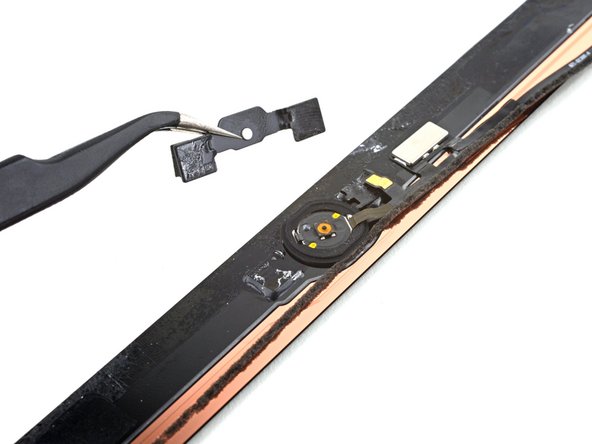
– Gently use your fingers to lift the home button cable off the back of the front panel. A little patience here goes a long way!

Step 48

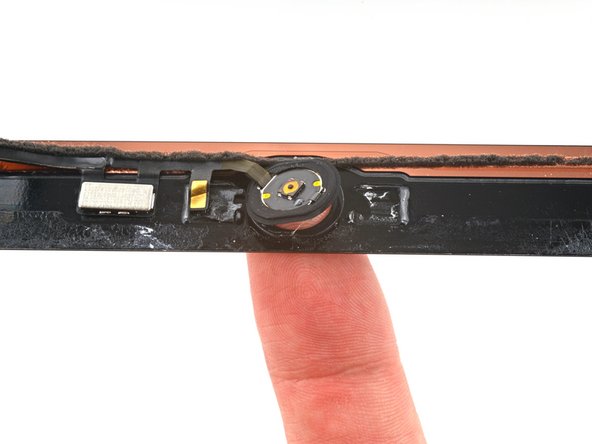
– Slide your trusty opening pick under the home button cable to gently separate it from the front panel. No rush, just a smooth move.

– Keep gliding that pick along until you hit the home button bracket. You’re almost there!

Tools Used
  1. iOpeneriPad 8 LTE Home Button Assembly Replacement

Step 49

– Carefully slide an opening pick under the top of the home button cable to gently free the metal contact from the home button bracket. Take your time, and be sure not to rush this step!

Step 50

– Warm up an iOpener and place it on the home button bracket for about thirty seconds to loosen things up.

Tools Used
  1. iOpeneriPad 8 LTE Home Button Assembly Replacement

Step 51

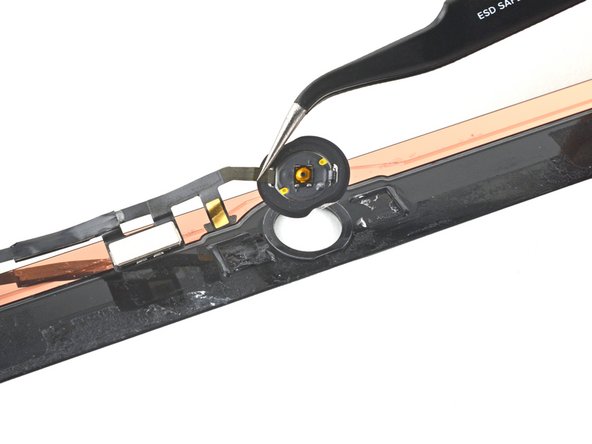
– Gently slide an opening tool under the home button bracket and lift it away from the front panel with care.

Step 52

– Take off the home button bracket carefully.

– When putting it back, grab some strong glue like E6000 to stick it firmly to the front panel assembly.

Step 53

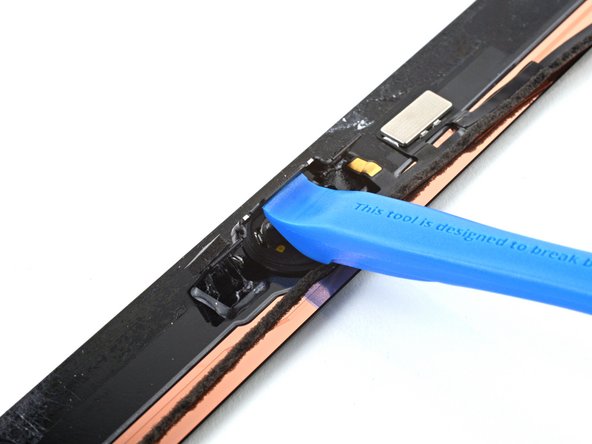
– Gently press the home button from the front panel using your finger to loosen the adhesive holding it down.

Step 54

– Put your device back together by doing these steps in reverse order.

– When you’re done, make sure to recycle your e-waste at an R2 or e-Stewards certified facility.

– If the repair didn’t quite work out, try some basic troubleshooting or reach out to our iPad 8 Answers community for support.

Success!
Put your device back together by retracing these steps in reverse—easy peasy!
Remember to drop off your e-waste at an R2 or e-Stewards certified recycler to keep things green.
If the repair didn’t quite work out, try some basic troubleshooting, or swing by our iPad 8 Answers community for a hand.
And if you’re feeling stuck, you can always schedule a repair with us!

iPad 8 LTE Headphone Jack Replacement

Duration: 45 minutes
Steps: 57 Steps

Ready to replace the headphone jack on your iPad 8 LTE? Great! Just a quick heads-up: this guide is for the LTE version only. If you’ve got the Wi-Fi version, you’ll need a different guide. When isolating the battery with a blocker, proceed with caution. Those battery contacts are pretty sensitive, and bending or breaking them can cause some serious damage. If you’re skipping the battery isolation step (we get it, sometimes you just want to get straight to the action), make sure to steer clear of metal tools unless absolutely necessary (for screw removal, of course) to avoid damaging your battery or other sensitive parts. A quick note: some of the photos here are from a different model, so there may be tiny visual differences, but don’t worry, they’ll have no impact on the procedure. If you’re feeling unsure or just want some extra hands, you can always schedule a repair.

Step 1

– Warm up an iOpener and let it cozy up to the left edge of your device for a solid two minutes.

Tools Used
  1. iOpeneriPad 8 LTE Headphone Jack Replacement

Step 2

– While you’re waiting for the adhesive to take a little break, be sure to keep an eye on these delicate areas. They’re a bit touchy when it comes to prying:

– Front camera

– Antennas

– Display cables

Step 3

– Pull the blue handle back to release the Anti-Clamp’s arms—easy does it!

– Set your iPad on something so it sits nice and level between the suction cups.

– Place the suction cups near the center of the left edge—one up top, one down low.

– Keep the bottom of the Anti-Clamp steady and press down firmly on the top cup to get a good seal.

Step 4

– Give that blue handle a pull forward to lock those arms in place like a pro!

– Now, spin the handle a full 360 degrees, or until those suction cups start to stretch out. It’s like a little dance for your device!

– Keep an eye on those suction cups to make sure they’re still buddies and aligned. If they start to drift apart, just loosen them up a bit and give those arms a quick realignment. You’ve got this!

Step 5

– Wait for a minute to let the adhesive loosen up a bit and give you the space you need.

– If your screen isn’t warming up like it should, try using a hair dryer along the left edge of your iPad to give it a little extra heat.

– When the Anti-Clamp creates enough of a gap, carefully slide the opening pick under the digitizer.

– You can skip the next step and move ahead.

Step 6

– Once the screen feels warm to the touch, grab your suction handle and stick it right on the left edge of the screen, as close to the edge as you can get.

– Gently pull up on the screen using the suction handle to create a tiny gap between the digitizer and the frame.

– Slide an opening pick carefully into the gap between the digitizer and the frame to help separate them.

Step 7

– Pop in a second opening pick where you’ve just made some space.

– Gently glide that pick down towards the bottom-left corner of your device to break free from the adhesive’s grip.

– Keep that pick chilling in the bottom-left corner to stop the adhesive from reuniting!

Step 8

– If your opening pick gets a little clingy and sticks in the adhesive, just gently roll it along the edge of the iPad to keep things moving and separate that adhesive like a pro.

Step 9

– Gently glide the first opening pick toward the top-left corner of your device to break that sticky seal. You’ve got this!

– Once you’ve made some progress, leave the pick right there in the corner to keep that adhesive from getting cozy again.

Step 10

– Warm up that iOpener and give it a cozy spot on the top edge of your device for a solid two minutes. Let’s get things nice and toasty!

Tools Used
  1. iOpeneriPad 8 LTE Headphone Jack Replacement

Step 11

– Gently rotate the pick around the top-left corner of the device to break the adhesive seal. Take your time and let the tool do the work!

Step 12

– Gently glide the opening pick along the top edge of your device, making sure to pause just shy of the front camera. You’re doing great!

Step 13

– Gently pull the pick out so only the tip stays tucked between the digitizer and the frame.

– Carefully slide the pick over the front camera to loosen up the adhesive.

– Keep the pick resting just to the right of the front camera before moving on.

Step 14

– Slide the pick back in and carefully glide it toward the top-right corner to fully loosen that stubborn top adhesive.

– Keep the pick lodged in the top-right corner so the adhesive doesn’t sneak back and stick together.

Step 15

– Warm up your iOpener and gently press it to the right edge of the device for a solid two minutes. Take your time and let the heat do its magic.

Tools Used
  1. iOpeneriPad 8 LTE Headphone Jack Replacement

Step 16

– Gently work your pick around the top-right corner of the device to loosen the adhesive. Take it slow and steady, and you’ll get it!

Step 17

– Grab a new opening pick and carefully slide it to the center of the iPad’s right edge. You’re doing great!

Step 18

– Warm up your trusty iOpener and give it a cozy hug to the bottom edge of your device for a solid two minutes.

Tools Used
  1. iOpeneriPad 8 LTE Headphone Jack Replacement

Step 19

– Gently slide the pick into the bottom-left corner to break that stubborn adhesive seal.

– Keep the pick in place before you tackle the next step.

Step 20

– Pop a new opening pick into the gap you just made along the bottom edge of the iPad.

– Gently slide the pick along the antenna, stopping right before you reach the home button.

– Let the pick rest just to the left of the home button before moving on.

Step 21

– Slide an opening pick into the gap you’ve just made. Go on, give it a little nudge!

– Carefully glide the pick under the home button and towards the bottom-right corner. Just the tip should fit between the digitizer and the frame—like a secret agent sneaking in!

Step 22

– Slide the pick back in and shimmy it toward the home button to free up that stubborn bottom adhesive completely. You’re almost there!

– Now, let the pick chill to the right of the home button before you move on to the next step.

Step 23

– Warm up an iOpener and stick it on the right edge of your device for a solid two minutes to loosen things up.

Tools Used
  1. iOpeneriPad 8 LTE Headphone Jack Replacement

Step 24

– Gently twist the two opening picks positioned at the left corners of the iPad to raise the digitizer just a bit, helping to loosen the last stubborn bits of adhesive holding it down.

Step 25

– Gently lift the left edge of the digitizer to help peel away the adhesive along the right edge of your iPad. You’re doing great!

Step 26

– As you gently hold the digitizer in place, take an opening pick and slide it between the two display cables. This will help you break free the last bit of that pesky adhesive!

Step 27

– Once you’ve got all the adhesive peeled away, gently open the digitizer like a book and place it flat next to the iPad.

– When you’re putting everything back together, grab some isopropyl alcohol to clean off any leftover adhesive from the frame—and from the digitizer if you’re reusing it. Then, stick on our adhesive strips or pre-cut adhesive cards for a nice, secure hold.

– Be careful with those display cables while you’re reassembling! Make sure they’re neatly folded underneath the LCD screen so they don’t get damaged.

Step 28

– Grab some tweezers or use your fingers to gently peel away any tape that’s hiding the LCD screws. Let’s uncover those screws and get to work!

Tools Used
  1. TweezersiPad 8 LTE Headphone Jack Replacement

Step 29

– Grab your trusty Phillips screwdriver and unscrew the four 4.3 mm screws holding the LCD screen in place. You got this!

Step 30

– Gently slide a spudger into the gap between the frame and the top-right corner of the LCD.

– Carefully pry with the spudger to loosen and separate the adhesive.

Tools Used
  1. SpudgeriPad 8 LTE Headphone Jack Replacement

Step 31

– Now, go ahead and do the same thing for the top-left corner of the LCD. You got this!

Step 32

– Gently wedge the flat end of a spudger under the LCD just enough to lift it out of its slot so you can grab it with your fingers.

– Flip the LCD over like turning a page in a book—lift near the camera and fold it back over the home button side of the frame.

– Place the LCD on a clean, soft, lint-free surface to get easy access to the display cables.

Tools Used
  1. SpudgeriPad 8 LTE Headphone Jack Replacement

Step 33

– Grab your trusty Phillips screwdriver and tackle that 2.3 mm screw holding the battery connector tight against the logic board. You’ve got this!

Step 34

Step 35

– Gently slide the battery blocker beneath the logic board’s battery connector at a cool 35-degree angle. You’ve got this!

– Keep that battery blocker snugly in place while you continue your work. It’s your trusty sidekick!

Tools Used
  1. Battery BlockeriPad 8 LTE Headphone Jack Replacement

Step 36

– Grab a Phillips screwdriver and twist out the three 1.4 mm screws holding down the display cable bracket.

Step 37

– Gently use tweezers or your fingers to lift off the display cable bracket—easy does it!

Tools Used
  1. TweezersiPad 8 LTE Headphone Jack Replacement

Step 38

– Gently use the flat end of a spudger to lift and unplug the LCD cable press connector.

– When reconnecting press connectors like this one, line up one side carefully and press down until you hear a click, then do the same for the other side.

– Avoid pressing down the middle — if the connector is off-center, those pins might bend and cause permanent damage.

Tools Used
  1. SpudgeriPad 8 LTE Headphone Jack Replacement

Step 39

– Carefully detach the LCD and lay it down face first on a clean, soft surface that won’t leave any lint behind.

Step 40

– Grab your tweezers and gently lift the tape that’s hiding the home button cable ZIF connector.

Tools Used
  1. TweezersiPad 8 LTE Headphone Jack Replacement

Step 41

– Grab a spudger, an opening tool, or even your fingernail to gently flip up the tiny, hinged locking flap on the home button cable’s ZIF connector — nice and easy!

Tools Used
  1. SpudgeriPad 8 LTE Headphone Jack Replacement

Step 42

– Grab a trusty pair of tweezers and gently pull that home button ribbon cable straight out of the ZIF connector. You’ve got this!

Tools Used
  1. TweezersiPad 8 LTE Headphone Jack Replacement

Step 43

– Gently slide the flat end of your spudger under those two digitizer cable press connectors and give them a little nudge to disconnect them. You’ve got this!

Tools Used
  1. SpudgeriPad 8 LTE Headphone Jack Replacement

Step 44

– Gently slide the flat end of your spudger under the vibration isolator just below the SIM card reader to lift it up.

– Carefully take out the vibration isolator.

Tools Used
  1. SpudgeriPad 8 LTE Headphone Jack Replacement

Step 45

– Grab a trusty pair of tweezers and gently coax the home button cable away from the rear case. It’s like giving it a little hug goodbye!

Tools Used
  1. TweezersiPad 8 LTE Headphone Jack Replacement

Step 46

– Take off the front panel assembly carefully.

– If your new screen starts acting like it’s haunted with random touches, slap on a super thin insulating tape—Kapton (polyimide) tape works great—on the marked spots on the back of the panel. Replacement digitizers already have this covered, so no extra tape should be needed.

– When putting things back together, clean off any leftover adhesive from the iPad, then wipe down the glued areas with strong isopropyl alcohol (90% or higher) and a lint-free cloth. This preps your device for fresh adhesive and helps it stick like a charm.

– Give your iPad a test run to make sure everything’s working, then apply the pre-cut adhesive strips to the back of the display following our adhesive guide before sealing it up tight.

Step 47

– Gently lift the LCD buffer tape off the upper component bracket, taking your time to ensure a smooth peel.

Step 48

– Grab your trusty Phillips screwdriver and let’s get those five screws out of the way that are holding the upper component bracket in place:

– Three screws that are 1.4 mm long and ready to be removed

– Two longer screws measuring 1.9 mm just waiting for their turn

Step 49

– Grab your trusty spudger and use the pointed end to gently lift the upper component bracket. Once it’s up, give it a little tug with your fingers.

– Now, go ahead and remove that upper component bracket. You got this!

Tools Used
  1. SpudgeriPad 8 LTE Headphone Jack Replacement

Step 50

– Grab your trusty spudger and gently slide the flat end underneath the front camera cable press connector. Give it a little pry to disconnect it. You’re doing great!

Tools Used
  1. SpudgeriPad 8 LTE Headphone Jack Replacement

Step 51

– Grab your trusty spudger and gently lift the front camera out of its cozy little spot until you can get a good grip on it with your fingers.

– Now, use that same spudger to carefully peel away the adhesive foam pad that’s been keeping the front camera snug as a bug.

Tools Used
  1. SpudgeriPad 8 LTE Headphone Jack Replacement

Step 52

– Grab your trusty pair of tweezers and gently hold the front camera. Now, twist it to the right—clockwise—and slide that cable right through its little slot in the frame.

– Carefully lift out the front camera and set it aside.

Tools Used
  1. TweezersiPad 8 LTE Headphone Jack Replacement

Step 53

– Gently use the flat end of your spudger to lift up and disconnect the headphone jack’s press connector. A little nudge goes a long way!

Tools Used
  1. SpudgeriPad 8 LTE Headphone Jack Replacement

Step 54

– Grab some tweezers or just use your fingers to gently lift the headphone jack cable off the frame. It’s a simple move, but make sure you’re doing it carefully to avoid any damage. If you feel stuck, don’t worry! You can always schedule a repair.

Tools Used
  1. TweezersiPad 8 LTE Headphone Jack Replacement

Step 55

– Grab your trusty Phillips screwdriver and carefully unscrew the 4.2 mm-long screw holding the headphone jack in place on the back case.

Step 56

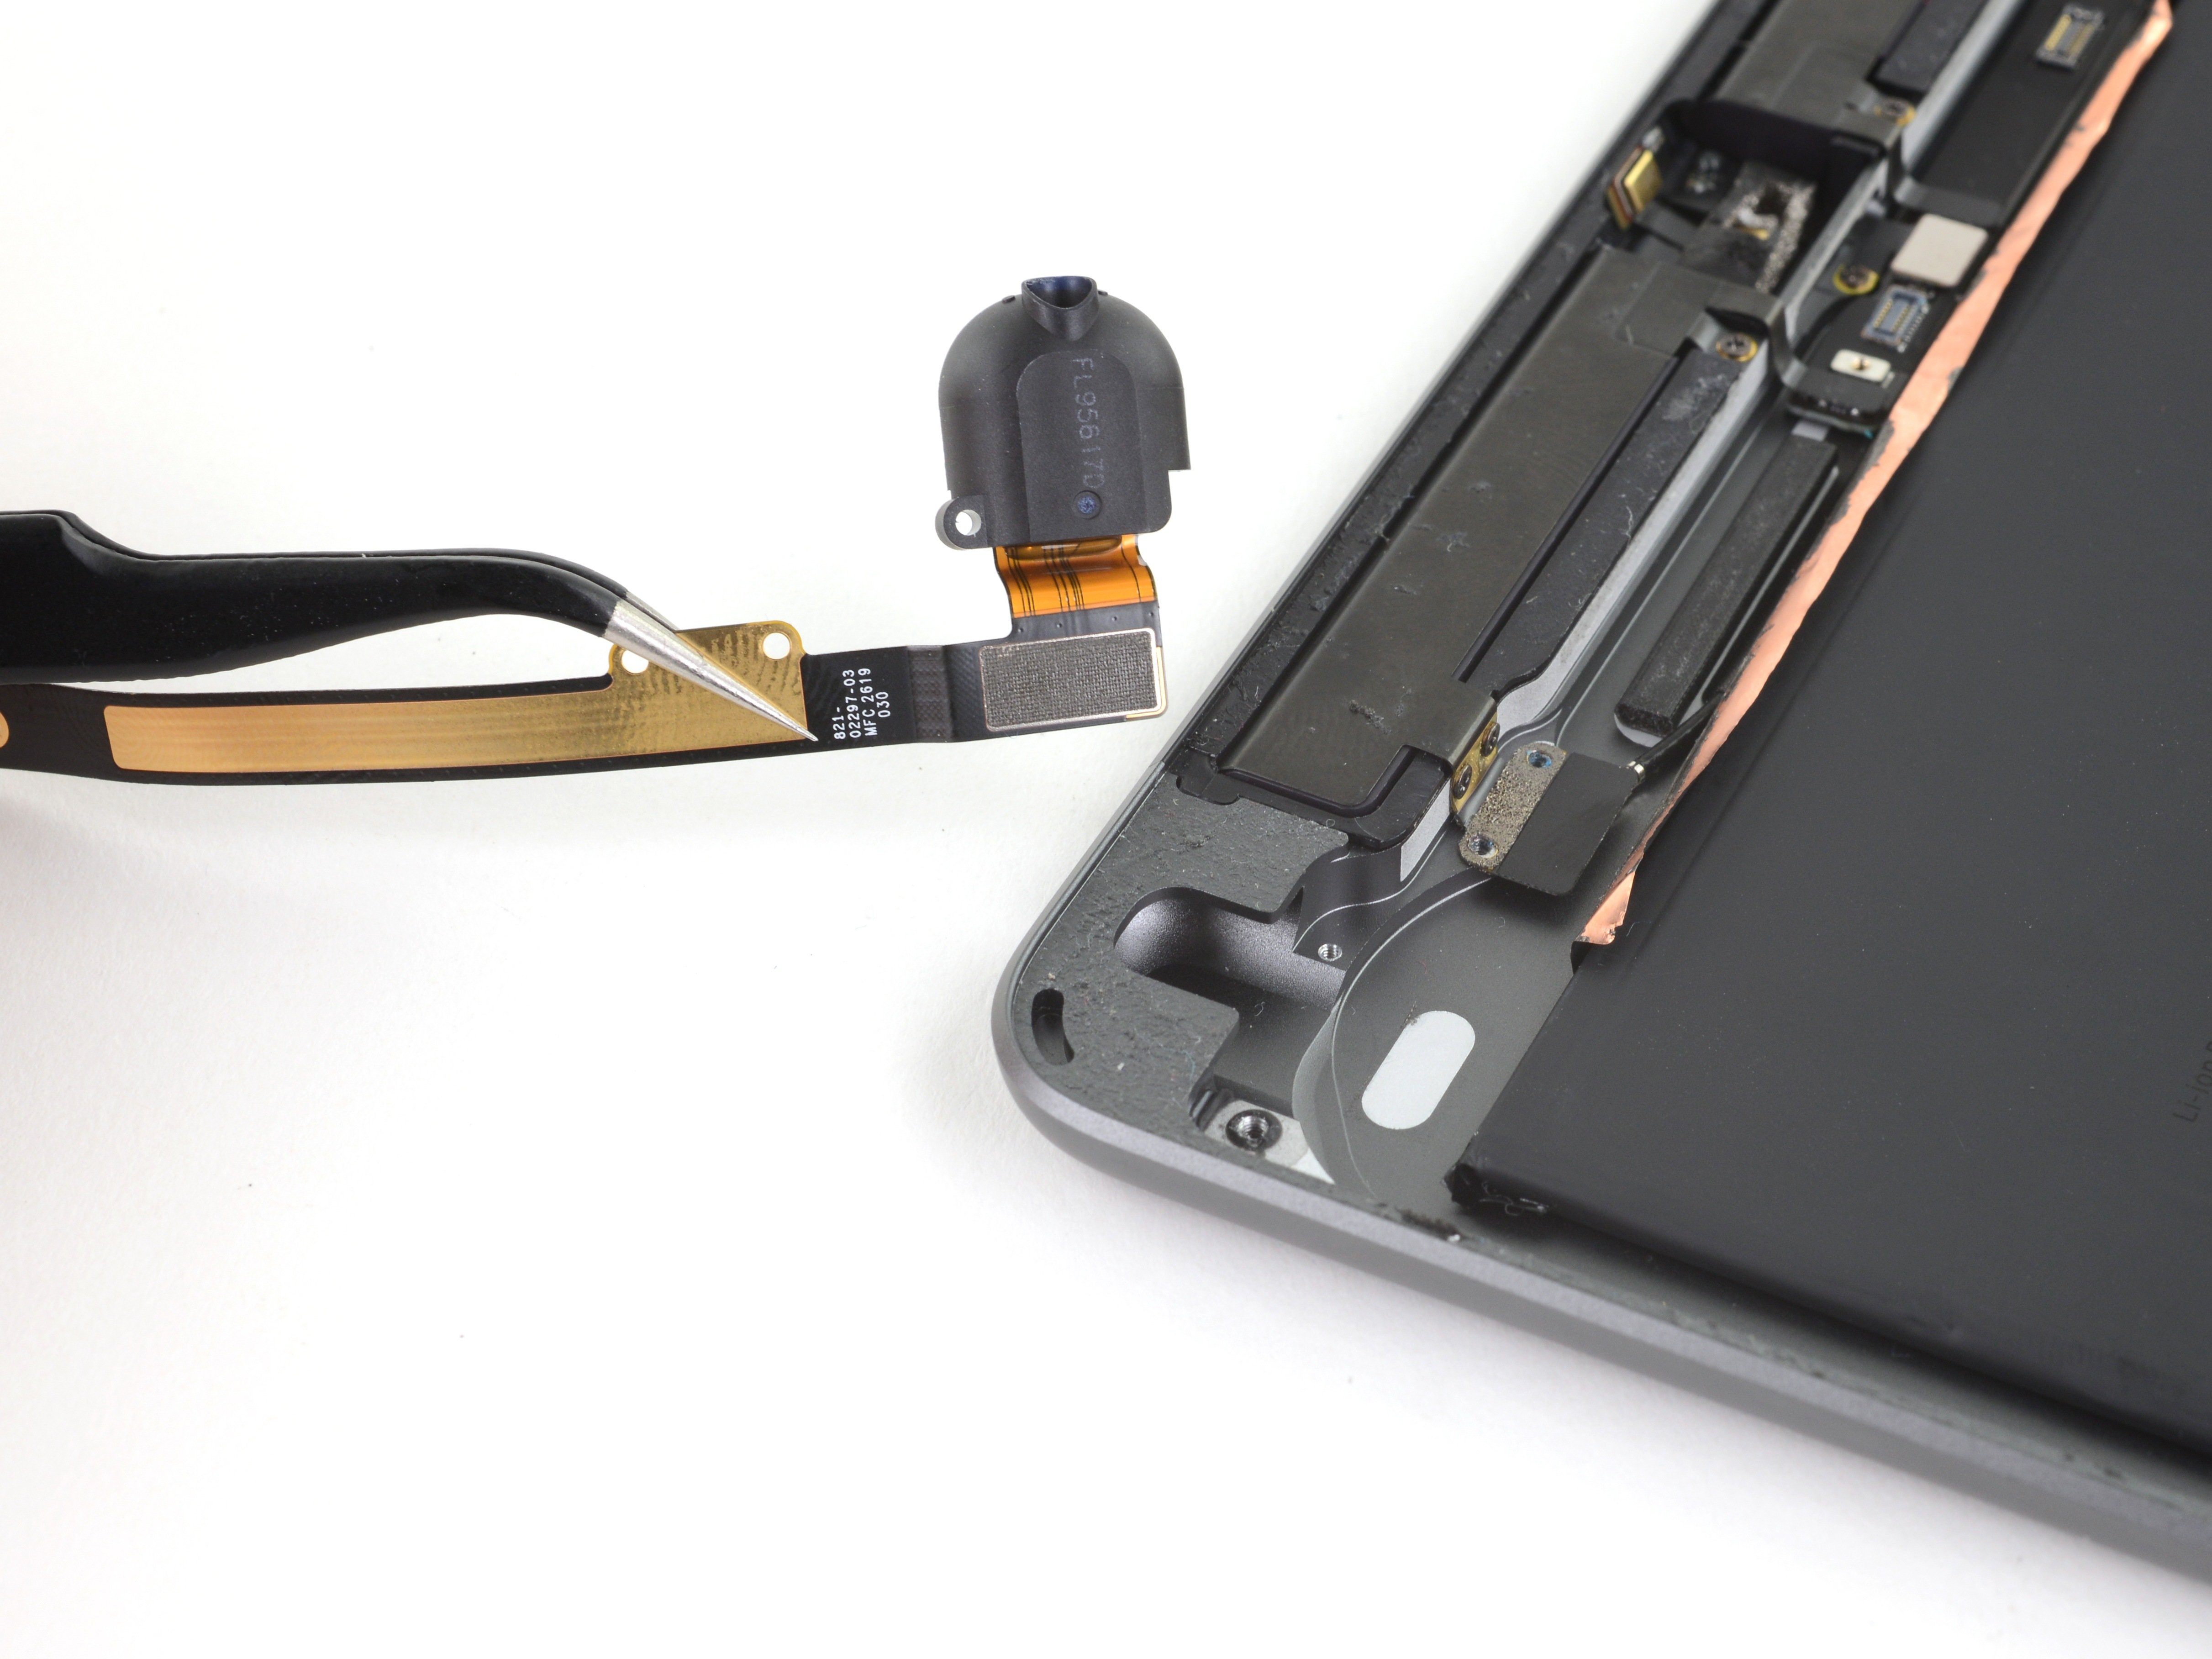
– Grab the flat end of your spudger and gently work it under the headphone jack. Give it a little lift to separate it from the rear case. Easy does it!

Tools Used
  1. SpudgeriPad 8 LTE Headphone Jack Replacement

Step 57

– Put your device back together by following these steps in reverse—easy peasy.

– Got e-waste? Make sure to recycle it responsibly at an R2 or e-Stewards certified center.

– If things didn’t go quite right, try some basic troubleshooting or check out the iPad 8 Answers community for tips.

– And if you hit a wall, remember you can always schedule a repair with us!

Tools Used
  1. TweezersiPad 8 LTE Headphone Jack Replacement

Success!
Now that you’ve tackled the assembly, just retrace your steps in reverse to get everything back together.
Got some e-waste? Don’t toss it! Find an R2 or e-Stewards certified recycler to give it a new life.
If things didn’t go as smoothly as you’d hoped, no worries! Check out some basic troubleshooting tips or swing by our iPad 8 Answers community for a helping hand.

iPad 8 LTE Front Camera Replacement

Duration: 45 minutes
Steps: 52 Steps

Ready to swap out the front camera on your iPad 8 LTE? Let’s dive in! A quick heads up: this guide is specific to the LTE version, so if you’re rocking the Wi-Fi version, click here for the right steps. When you’re isolating the battery with the battery blocker, take it easy. The battery contacts can be fragile and could break if you’re not careful, and that could lead to some not-so-cool consequences. If you decide to skip the battery isolation (no judgment), just be sure to avoid metal tools unless absolutely needed (like for screws) to steer clear of shorting the battery or causing damage to the sensitive components. Also, heads up: some of the photos here might show a different model, but don’t sweat it—they’re close enough to get the job done!

Step 1

– Warm up that iOpener and press it against the left edge of your device for a solid two minutes. You’ve got this!

Tools Used
  1. iOpeneriPad 8 LTE Front Camera Replacement

Step 2

– While the adhesive is taking its sweet time to loosen up, keep these delicate spots in mind before you start prying:

– Front camera

– Antennas

– Display cables

Step 3

– Slide the blue handle backward to release the Anti-Clamp’s arms.

– Set something under your iPad so it stays balanced and level between the suction cups.

– Place the suction cups close to the center of the left side—one near the top and the other near the bottom.

– Keep the bottom of the Anti-Clamp steady and press down firmly on the top suction cup to get a good seal.

Step 4

– Gently pull the blue handle forward to lock the arms in place.

– Turn the handle clockwise a full 360 degrees or until you see the suction cups start to stretch. Feel free to give it a little extra twist if needed!

– Keep an eye on the suction cups—make sure they stay nice and aligned. If they start to drift apart, just loosen them a bit, realign the arms, and tighten everything back up.

Step 5

– Hang tight for about a minute to let that adhesive loosen up and create a little opening for you.

– If your screen isn’t warming up enough, give it some love with a hair dryer along the left edge of the iPad.

– Slide an opening pick under the digitizer once the Anti-Clamp has worked its magic and made a decent gap.

– Feel free to skip the next step!

Step 6

– Once the screen is nice and toasty, stick a suction handle on the left edge, right up close to that border.

– Gently lift the screen with the suction handle to wiggle a little gap between the digitizer and the frame.

– Slide an opening pick into that gap you just created between the digitizer and the frame.

Step 7

– Pop a second opening pick into that nifty gap you just made.

– Gently slide the pick down towards the bottom-left corner of your device to break free from the adhesive.

– Keep that pick in the bottom-left corner to make sure the adhesive doesn’t decide to play hide and seek again.

Step 8

– If the opening pick is feeling a little stuck in the adhesive, no worries! Just gently roll it along the side of the iPad and keep separating that adhesive like a pro.

Step 9

– Gently slide your first opening pick up towards the top-left corner to loosen up that stubborn adhesive.

– Keep the pick wedged in the top-left corner so the adhesive doesn’t sneak back together on you.

Step 10

– Warm up an iOpener and stick it on the top edge of your device for a solid two minutes to loosen things up.

Tools Used
  1. iOpeneriPad 8 LTE Front Camera Replacement

Step 11

– Gently spin the pick around the top-left corner of your device to break free the adhesive. It’s like peeling a sticker, but with more finesse!

Step 12

– Gently slide the opening pick along the top edge of your device, but stop just shy of reaching that front camera—no need to disturb the VIP section!

Step 13

– Gently pull the pick out until just the tip is nestled between the digitizer and the frame. You’ve got this!

– Slide that pick right above the front camera to break free the adhesive. Keep it smooth!

– Leave the pick chilling near the right side of the front camera before moving on to the next step. Nice work!

Step 14

– Grab the pick and gently slide it toward the top-right corner of your device to fully separate the top adhesive. A smooth, steady motion works best!

– Leave the pick in place at the top-right corner to keep that adhesive from sealing back up. You’ve got this!

Step 15

– Warm up an iOpener and let it chill on the right edge of your device for two minutes.

Tools Used
  1. iOpeneriPad 8 LTE Front Camera Replacement

Step 16

– Gently rotate the pick around the top-right corner of your device to loosen the adhesive and get things moving.

Step 17

– Grab a fresh opening pick and slide it gently along the right edge of the iPad. Aim for the middle to get the job done smoothly.

Step 18

– Warm up an iOpener and stick it on the bottom edge of your device for a solid two minutes to loosen things up.

Tools Used
  1. iOpeneriPad 8 LTE Front Camera Replacement

Step 19

– Gently slide the bottom-left pick into the bottom-left corner to break the adhesive seal. You’ve got this!

– Once you’ve got that pick in place, hang tight before moving on to the next step.

Step 20

– Pop a fresh opening pick into the gap you just made at the bottom edge of the iPad.

– Gently slide the pick along, passing the antenna and stopping just before you hit the home button.

– Leave the pick sitting to the left of the home button before moving on to the next step.

Step 21

– Pop an opening pick into the gap you just made.

– Gently slide the pick under the home button and glide it toward the bottom-right corner, keeping just the tip between the digitizer and the frame.

Step 22

– Slide the pick back in and gently glide it toward the home button to fully loosen that stubborn bottom adhesive.

– Once done, leave the pick resting just to the right of the home button before moving on.

Step 23

– Warm up an iOpener and let it chill on the right edge of your device for a solid two minutes to loosen things up.

Tools Used
  1. iOpeneriPad 8 LTE Front Camera Replacement

Step 24

– Gently twist the two opening picks at the left corners of your iPad to lift the digitizer just a tad, while also helping to break free the last bits of adhesive. You’re doing great!

Step 25

– Gently lift the left edge of the digitizer to help loosen the adhesive on the right side of the iPad. This should make it easier to separate the two parts.

Step 26

– Gently slide an opening pick between the display cables while supporting the digitizer, to carefully separate the last of the adhesive. Keep it steady and take your time!

Step 27

– After carefully separating all the adhesive, gently open the digitizer like a book and lay it flat next to the iPad.

– When putting things back together, make sure to clean off any leftover adhesive from the frame—and the digitizer if you’re reusing it—using some isopropyl alcohol. Then, replace the adhesive with fresh strips or pre-cut adhesive cards.

– Keep an eye on those display cables during reassembly. Fold them neatly under the LCD screen to avoid any damage.

Step 28

– Grab your tweezers or just use your fingers to peel off any tape that’s hiding the LCD screws. It’s a small step, but it’ll make everything smoother from here on out!

Tools Used
  1. TweezersiPad 8 LTE Front Camera Replacement

Step 29

– Grab your trusty Phillips screwdriver and let’s get those four 4.3 mm screws holding the LCD screen in place out of there!

Step 30

– Slide a spudger gently between the frame and the top-right corner of the LCD.

– Carefully wiggle the spudger to loosen the adhesive without rushing.

Tools Used
  1. SpudgeriPad 8 LTE Front Camera Replacement

Step 31

– Now, let’s tackle the top-left corner of the LCD just like we did before. You’ve got this!

Step 32

– Grab your trusty spudger and gently pry the LCD out of its cozy spot just enough so you can give it a good grip with your fingers.

– Now, flip that LCD like you’re turning a page in a book, lifting it near the camera and gracefully flipping it over towards the home button end of the frame.

– Place the LCD down on a clean, soft, lint-free surface to give yourself easy access to those display cables.

Tools Used
  1. SpudgeriPad 8 LTE Front Camera Replacement

Step 33

– Grab a Phillips screwdriver and carefully remove the 2.3 mm-long screw that’s holding the battery connector to the logic board in place.

Step 34

Step 35

– Gently slide that battery blocker under the logic board’s battery connector, angling it at about 35 degrees—like a pro!

– Keep the battery blocker snugly in place while you tackle the next steps.

Tools Used
  1. Battery BlockeriPad 8 LTE Front Camera Replacement

Step 36

– Grab a Phillips screwdriver and go ahead and remove the three screws (1.4 mm long) that are holding the display cable bracket in place. You’ll be one step closer to getting this fixed!

Step 37

– Gently grab the display cable bracket with tweezers or your fingers and lift it off like a pro.

Tools Used
  1. TweezersiPad 8 LTE Front Camera Replacement

Step 38

– Grab that spudger and gently use its flat end to lift up and disconnect the LCD cable press connector. You’ve got this!

– When it’s time to reconnect those press connectors, just align one side carefully, then give it a gentle push until you hear that satisfying click. Repeat on the other side for good measure!

– A little tip: steer clear of pressing down on the middle. If the connector gets misaligned, those pins can bend, and nobody wants that kind of drama!

Tools Used
  1. SpudgeriPad 8 LTE Front Camera Replacement

Step 39

– Take the LCD off with care and place it face down on a clean, soft, lint-free surface so it can rest easy while you work your magic.

Step 40

– Grab a pair of tweezers and gently peel away the tape that’s covering the home button cable ZIF connector. Go slow and steady – we want no accidental snags here!

Tools Used
  1. TweezersiPad 8 LTE Front Camera Replacement

Step 41

– Grab your trusty spudger, an opening tool, or even your fingernail, and gently lift that little hinged locking flap on the home button cable ZIF connector. You’ve got this!

Tools Used
  1. SpudgeriPad 8 LTE Front Camera Replacement

Step 42

– Grab a trusty pair of tweezers and gently wiggle that home button ribbon cable right out of the ZIF connector. You’ve got this!

Tools Used
  1. TweezersiPad 8 LTE Front Camera Replacement

Step 43

– Gently use the flat end of your spudger to lift and disconnect the two digitizer cable press connectors. It’s a simple step, but be careful not to rush!

Tools Used
  1. SpudgeriPad 8 LTE Front Camera Replacement

Step 44

– Grab the flat end of a spudger and gently lift the vibration isolator right below the SIM card reader.

– Carefully remove the vibration isolator.

Tools Used
  1. SpudgeriPad 8 LTE Front Camera Replacement

Step 45

– Grab your tweezers and gently lift the home button cable away from the rear case like a pro!

Tools Used
  1. TweezersiPad 8 LTE Front Camera Replacement

Step 46

– Take off the front panel assembly carefully.

– If your new display is acting up with weird ‘ghost’ or ‘phantom’ touches, don’t worry! You can fix this by adding a super thin layer of insulating tape like Kapton (polyimide) tape to the highlighted spots on the back of the panel. Replacement digitizers already come with this insulation, so no extra tape should be needed.

– When putting everything back together, make sure to scrape off any leftover adhesive from the iPad. Clean the sticky areas with high-concentration isopropyl alcohol (90% or higher) and a lint-free cloth. This preps the surface perfectly for new adhesive and helps it stick like a champ.

– Give your iPad a test run to make sure everything’s working, then apply pre-cut adhesive strips to the back of the display following the display adhesive application guide before sealing it up tight.

Step 47

– Gently lift the LCD buffer tape off the upper component bracket. Take your time, and make sure to do it with care!

Step 48

– Grab your Phillips screwdriver and get ready to take out the five screws holding down the upper component bracket:

– Three screws that are 1.4 mm long

– Two screws that measure 1.9 mm in length

Step 49

– Grab your trusty spudger and use its pointed end to gently lift the upper component bracket. Once it’s popped up, feel free to get in there with your fingers for a better grip!

– Now, go ahead and remove that upper component bracket like a pro!

Tools Used
  1. SpudgeriPad 8 LTE Front Camera Replacement

Step 50

– Gently slide the flat end of your spudger under the front camera cable’s press connector to lift and unplug it with care.

Tools Used
  1. SpudgeriPad 8 LTE Front Camera Replacement

Step 51

– Gently slide your spudger under the front camera to lift it out of its spot until you can grab it with your fingers.

– Use the spudger to carefully peel away the sticky foam pad from the front camera.

Tools Used
  1. SpudgeriPad 8 LTE Front Camera Replacement

Step 52

– Put your device back together by following these steps in reverse—easy peasy!

– Don’t forget to drop your old electronics off at an R2 or e-Stewards certified recycler to keep things green.

– If things didn’t quite work out, try some simple troubleshooting or reach out to our iPad 8 Answers community for a hand.

– And if all else fails, you can always schedule a repair with Salvation Repair.

Tools Used
  1. TweezersiPad 8 LTE Front Camera Replacement

Success!
Time to put everything back together! Just follow these steps in reverse order and you’ll be good to go.
Got some old e-waste hanging around? Make sure to recycle it the right way by taking it to an R2 or e-Stewards certified recycler.
Repair didn’t go as smoothly as planned? No worries! Try some basic troubleshooting, or if you’re feeling stuck, our community is here to help. Check out the schedule a repair page for more options!

iPad 8 LTE Cellular Antennas Replacement

Duration: 45 minutes
Steps: 61 Steps

Get ready for a fun adventure as you swap out the cellular antennas in your iPad 8 LTE! Just a heads-up: this guide is specifically for the LTE version, so if you have the Wi-Fi model, click here. When working with the battery, make sure to tread carefully with that battery blocker. Those battery contacts can be a bit fragile and might bend or break, which could lead to some serious woes. If you decide to dive into the guide without isolating the battery, try to minimize the use of metal tools unless absolutely necessary (like when removing screws) to keep the battery safe and protect those delicate circuit components. You’ll notice some photos in this guide might feature a different model, but no worries—those little differences won’t mess with the steps you need to follow!

Step 1

– Warm up an iOpener and stick it on the left edge of your device for a solid two minutes to loosen things up.

Tools Used
  1. iOpeneriPad 8 LTE Cellular Antennas Replacement

Step 2

– While the adhesive is doing its thing and loosening up, keep an eye out for these tricky spots that really don’t like being pried:

– Front camera

– Antennas

– Display cables

Step 3

– Slide the blue handle back to release the Anti-Clamp’s arms.

– Set something under your iPad so it stays nice and level between the suction cups.

– Place the suction cups near the center of the left edge—one up top and one down low.

– Keep a steady grip on the bottom of the Anti-Clamp while pressing down firmly on the top cup to get a good suction seal.

Step 4

– Give that blue handle a gentle tug forward to lock those arms in place!

– Now, twist that handle clockwise a full 360 degrees or until those suction cups start stretching out. You’ve got this!

– Keep an eye on those suction cups to make sure they’re staying aligned. If they start to wander off course, just loosen them up a bit and guide those arms back into alignment!

Step 5

– Pause for a minute to let the adhesive loosen up and create a nice opening gap.

– If your screen isn’t heating up enough, try warming the left edge of the iPad with a hair dryer.

– Carefully slide an opening pick under the digitizer once the Anti-Clamp has made a big enough gap.

– Skip the next step.

Step 6

– First things first, warm up that screen until it’s nice and cozy to the touch! Next, grab a suction handle and stick it on the left edge of the screen, as close to the edge as you can get.

– Now, give that screen a gentle lift with the suction handle to create a little gap between the digitizer and the frame. We’re making room for some magic here!

– Slide an opening pick into the gap you just created between the digitizer and the frame. You’re doing great!

Step 7

– Pop in a second opening pick right where you just made that gap.

– Gently slide the pick towards the bottom-left corner of your device to break that adhesive free.

– Keep the pick in that bottom-left corner to stop the adhesive from sticking back together.

Step 8

– If your opening pick gets a little clingy with the adhesive, just give it a smooth little roll along the edge of the iPad to keep things peeling apart nicely.

Step 9

– Gently slide the first opening pick up towards the top-left corner of your device to break free that stubborn adhesive.

– Once you’ve got it in place, leave the pick in the top-left corner to keep that adhesive from being a sticky little rascal and re-sealing.

Step 10

– Warm up an iOpener and place it on the top edge of your device for a solid two minutes to loosen things up.

Tools Used
  1. iOpeneriPad 8 LTE Cellular Antennas Replacement

Step 11

– Gently twist the pick around the top-left corner to loosen up that stubborn adhesive.

Step 12

– Gently slide the opening pick along the top edge of the device, pausing just before you hit the front camera.

Step 13

– Gently pull the pick out until just the tip is nestled between the digitizer and the frame. You’re doing great!

– Carefully slide the pick above the front camera to break the adhesive seal. Keep it smooth!

– Now, leave that pick resting near the right side of the front camera before moving on. You’re almost there!

Step 14

– Take your pick and gently slide it into the top-right corner of your device to fully break free from the adhesive’s grasp.

– Keep that pick snug in the top-right corner to ensure the adhesive doesn’t sneak back and reattach!

Step 15

– Warm up an iOpener and stick it on the right edge of your device for a solid two minutes to get things nice and toasty.

Tools Used
  1. iOpeneriPad 8 LTE Cellular Antennas Replacement

Step 16

– Gently twist the pick around the top-right corner of the device to loosen up that stubborn adhesive.

Step 17

– Pop in a fresh opening pick and slide it smoothly to the center of the iPad’s right side.

Step 18

– Warm up that iOpener and stick it on the bottom edge of your device for a cozy two minutes.

Tools Used
  1. iOpeneriPad 8 LTE Cellular Antennas Replacement

Step 19

– Gently slide the bottom-left pick into the corner to break that sticky bond. You’re doing great!

– Keep the pick in place before moving on to the next step. You’re one step closer!

Step 20

– Grab a fresh opening pick and gently slide it into the gap you’ve made along the bottom edge of your iPad.

– Carefully slide the pick over the antenna, making sure to stop just shy of the home button.

– Now, leave the pick to the left of the home button and get ready to keep moving forward.

Step 21

– Pop an opening pick into the little gap you just made.

– Gently slide the pick under the home button, heading towards the bottom-right corner, making sure only the tip sneaks between the digitizer and the frame.

Step 22

– Gently reinsert that pick and glide it over to the home button to break free from the bottom adhesive like a pro!

– Once you’ve done that, let the pick chill to the right of the home button before moving on to the next step.

Step 23

– Warm up an iOpener and stick it on the right edge of your device for a solid two minutes to get things loosened up.

Tools Used
  1. iOpeneriPad 8 LTE Cellular Antennas Replacement

Step 24

– Give those two opening picks a little twist in the left corners of your iPad! This will gently lift the digitizer and help you break free the last bit of adhesive that’s holding it down. You’ve got this!

Step 25

– Gently lift the left edge of the digitizer to peel away the adhesive along the right edge of your iPad. Keep it steady and take your time—you’re doing great!

Step 26

– Keep the digitizer steady and gently slide an opening pick between the two display cables to carefully loosen the last bit of stubborn adhesive.

Step 27

– After you’ve loosened all the adhesive, gently open the digitizer like a book and let it rest flat next to the iPad.

– When putting everything back together, make sure to clean off any leftover adhesive from the frame—and from the digitizer if you’re reusing it—using some isopropyl alcohol. Then, swap in fresh adhesive strips or pre-cut adhesive cards to keep things secure.

– Keep an eye on those display cables while reassembling. Fold them neatly underneath the LCD screen to avoid any accidental damage.

Step 28

– Grab your tweezers or just use your fingers to peel away any tape hiding those LCD screws.

Tools Used
  1. TweezersiPad 8 LTE Cellular Antennas Replacement

Step 29

– Grab your trusty Phillips screwdriver and let’s get to work! Carefully unscrew those four 4.3 mm screws that are holding the LCD screen in place. You’re doing great, keep it up!

Step 30

– Gently slide a spudger between the frame and the top-right corner of the LCD.

– Carefully pry with the spudger to loosen the adhesive, taking your time to avoid any damage.

Tools Used
  1. SpudgeriPad 8 LTE Cellular Antennas Replacement

Step 31

– Now, let’s tackle the top-left corner of the LCD just like we did before!

Step 32

– Gently use the flat end of a spudger to lift the LCD just enough to grab it with your fingers—easy does it!

– Flip the LCD over like turning a page in a book, starting near the camera and folding it back over the home button side of the frame.

– Place the LCD face down on a clean, soft, lint-free surface so you can get to those display cables without any fuss.

Tools Used
  1. SpudgeriPad 8 LTE Cellular Antennas Replacement

Step 33

– Grab your trusty Phillips screwdriver and gently unscrew the 2.3 mm-long screw that’s holding the battery connector snugly to the logic board. You’re doing great!

Step 34

Step 35

– Gently slide the battery blocker under the logic board’s battery connector at about a 35-degree angle—smooth and steady wins the race.

– Keep that battery blocker right where it is while you continue working to keep things safe and sound.

Tools Used
  1. Battery BlockeriPad 8 LTE Cellular Antennas Replacement

Step 36

– Grab your Phillips screwdriver and carefully unscrew the three tiny 1.4 mm screws holding down the display cable bracket.

Step 37

– Gently lift off the display cable bracket using tweezers or your fingers—easy does it!

Tools Used
  1. TweezersiPad 8 LTE Cellular Antennas Replacement

Step 38

– Grab that trusty spudger and gently lift up to disconnect the LCD cable press connector – it’s like giving your device a little hug!

– When it’s time to reconnect, line it up just right and press down on one side until you hear that satisfying click. Then, do the same on the other side. Easy peasy!

– Remember, no need to apply pressure in the middle. If things get a bit wobbly and the connector isn’t lined up, those pins can bend and we definitely don’t want that! Keep it aligned and you’re golden.

Tools Used
  1. SpudgeriPad 8 LTE Cellular Antennas Replacement

Step 39

– Carefully take off the LCD and lay it face down on a clean, soft, lint-free spot to keep it safe while you work.

Step 40

– Grab your trusty tweezers and gently lift the tape that’s keeping the home button cable ZIF connector under wraps.

Tools Used
  1. TweezersiPad 8 LTE Cellular Antennas Replacement

Step 41

– Grab a spudger, an opening tool, or even your trusty fingernail to gently lift that little hinged locking flap on the home button cable ZIF connector. You’ve got this!

Tools Used
  1. SpudgeriPad 8 LTE Cellular Antennas Replacement

Step 42

– Grab a trusty pair of tweezers and gently tug the home button ribbon cable straight out of the ZIF connector. You’ve got this!

Tools Used
  1. TweezersiPad 8 LTE Cellular Antennas Replacement

Step 43

– Grab your trusty spudger and use its flat end to gently pry up and disconnect those two digitizer cable press connectors. You’re almost there!

Tools Used
  1. SpudgeriPad 8 LTE Cellular Antennas Replacement

Step 44

– Grab your spudger and gently wedge the flat end underneath the vibration isolator that’s hanging out beneath the SIM card reader.

– Pop that vibration isolator off and set it aside.

Tools Used
  1. SpudgeriPad 8 LTE Cellular Antennas Replacement

Step 45

– Grab a pair of tweezers and gently peel the home button cable off the rear case. Nice and steady – you’ve got this!

Tools Used
  1. TweezersiPad 8 LTE Cellular Antennas Replacement

Step 46

– Start by taking off the front panel assembly. You’ve got this!

– If your new display acts a bit quirky with ‘ghost’ or ‘phantom’ touches, no worries! Just grab a piece of super thin insulating tape, like Kapton (polyimide) tape, and apply it to the highlighted spots on the back of the panel. The replacement digitizers from our pals usually come prepped just right, so you might not even need to add any tape!

– Before you put everything back together, make sure to clear away any leftover adhesive from the iPad, and give those glued areas a good clean with some high concentration isopropyl alcohol (90% or higher) using a lint-free cloth. This little prep work is key to making sure your fresh adhesive sticks like a champ.

– Once you’re all set, test out your iPad functions and apply those handy pre-cut adhesive strips to the back of the display using our display adhesive application guide before sealing it up tight. You’re almost there!

Step 47

– Gently lift the LCD buffer tape from the upper component bracket, taking care not to rush it.

Step 48

– Grab your Phillips screwdriver and carefully take out the five screws holding the upper component bracket in place:

– Three screws that are 1.4 mm long

– Two screws that are 1.9 mm long

Step 49

– Grab your trusty spudger and gently nudge the upper component bracket up until you can give it a friendly little tug with your fingers.

– Now, go ahead and remove that upper component bracket like a pro!

Tools Used
  1. SpudgeriPad 8 LTE Cellular Antennas Replacement

Step 50

– Grab the flat end of your spudger and gently pry up to disconnect the front camera cable press connector. Nice and easy, just like that!

Tools Used
  1. SpudgeriPad 8 LTE Cellular Antennas Replacement

Step 51

– Grab a spudger and gently lift the front camera out of its cozy little spot until you can easily grab it with your fingers.

– Now, use the spudger to carefully peel away the adhesive foam pad that’s sticking to the front camera.

Tools Used
  1. SpudgeriPad 8 LTE Cellular Antennas Replacement

Step 52

– Grab a trusty pair of tweezers and give that front camera a gentle grip. Now, twist it clockwise to neatly thread the cable through its cozy little slot in the frame.

– Now, go ahead and take out the front camera!

Tools Used
  1. TweezersiPad 8 LTE Cellular Antennas Replacement

Step 53

– Grab the flat end of your trusty spudger and gently lift the headphone jack’s press connector straight up to disconnect it. Easy does it!

Tools Used
  1. SpudgeriPad 8 LTE Cellular Antennas Replacement

Step 54

– Grab some tweezers and gently lift the headphone jack off the logic board, then give that cable a little nudge to reposition it just right.

Tools Used
  1. TweezersiPad 8 LTE Cellular Antennas Replacement

Step 55

– Grab a Phillips screwdriver and unscrew the three 1.4mm screws holding the cellular antennas in place on the rear case.

Step 56

– Grab your trusty Phillips screwdriver and get ready to tackle those four tiny screws (1.4 mm long) that are holding the cellular antennas snugly in place on the rear case. Let’s set those antennas free!

Step 57

– Gently grab your spudger and use the pointed end to lift up the right cellular antenna coaxial cable, prying as close to the connector as possible. Take it slow, and remember, precision is key!

– Now, let’s move on to the left antenna cable. Disconnect it just like we did with the right one, keeping it steady and simple.

Tools Used
  1. SpudgeriPad 8 LTE Cellular Antennas Replacement

Step 58

– Grab your trusty spudger and use the flat end to gently lift straight up on those press connectors to disconnect both cellular antennas. You’ve got this!

Tools Used
  1. SpudgeriPad 8 LTE Cellular Antennas Replacement

Step 59

– Gently slide the sharp end of your trusty spudger behind the right cellular antenna bracket and give it a little nudge to pop it loose.

– Carefully lift out the right cellular antenna from the rear case and set it aside.

Tools Used
  1. SpudgeriPad 8 LTE Cellular Antennas Replacement

Step 60

– Gently lift the left cellular antenna coaxial cable away from the rear case, like you’re coaxing a shy cat to come out and play.

Step 61

– Put your device back together by following these steps in reverse—easy peasy!

– Got some e-waste? Make sure to recycle it at an R2 or e-Stewards certified spot.

– If things didn’t quite work out, give some basic troubleshooting a shot or reach out to our iPad 8 Answers community for some friendly advice.

– And if you’re stuck, don’t hesitate to schedule a repair with us!

Tools Used
  1. SpudgeriPad 8 LTE Cellular Antennas Replacement

Success!
Now it’s time to put everything back together! Just follow these steps in reverse, and you’ll be all set.
Got some e-waste? Don’t just toss it; take it to an R2 or e-Stewards certified recycler. They’re the real MVPs!
If things didn’t go as smoothly as you hoped, don’t sweat it! Give some basic troubleshooting a whirl, or swing by our iPad 8 Answers community for a little extra support.

iPad 8 LTE Button Control Cable Replacement

Duration: 45 minutes
Steps: 62 Steps

Ready to swap out that button control cable in your iPad 8 LTE? Just a heads-up, this guide is specifically for the LTE version – if you’ve got the Wi-Fi model, head over here. The button control cable includes the lock and volume buttons, so if any of those are giving you trouble, it’s time to replace the whole cable. When isolating the battery with a blocker, take extra care – the battery contacts can easily get bent or broken, and that can lead to some serious (and irreversible) damage. If you decide to skip isolating the battery, try to avoid metal tools unless absolutely necessary (like for screw removal) to avoid causing a short circuit or damaging any sensitive parts. Some images in this guide might be from a slightly different model and may look a little different, but don’t worry – they’ll still guide you through the process just fine.

Step 1

– Warm up an iOpener and stick it on the left side of your device for a solid two minutes to loosen things up.

Tools Used
  1. iOpeneriPad 8 LTE Button Control Cable Replacement

Step 2

– While the adhesive is taking its time to loosen up, keep in mind these areas that are a bit more delicate when it comes to prying:

– Front camera

– Antennas

– Display cables

Step 3

– Slide the blue handle back to release the Anti-Clamp’s arms.

– Set something under your iPad so it stays level between the suction cups.

– Place the suction cups close to the center of the left edge—one near the top and one near the bottom.

– Keep the bottom of the Anti-Clamp steady while pressing down firmly on the top cup to create suction.

Step 4

– Give that blue handle a gentle pull forward to lock the arms in place.

– Spin the handle clockwise a full 360 degrees, or until you see the suction cups start to stretch out.

– Keep an eye on those suction cups — they should stay perfectly lined up. If they start to drift, just loosen them a bit and realign the arms before continuing.

Step 5

– Give the adhesive a minute to loosen up and create a nice little gap. Patience pays off!

– If your screen isn’t warming up as it should, a hair dryer along the left edge of the iPad will do the trick.

– Slide an opening pick under the digitizer once the Anti-Clamp has made enough space for you to get in there.

– Feel free to skip ahead to the next step!

Step 6

– First things first, warm up that screen until it’s toasty! Once it’s nice and warm to the touch, grab a suction handle and stick it right on the left edge of the screen, getting as close to the edge as you can.

– Now for some lifting! Pull gently on the suction handle to create a little gap between the digitizer and the frame.

– Time to get sneaky! Slide an opening pick into that delightful gap you just made between the digitizer and the frame.

Step 7

– Pop a second opening pick into the gap you just made.

– Gently slide that pick down to the bottom-left corner to loosen up the adhesive.

– Keep the pick wedged there so the adhesive doesn’t sneak back and seal itself.

Step 8

– If your opening pick gets stuck in the adhesive, gently “roll” it along the edge of the iPad to keep peeling that sticky stuff apart.

Step 9

– Gently slide the first opening pick towards the top-left corner of your device to break that pesky adhesive loose.

– Once you’ve done that, keep the pick in the top-left corner to stop the adhesive from sticking back together. You’re doing great!

Step 10

– Warm up your iOpener and give the top edge of your device a cozy two-minute hug.

Tools Used
  1. iOpeneriPad 8 LTE Button Control Cable Replacement

Step 11

– Gently twist the pick around the top-left corner to loosen up that stubborn adhesive like a pro.

Step 12

– Gently glide the opening pick along the top edge of your device, making sure to pause just shy of the front camera. You’ve got this!

Step 13

– Gently pull the pick out until only the tip is wedged between the digitizer and the frame.

– Slide the pick above the front camera to loosen the adhesive. Take your time, no rush!

– Leave the pick close to the right side of the front camera, then continue with the next steps.

Step 14

– Grab your trusty pick and slide it right up to the top-right corner of your device to make sure that top adhesive is fully separated. You’ve got this!

– Keep that pick in the top-right corner to make sure the adhesive doesn’t decide to play hide and seek again.

Step 15

– Warm up an iOpener and press it against the right side of your device for a solid two minutes to get things nice and pliable.

Tools Used
  1. iOpeneriPad 8 LTE Button Control Cable Replacement

Step 16

– Gently twist the pick around the top-right corner to loosen up that stubborn adhesive and get things moving.

Step 17

– Grab your opening pick and slide it along the right edge of your iPad, aiming for the middle. Keep it smooth and steady – you’ve got this!

Step 18

– Warm up an iOpener and place it on the bottom edge of your device for a solid two minutes to loosen things up.

Tools Used
  1. iOpeneriPad 8 LTE Button Control Cable Replacement

Step 19

– Gently slide the bottom-left pick into the bottom-left corner to break the adhesive seal.

– Keep the pick in place for now, we’re not done yet—let’s move to the next step!

Step 20

– Slide a new opening pick into the gap you just made along the bottom edge of the iPad.

– Gently glide the pick past the antenna, stopping just before you reach the home button.

– Set the pick down to the left side of the home button and get ready for the next step.

Step 21

– Pop an opening pick into the gap you just made like a pro.

– Gently slide that pick under the home button heading towards the bottom-right corner, keeping just the tip tucked between the digitizer and the frame.

Step 22

– Slide the pick back in and gently work it towards the home button to fully loosen that bottom adhesive.

– Once done, rest the pick just to the right of the home button before moving on.

Step 23

– Warm up your iOpener and gently press it against the right edge of your device for two minutes. This will soften things up and make the next steps easier!

Tools Used
  1. iOpeneriPad 8 LTE Button Control Cable Replacement

Step 24

– Gently twist the two opening picks at the left corners of the iPad to nudge the digitizer up a bit, loosening the last stubborn bits of adhesive along the way.

Step 25

– Gently lift the left edge of the digitizer to loosen the adhesive along the right side of the iPad a bit more.

Step 26

– While carefully holding the digitizer in place, gently slide an opening pick between the two display cables to break free the last bits of adhesive. Keep it steady and you’ll be on your way to a successful repair!

Step 27

– After you’ve carefully loosened all the adhesive, swing the digitizer open like a book and lay it flat next to the iPad.

– When putting things back together, make sure to wipe away any leftover adhesive from both the frame and the digitizer (if you’re reusing it) using some isopropyl alcohol. Then, swap in fresh adhesive strips or pre-cut adhesive cards to keep everything snug.

– Keep an eye on those display cables during reassembly—fold them neatly under the LCD screen to avoid any unwanted damage.

Step 28

– Grab your trusty tweezers and gently peel away the tape that’s keeping the home button cable ZIF connector under wraps. You’re doing great!

Tools Used
  1. TweezersiPad 8 LTE Button Control Cable Replacement

Step 29

– Grab a spudger, an opening tool, or even your trusty fingernail, and gently lift that little hinged locking flap on the home button cable ZIF connector. You’ve got this!

Tools Used
  1. SpudgeriPad 8 LTE Button Control Cable Replacement

Step 30

– Grab a pair of tweezers and carefully pull the home button ribbon cable straight out of the ZIF connector. Take it easy, no need to rush!

Tools Used
  1. TweezersiPad 8 LTE Button Control Cable Replacement

Step 31

– Gently use the flat end of a spudger to lift up and unplug those two digitizer cable press connectors. You’ve got this!

Tools Used
  1. SpudgeriPad 8 LTE Button Control Cable Replacement

Step 32

– Grab the flat end of your trusty spudger and gently pry up the vibration isolator hiding just below the SIM card reader.

– Now, carefully remove the vibration isolator and set it aside.

Tools Used
  1. SpudgeriPad 8 LTE Button Control Cable Replacement

Step 33

– Grab a pair of tweezers and gently lift the home button cable off the rear case. Easy does it!

Tools Used
  1. TweezersiPad 8 LTE Button Control Cable Replacement

Step 34

– Let’s kick things off by taking off that front panel assembly.

– If your new display is acting a bit quirky with ‘ghost’ or ‘phantom’ touches, fear not! A super thin layer of insulating tape, like Kapton (polyimide) tape, can save the day! Just stick it to the highlighted areas on the back of the panel. And guess what? Our replacement digitizers already come with the right insulation, so you shouldn’t need to add any extra tape.

– Now, as we gear up for reassembly, make sure to clear away any leftover adhesive from the iPad. Grab some high concentration isopropyl alcohol (90% or more) and a lint-free cloth to clean those glued areas. This little prep will set the stage for fresh adhesive to bond like a champ.

– Before sealing everything up, give your iPad a quick function test and then carefully install the pre-cut adhesive strips on the back of the display using our handy display adhesive application guide.

Step 35

– Grab your tweezers and carefully lift the tape that’s hiding the home button cable’s ZIF connector. Nice and easy, you’ve got this!

Tools Used
  1. TweezersiPad 8 LTE Button Control Cable Replacement

Step 36

– Grab a spudger, an opening tool, or even your fingernail to gently lift up the tiny hinged locking flap on the home button cable ZIF connector. You’ve got this!

Tools Used
  1. SpudgeriPad 8 LTE Button Control Cable Replacement

Step 37

– Grab your tweezers and gently pull the home button ribbon cable straight out of the ZIF connector—steady hands win the day!

Tools Used
  1. TweezersiPad 8 LTE Button Control Cable Replacement

Step 38

– Grab the flat end of your spudger and gently wiggle it under the digitizer cable connectors. Once you’ve got a good grip, pry them apart to disconnect. Easy does it!

Tools Used
  1. SpudgeriPad 8 LTE Button Control Cable Replacement

Step 39

– Grab the flat end of your trusty spudger and gently pry up the vibration isolator hanging out right below the SIM card reader.

– Once you’ve got it loose, go ahead and remove that vibration isolator like a pro!

Tools Used
  1. SpudgeriPad 8 LTE Button Control Cable Replacement

Step 40

– Grab your trusty tweezers and gently lift the home button cable away from the rear case. Easy does it!

Tools Used
  1. TweezersiPad 8 LTE Button Control Cable Replacement

Step 41

– First things first, let’s get that front panel assembly off. You’ve got this!

– If your new display is acting a bit quirky with ‘ghost’ or ‘phantom’ touch inputs, no worries! Just add a super thin layer of insulating tape, like Kapton (polyimide) tape, to the highlighted spots on the back of the panel. The replacement digitizers we provide come equipped with the right insulation, so you likely won’t need any extra tape.

– When it’s time to put everything back together, make sure to remove any leftover adhesive from your iPad, and give those glued areas a good clean with some high concentration isopropyl alcohol (90% or greater) and a lint-free cloth. This will prep your iPad for some fresh adhesive and ensure a solid bond.

– Before sealing it all up, test out your iPad’s functions and apply those pre-cut adhesive strips to the back of the display, using our display adhesive application guide. You’re almost there!

Step 42

– Gently lift the LCD buffer tape off the top component bracket—take it slow and steady, you’ve got this!

Step 43

– Grab your trusty Phillips screwdriver and let’s tackle those five screws that are holding the upper component bracket in place:

– Three screws measuring 1.4 mm long – they’re the little guys!

– And two slightly taller screws at 1.9 mm long – they might be small, but they’re essential!

Step 44

– Gently pry up the upper component bracket using the pointed end of your spudger until you can grab it with your fingers.

– Take the upper component bracket off and set it aside.

Tools Used
  1. SpudgeriPad 8 LTE Button Control Cable Replacement

Step 45

– Grab your spudger and use its flat end to gently pry up and disconnect the rear camera press connector. Be gentle, it’s a bit of a delicate move, but you’ve got this!

Tools Used
  1. SpudgeriPad 8 LTE Button Control Cable Replacement

Step 46

– Warm up that iOpener and give it a cozy spot on the top-left edge of your iPad’s back for about thirty seconds. This little trick will help loosen the adhesive holding that rear camera in place!

Tools Used
  1. iOpeneriPad 8 LTE Button Control Cable Replacement

Step 47

– Grab your opening tool and carefully work around the rear camera to gently pop it out of the rear case. Take it slow, and you’ll be all set!

Step 48

– Grab your tweezers, or just use your fingers, and carefully pop out the rear camera. It’s a simple move, so don’t sweat it!

Tools Used
  1. TweezersiPad 8 LTE Button Control Cable Replacement

Step 49

– Carefully remove any tape that’s covering the button control cable ZIF connector. It’s like peeling off a sticker, but even more satisfying!

Step 50

– Gently use the tip of a spudger, an opening tool, or even your trusty fingernail to lift up that little hinged locking flap on the button control cable ZIF connector. You’ve got this!

Tools Used
  1. SpudgeriPad 8 LTE Button Control Cable Replacement

Step 51

– Grab your tweezers and gently wiggle the button control cable straight out of the ZIF connector—steady hands for the win!

Tools Used
  1. TweezersiPad 8 LTE Button Control Cable Replacement

Step 52

– Grab your trusty Phillips screwdriver and let’s get to work! Carefully take out those two 2.3 mm-long screws that are holding the volume button bracket snugly in place on the rear case. You’ve got this!

Step 53

– Grab your trusty Phillips screwdriver and get ready to tackle those two 2.3 mm-long screws that are keeping the lock button bracket in place. Let’s unscrew and set it free!

Step 54

– Take your spudger and gently wedge it between the rear case and the bottom of the volume button bracket to carefully pop it loose.

– Once it’s freed, go ahead and remove the volume button bracket.

Tools Used
  1. SpudgeriPad 8 LTE Button Control Cable Replacement

Step 55

– Gently use the flat end of a spudger to nudge the volume buttons out from their spots in the back case.

Tools Used
  1. SpudgeriPad 8 LTE Button Control Cable Replacement

Step 56

– Carefully slide an opening pick between the button control cable and the rear case.

– Gently push the pick upward toward the lock button to slice through the adhesive holding the button control cable to the rear case.

Step 57

– Gently unplug the button control cable.

– When putting everything back together, make sure to pop the lock button snugly back into its slot.

Step 58

– Warm up that iOpener and give it a cozy hug around the button control cable for about thirty seconds.

Tools Used
  1. iOpeneriPad 8 LTE Button Control Cable Replacement

Step 59

– Grab your trusty tweezers and give the upper volume button a gentle squeeze.

– Slide an opening pick in between the volume control cable and the upper volume button like a pro.

– Carefully peel away the volume control cable from the upper volume button. You’ve got this!

Tools Used
  1. TweezersiPad 8 LTE Button Control Cable Replacement

Step 60

– Now, let’s keep that momentum going! Just like before, gently peel the volume control cable away from the lower volume button. You’ve got this!

Step 61

– Grab your trusty tweezers and give that lock button bracket a gentle squeeze.

– Slide a halberd spudger or opening pick right between the lock button bracket and the button control cable—like a smooth operator.

– Carefully peel that button control cable away from the pegs on the lock button bracket—think of it as a little stretching exercise for your device.

– When it’s time to put everything back together, don’t forget to use some Tesa tape to keep those volume buttons and lock button bracket snugly attached to the button control cable.

Step 62

– Put your device back together by following these steps in reverse—easy peasy!

– Got some old tech? Make sure to drop it off at an R2 or e-Stewards certified recycler to keep things green.

– If things didn’t quite work out, give some basic troubleshooting a shot, or check out the iPad 8 Answers community for a bit of extra help.

Success!
Put your device back together by retracing these steps in reverse.
Remember to recycle your electronic waste responsibly at an R2 or e-Stewards certified facility.
If things didn’t quite work out, try some basic troubleshooting or get a hand from our iPad 8 Answers community.
And if you get stuck, you can always schedule a repair with us!

iPad 8 LTE Battery Replacement

Duration: 45 minutes
Steps: 119 Steps

Ready to swap out the battery in your iPad 8 LTE? You’re in the right place! Just a heads up: this guide is for the LTE version only, so if you’re rocking the Wi-Fi version, check out the other guide. First thing’s first—safety! Make sure the battery is under 25% before diving in. This lowers the risk of fire if things go sideways. If your battery’s a little puffy, take extra care. When you’re isolating the battery with a battery blocker, go slow! The contacts can be fragile, and you definitely don’t want to bend or break them. If you’re feeling brave and decide not to isolate the battery, avoid using metal tools unless absolutely necessary (like when you’re unscrewing things) to avoid damaging your battery or the delicate components. Some of the photos in this guide are from a different model, but don’t worry—nothing that’ll mess with the steps. If this feels like too much, no worries! You can always schedule a repair for expert help.

Step 1

– Warm up an iOpener and stick it onto the left side of your device for a solid two minutes to get things nice and toasty.

Tools Used
  1. iOpeneriPad 8 LTE Battery Replacement

Step 2

– As the adhesive is softening up, keep in mind these tricky spots where prying can cause trouble:

– Front camera

– Antennas

– Display cables

Step 3

– Pull the blue handle back to release the Anti-Clamp’s arms.

– Set an object under your iPad so it sits evenly between the suction cups.

– Place the suction cups close to the center of the left edge—one near the top, the other near the bottom.

– Keep the bottom of the Anti-Clamp steady and press down firmly on the top cup to create suction.

Step 4

– Grab the blue handle and pull it forward to lock those arms in place.

– Give the handle a smooth 360-degree clockwise turn, or keep going until you feel the suction cups start to stretch.

– Keep an eye on the suction cups to make sure they stay perfectly lined up. If they start to drift, just loosen them a bit and realign the arms before moving on.

Step 5

– Give it a minute to let the adhesive loosen up and create a little opening gap.

– If the screen isn’t warming up enough, try gently heating the left edge of the iPad with a hair dryer.

– Once the Anti-Clamp has made a big enough gap, slide an opening pick under the digitizer.

– Skip the next step.

Step 6

– Once the screen feels pleasantly warm, grab a suction handle and stick it onto the left edge of the screen, as close to the edge as you can get.

– Gently pull up on the suction handle to create a tiny gap between the digitizer and the frame.

– Slide an opening pick into that little gap you just made between the digitizer and the frame.

Step 7

– Pop a second opening pick into the gap you just made.

– Gently slide that pick down to the bottom-left corner to loosen the adhesive.

– Keep the pick wedged there so the adhesive doesn’t sneak back together.

Step 8

– If your opening pick gets stuck in the adhesive, try gently ‘rolling’ it along the edge of the iPad to keep peeling that sticky stuff away.

Step 9

– Gently slide your first opening pick up towards the top-left corner to loosen that stubborn adhesive.

– Keep the pick wedged in the top-left corner so the adhesive doesn’t sneak back and seal itself.

Step 10

– Warm up your iOpener and give it a cozy two-minute hug on the top edge of your device.

Tools Used
  1. iOpeneriPad 8 LTE Battery Replacement

Step 11

– Gently twist the pick around the top-left corner to loosen up that stubborn adhesive.

Step 12

– Gently slide the opening pick along the top edge of your device, stopping just shy of the front camera to keep things safe and sound.

Step 13

– Gently pull the pick so that only the tip is sitting comfortably between the digitizer and the frame. A little goes a long way!

– Slide the pick above the front camera, giving the adhesive a little nudge to separate. Just a smooth, steady motion.

– Keep the pick resting near the right side of the front camera for now, and get ready to move on to the next step!

Step 14

– Slide the pick back in and gently glide it toward the top-right corner to fully loosen the adhesive holding that area.

– Keep the pick lodged in the top-right corner so the adhesive doesn’t sneak back together on you.

Step 15

– Warm up an iOpener and stick it to the right side of your device for a solid two minutes to get things nice and toasty.

Tools Used
  1. iOpeneriPad 8 LTE Battery Replacement

Step 16

– Give that pick a little spin around the top-right corner of your device to break free the adhesive. You’ve got this!

Step 17

– Grab your trusty opening pick and gently slide it into the middle of the iPad’s right edge like you’re unzipping a cozy sleeping bag. Nice and smooth!

Step 18

– Warm up an iOpener and stick it on the bottom edge of your device for about two minutes. Give it some time to work its magic!

Tools Used
  1. iOpeneriPad 8 LTE Battery Replacement

Step 19

– Gently slide the bottom-left pick all the way to the bottom-left corner to loosen up that adhesive.

– Keep the pick nestled in the corner before moving on to the next step.

Step 20

– Slide a fresh opening pick into the gap you just made along the bottom edge of the iPad.

– Gently glide the pick across the antenna, stopping right before you hit the home button.

– Keep the pick resting just to the left of the home button before moving on.

Step 21

– Pop an opening pick into the little gap you just made.

– Carefully slide the pick under the home button heading toward the bottom-right corner, making sure only the tip is sneaking between the digitizer and frame.

Step 22

– Slide the pick back in and gently nudge it towards the home button to fully loosen that bottom adhesive.

– Let the pick chill just to the right of the home button before moving on.

Step 23

– Warm up an iOpener and chill it on the right edge of your device for a solid two minutes—think of it as a little spa moment for your gadget before the next step.

Tools Used
  1. iOpeneriPad 8 LTE Battery Replacement

Step 24

– Give those opening picks a little twist at the left corners of your iPad! This will help you gently lift the digitizer just enough to break free the last bit of adhesive. You’re doing great!

Step 25

– Gently lift the left edge of the digitizer upwards to help loosen the adhesive along the right side of the iPad, making the separation smoother.

Step 26

– Keep the digitizer steady while you gently slide an opening pick between the two display cables to carefully break apart the last bit of adhesive.

Step 27

– After you’ve successfully separated all that sticky adhesive, gently swing the digitizer open like a book and lay it down parallel to your iPad. Easy peasy!

– As you put everything back together, don’t forget to tidy up! Use some isopropyl alcohol to clean off any leftover adhesive from the frame—and if you’re reusing the digitizer, give it a little love too. To stick it all back together, our adhesive strips or pre-cut adhesive cards are your best pals.

– Keep an eye on those delicate display cables while you’re reassembling your device. Make sure they’re neatly tucked under the LCD screen to avoid any mishaps. You’re doing great!

Step 28

– Grab your tweezers or just your trusty fingers, and gently peel away any tape that’s hiding the LCD screws. You’ve got this!

Tools Used
  1. TweezersiPad 8 LTE Battery Replacement

Step 29

– Grab your trusty Phillips screwdriver and let’s get to work! Start by removing those four 4.3 mm screws holding the LCD screen in place. You’ve got this!

Step 30

– Slide a spudger into the gap between the frame and the top-right corner of the LCD.

– Gently pry with the spudger to break that stubborn adhesive free.

Tools Used
  1. SpudgeriPad 8 LTE Battery Replacement

Step 31

– Do the same thing you just did, but now tackle the top-left corner of the LCD. You got this!

Step 32

– Take the flat end of your spudger and gently wiggle it under the LCD to pop it out just enough so you can grab it with your fingers.

– Flip the LCD over like you’re turning a page in a book—lift near the camera and carefully fold it over toward the home button side of the frame.

– Place the LCD on a clean, soft, lint-free surface to give yourself some room to access those display cables.

Tools Used
  1. SpudgeriPad 8 LTE Battery Replacement

Step 33

– Grab your Phillips screwdriver and carefully unscrew the 2.3 mm-long screw that’s holding the battery connector onto the logic board. Steady hands, you got this!

Step 34

Step 35

– Gently slide the battery blocker under the logic board’s battery connector at a 35-degree angle—think of it as giving the connector a gentle nudge in the right direction.

– Keep the battery blocker in place as you continue working—like holding the door open for your next step.

Tools Used
  1. Battery BlockeriPad 8 LTE Battery Replacement

Step 36

– Grab a Phillips screwdriver and go ahead and unscrew the three 1.4 mm-long screws holding the display cable bracket in place. Easy does it!

Step 37

– Grab those tweezers or use your fingers to gently pop off the display cable bracket. You’ve got this!

Tools Used
  1. TweezersiPad 8 LTE Battery Replacement

Step 38

– Grab your trusty spudger and gently slide the flat end underneath the LCD cable press connector to pry it up and disconnect.

– When you’re ready to reattach the connector, line it up carefully and press down one side until you hear that satisfying click. Then, do the same on the other side.

– Avoid pressing the middle too hard—if the connector is off-center, you might bend the pins, and that’s a permanent bummer.

Tools Used
  1. SpudgeriPad 8 LTE Battery Replacement

Step 39

– Carefully lift the LCD off completely and lay it face down on a clean, soft, lint-free surface to keep it safe and sound.

Step 40

– Grab a trusty pair of tweezers and gently peel away the tape that’s guarding the home button cable ZIF connector. You’ve got this!

Tools Used
  1. TweezersiPad 8 LTE Battery Replacement

Step 41

– Grab a spudger, an opening tool, or even your fingernail, and gently flip up the tiny hinged locking flap on the home button cable’s ZIF connector to get things moving.

Tools Used
  1. SpudgeriPad 8 LTE Battery Replacement

Step 42

– Grab a pair of tweezers and gently pull the home button ribbon cable straight out of the ZIF connector. Take it slow and steady—you’ve got this!

Tools Used
  1. TweezersiPad 8 LTE Battery Replacement

Step 43

– Grab your trusty spudger and use its flat end to gently pry up and disconnect those two digitizer cable press connectors. You’re doing great!

Tools Used
  1. SpudgeriPad 8 LTE Battery Replacement

Step 44

– Grab your trusty spudger and gently lift up that vibration isolator hanging out below the SIM card reader. It’s time for it to come out and play!

– Now, go ahead and pull out the vibration isolator. You’re doing great!

Tools Used
  1. SpudgeriPad 8 LTE Battery Replacement

Step 45

– Grab your trusty tweezers and gently coax the home button cable away from the rear case. You’ve got this!

Tools Used
  1. TweezersiPad 8 LTE Battery Replacement

Step 46

– First up, let’s pop off that front panel assembly. Easy peasy!

– If your new display is throwing a tantrum with ‘ghost’ or ‘phantom’ touch inputs, don’t sweat it! Just grab some super thin insulating tape, like Kapton (polyimide) tape, and stick it to the highlighted spots on the back of the panel. Most replacement digitizers come prepped with the right insulation, so you shouldn’t need to fuss with any extra tape.

– Now, during reassembly, make sure to clear off any leftover adhesive from your iPad. Give those glued areas a good scrub with high concentration isopropyl alcohol (90% or greater) and a lint-free cloth. This little prep work is key to making sure your fresh adhesive sticks like it should.

– Before sealing everything back up, give your iPad’s functions a quick test and apply the pre-cut adhesive strips to the back of the display using our handy display adhesive application guide. You got this!

Step 47

– Grab a SIM eject tool, a tiny bit, or even a straightened paper clip and pop it into the SIM card tray hole.

– Give it a firm press to make the SIM card tray pop right out.

Step 48

– Gently pop out the SIM card tray from your iPad to get started.

Step 49

– Gently lift the LCD buffer tape off the top component bracket with care.

Step 50

– Grab your Phillips screwdriver and gently take out the five screws holding the upper component bracket in place:

– Three screws, each 1.4 mm long

– Two screws, each 1.9 mm long

Step 51

– Gently use the pointed end of your spudger to pry up the upper component bracket just enough so you can grab it with your fingers.

– Carefully lift and remove the upper component bracket.

Tools Used
  1. SpudgeriPad 8 LTE Battery Replacement

Step 52

– Grab that trusty spudger and gently slide the flat end underneath the front camera cable press connector. With a little finesse, pry it up to disconnect it. You’re doing great!

Tools Used
  1. SpudgeriPad 8 LTE Battery Replacement

Step 53

– Grab your trusty spudger and gently pry the front camera out of its cozy little spot until you can give it a friendly pinch with your fingers.

– Next, use that spudger to peel away the adhesive foam pad that’s been hugging the front camera.

Tools Used
  1. SpudgeriPad 8 LTE Battery Replacement

Step 54

– Grab your tweezers and gently latch onto the front camera, then twist it clockwise to guide the cable smoothly through its frame slot.

– Now, carefully take out the front camera.

Tools Used
  1. TweezersiPad 8 LTE Battery Replacement

Step 55

– Gently pry up the headphone jack connector straight up using the flat end of a spudger to disconnect it.

Tools Used
  1. SpudgeriPad 8 LTE Battery Replacement

Step 56

– Grab your tweezers and gently lift the headphone jack off the logic board, then give the cable a little nudge to set it back in place.

Tools Used
  1. TweezersiPad 8 LTE Battery Replacement

Step 57

– Grab your trusty Phillips screwdriver and let’s tackle those three little screws, each measuring 1.4 mm, that are holding the cellular antennas snugly to the rear case. You’ve got this!

Step 58

– Grab the pointy end of your spudger and gently pry up the right cellular antenna coaxial cable right next to the connector to disconnect it.

– Next up, unplug the left antenna cable with a smooth move.

Tools Used
  1. SpudgeriPad 8 LTE Battery Replacement

Step 59

– Gently lift the left cellular antenna coaxial cable away from the back of the case.

Step 60

– Grab the flat end of your trusty spudger and gently lift straight up on those press connectors to unplug both cellular antennas like a pro.

Tools Used
  1. SpudgeriPad 8 LTE Battery Replacement

Step 61

– Grab the flat end of your spudger and gently lift the rear camera’s press connector straight up to unplug it. Easy does it!

Tools Used
  1. SpudgeriPad 8 LTE Battery Replacement

Step 62

– Grab your trusty spudger and gently lift the microphone assembly straight up from the press connector. You’ve got this!

Tools Used
  1. SpudgeriPad 8 LTE Battery Replacement

Step 63

– Carefully peel back any tape that’s hiding the button control cable ZIF connector.

Step 64

– Gently use the tip of a spudger, an opening tool, or even your fingernail to flip up the tiny, hinged locking flap on the button control cable’s ZIF connector. Easy does it!

Tools Used
  1. SpudgeriPad 8 LTE Battery Replacement

Step 65

– Grab a pair of tweezers and gently wiggle that button control cable right out of the ZIF connector. You’ve got this!

Tools Used
  1. TweezersiPad 8 LTE Battery Replacement

Step 66

– Gently peel away any tape that’s covering the Smart Cover sensor cable ZIF connector. Take your time, no rush!

Step 67

– Grab your trusty spudger, an opening tool, or even your fingernail, and gently lift that little hinged locking flap on the Smart Cover sensor cable ZIF connector. You’ve got this!

Tools Used
  1. SpudgeriPad 8 LTE Battery Replacement

Step 68

– Grab a trusty pair of tweezers and gently pull the Smart Cover sensor cable straight out of the ZIF connector. No rush, just a steady hand!

Tools Used
  1. TweezersiPad 8 LTE Battery Replacement

Step 69

– Gently use a spudger or an opening tool, or even your trusty fingernail, to lift the little hinged locking flap on the SIM card reader cable ZIF connector. You’ve got this!

Tools Used
  1. SpudgeriPad 8 LTE Battery Replacement

Step 70

– Grab your tweezers and gently wiggle the SIM card reader cable straight out of the ZIF connector—easy does it!

Tools Used
  1. TweezersiPad 8 LTE Battery Replacement

Step 71

– Slide the sharp end of a spudger under the right antenna cable and give it a gentle lift to disconnect it. You’re doing great!

Tools Used
  1. SpudgeriPad 8 LTE Battery Replacement

Step 72

– Gently lift the right antenna cable up like you’re giving it a little wave!

Step 73

– Gently slide the pointed end of your spudger under the left antenna cable. Give it a little lift to disconnect it, no need to force it!

Tools Used
  1. SpudgeriPad 8 LTE Battery Replacement

Step 74

– Gently lift the left antenna cable off the rear case, sliding along the bottom edge of the iPad.

Step 75

– Grab your trusty spudger and gently wiggle the flat end to lift up the vibration isolator located in the bottom left corner of the iPad. It’s like giving it a little nudge to say, ‘Hey, time to come out!’

– Once it’s up, let your tweezers do the magic and carefully pull out the vibration isolator. You’re on the right track!

Tools Used
  1. SpudgeriPad 8 LTE Battery Replacement
  2. TweezersiPad 8 LTE Battery Replacement

Step 76

– Grab a pair of tweezers or use your fingernail to gently lift up the tape covering the speaker connectors. Easy peasy!

Tools Used
  1. TweezersiPad 8 LTE Battery Replacement

Step 77

– Gently use the tip of a spudger, opening tool, or even your fingernail to lift up the tiny locking flap on both the left and right speaker cable ZIF connectors. Take your time, it’s a small step but totally necessary!

Tools Used
  1. SpudgeriPad 8 LTE Battery Replacement

Step 78

– Grab those tweezers and gently wiggle out the left and right speaker cables from their cozy ZIF connectors. You’ve got this!

Tools Used
  1. TweezersiPad 8 LTE Battery Replacement

Step 79

– Grab the pointed end of your spudger and carefully pry up the Smart Connector coaxial cable right next to the connector to disconnect it without a fuss.

Tools Used
  1. SpudgeriPad 8 LTE Battery Replacement

Step 80

– Grab a pair of tweezers and gently lift the Smart Connector cable connector straight up to disconnect it.

Tools Used
  1. TweezersiPad 8 LTE Battery Replacement

Step 81

– Grab your trusty tweezers and gently lift the tape holding the Smart Connector cables to the back case. Easy does it!

Tools Used
  1. TweezersiPad 8 LTE Battery Replacement

Step 82

– Gently peel the Smart Connector cables off the rear case. Take your time—no need to rush, just a smooth pull will do!

Step 83

– Warm up an iOpener and place it on the bottom left corner of the back case to gently loosen the SIM card tray’s adhesive for about thirty seconds.

Tools Used
  1. iOpeneriPad 8 LTE Battery Replacement

Step 84

– Gently use an opening tool to lift the bottom edge of the SIM card reader. Take your time and apply a steady force—you’ve got this!

Step 85

– Carefully take out the SIM card reader.

Step 86

– Grab your trusty Phillips screwdriver and unscrew the four screws holding the charging port in place:

– Two 2.2 mm-long screws

– Two 3.2 mm-long screws

Step 87

– Warm up an iOpener and place it on the bottom, top, and logic board side of the iPad, holding each spot for about thirty seconds to loosen things up.

Tools Used
  1. iOpeneriPad 8 LTE Battery Replacement

Step 88

– Gently slide an opening pick under the charging port cable, right by the charging port, and work your way towards the logic board to slice through the adhesive. Nice and easy – you’re doing great!

Step 89

– Gently wiggle the charging port free from its cozy spot in the frame.

Step 90

– Slide an opening pick under the upper arm of the logic board and gently push it toward the board to slice through the adhesive holding it to the rear case.

– Keep that opening pick in place to stop the adhesive from sticking back together.

Step 91

– Take off the battery blocker to get things moving.

Tools Used
  1. Battery BlockeriPad 8 LTE Battery Replacement

Step 92

– Place an opening tool carefully near the bottom of the logic board. Gently work it under the board, applying a steady, controlled force to lift it away from the rear case. Patience is key—take your time, and you’ll get it!

Step 93

– Slide an opening tool gently into the middle of the logic board and carefully lift it up with a steady hand to separate it from the rear case.

Step 94

– Slide an opening tool in near the top of the logic board and gently pry it up with a slow and steady motion to separate it from the rear case.

Step 95

– Slide an opening tool into the center of the logic board and gently lift it up until you can hold it comfortably with your fingers.

Step 96

– Grab a halberd spudger or an opening pick and gently work your way through any stubborn adhesive still holding the logic board in place. A little patience goes a long way here!

Step 97

– First things first, let’s get that logic board out of there! It’s time for a little extraction.

– When you’re putting things back together, double-check that no pesky ribbon cables are caught under the logic board before you secure it down with glue.

– And before you seal the deal, make sure to wipe off any leftover adhesive using some high-strength isopropyl alcohol (90% or higher). Then, grab some Tesa tape to keep that Logic Board snugly attached to the chassis!

Step 98

– Grab a strip of painter’s tape or some trusty Scotch tape, and cut it to match the width of your iPad.

– Now, take that tape and firmly press the bottom edge onto the rear case just above the speakers and bottom antennas.

– Finally, secure the top edge of the tape strip over the bottom components to keep those sneaky cables from interfering with your battery removal.

Step 99

– Now, let’s give those upper components the same taping treatment. Keep it smooth and steady, and you’ll be cruising through this step in no time!

Step 100

– Safety first! Pop on some eye protection before you dive into handling that adhesive remover.

– Contacts off! Make sure to protect those peepers with some eye gear if you’re rocking lenses.

– We’ve got you covered with gloves in your kit. If you’re worried about skin irritation, now’s the time to slip them on.

Step 101

– Start by carefully peeling off the black rubber stopper from your adhesive remover bottle. A gentle tug should do the trick!

– Next, grab your trusty scissors and snip off the sealed tip of the applicator. Be precise, but don’t stress—it’s just a quick trim!

Step 102

– The red boxes highlight where those sticky strips are tucked away, holding the battery snugly against the back case.

Step 103

– Gently apply a few drops of adhesive remover or some strong isopropyl alcohol along the left edge of the battery. This will help loosen things up so you can proceed with the next step. Take it slow and steady!

Step 104

– Drop a few dabs of adhesive remover or some potent isopropyl alcohol right along the bottom edge of the battery. Let’s get that sticky situation sorted out!

Step 105

– Squeeze a couple of drops of adhesive remover or high-concentration isopropyl alcohol right between the battery cells. This will help loosen things up, so you can keep moving forward with the repair!

Step 106

– Drop a few splashes of adhesive remover or high-concentration isopropyl alcohol along the right edge of the battery. This will help loosen things up for the next step.

Step 107

– Drop a few beads of adhesive remover or some high-strength isopropyl alcohol right along the top edge of the battery. It’s like giving your device a little spa treatment before we get to the real work!

Step 108

– Slide a plastic card gently into the bottom right corner of the battery to get things moving.

Tools Used
  1. iOpeneriPad 8 LTE Battery Replacement

Step 109

– Slide the plastic card carefully under the right edge, aiming for the center.

– Push the plastic card as deep as you can under the battery to gently separate it from the adhesive.

– Remove the plastic card and keep it aside.

Step 110

– Slide that trusty plastic card underneath the battery connector and push it in as far as it will go. You’re doing great!

– Keep that plastic card right where it is. It’ll be your little helper for a moment!

Step 111

– Slide another plastic card above the battery connector, pushing it in as far as it will comfortably go.

Step 112

– Gently slide a plastic card under the bottom edge of the battery, making sure it goes right under the battery connector. Be careful not to force it!

Step 113

– Gently slide that trusty plastic card along the bottom edge of the battery to break free the adhesive strip holding it in place. You’ve got this!

– When you hit the left corner at the bottom edge, slide the plastic card in as deep as it can go. Keep going; you’re doing great!

Step 114

– Gently slide the plastic card beneath the battery connector, just above it, and wiggle it in under the upper edge of the battery.

– Now, move the plastic card along the top edge of the battery to break through the adhesive strip.

Tools Used
  1. iOpeneriPad 8 LTE Battery Replacement

Step 115

– As you approach the upper left corner, slide that trusty plastic card in as deep as it’ll go!

Step 116

– Slide the plastic card gently under the upper left corner of the battery.

– Carefully move the plastic card downwards towards the bottom edge of the iPad.

– Once you reach the center of the battery, push the card as deep as it will go to break through the adhesive strip in the middle.

Step 117

– Slip that plastic card gently under the bottom left corner of the battery.

– Now, glide the card upwards towards the top of your iPad like you’re on a smooth, techy ride!

Step 118

– Once you hit the center edge, slide that plastic card in as deep as it’ll go to slice through the middle adhesive strip.

Step 119

– Time to put everything back together! Just follow the steps you took in reverse order, and your device will be good to go.

– Don’t forget to give your new battery a little TLC—calibrate it after you finish, and you’ll be running smoothly.

– Got some old tech lying around? Take it to a certified recycler like R2 or e-Stewards and make sure it’s disposed of responsibly.

– Did something not go quite as planned? No worries, just try some basic troubleshooting. Or, if you’re feeling stuck, feel free to schedule a repair and we’ll help you out.

Success!
Put your device back together by retracing these steps in reverse.
For the best performance, make sure to calibrate your new battery once you’re done.
Dispose of your old electronics responsibly by taking them to an R2 or e-Stewards certified recycler.
If things didn’t go as planned, try some basic troubleshooting or reach out to our iPad 8 Answers community for support.

iPad 7 Teardown

Duration: 45 minutes
Steps: 8 Steps

Apple’s 7th-generation iPad is here, bringing some fresh upgrades! Along with a sleek new 10.2” display, it still carries over a lot of the tried-and-true features from its fancier siblings. What other familiar features has Apple included? We’re ready to dive in and show you all the inside details with this teardown. Want the latest teardown news? Keep up with us on YouTube, Twitter, Instagram, or Facebook, and don’t forget to subscribe to our newsletter for more cool teardown updates.

Step 1

– Before we dive in, let’s take a quick look at what we’ve got under the hood. This device is rocking a mix of classic and cutting-edge tech:

– Apple A10 Fusion chip with a built-in M10 motion coprocessor (perfect for those beachside iPad jogs, if that’s your thing!)

– A 10.2-inch Retina display that’s multi-touch and packs 2160 × 1620 pixels (264 ppi) for crystal-clear visuals.

– Choose between 32 GB or 128 GB of internal storage, depending on your needs (more space, more memories!).

– 8 MP rear camera with 1080p resolution, plus a 1.2 MP front-facing FaceTime HD camera for those crisp selfies or video calls.

– Dual-band MIMO Wi-Fi (802.11a/b/g/n/ac) + Bluetooth 4.2, so you’re always connected.

– Touch ID fingerprint sensor, 3-axis gyro, accelerometer, barometer, and an ambient light sensor to round out the smart features.

Step 2

– The team at Creative Electron has been putting in the extra hours this week, and when we asked for a glimpse inside this iPad, they managed to gather some more electrons for us to explore.

– Peeking beyond the iPad’s sleek exterior, we can see that the magnet pattern along the edges has taken a new twist compared to last year.

– And check out that Smart Connector cable! It takes a bit of a scenic route around the battery, but hey, it’s definitely a smarter move than previous designs that left the cable tangled under a glued-down battery.

Step 3

– This iPad is packing some serious extra screen real estate—it’s now a 10.2″ model, up from last year’s 9.7″. Bigger, better, and ready to go!

– We’re diving right in! No time for detours—there’s plenty to get through, so we’re jumping straight into our reliable heat-and-suction method to start things off.

– Okay, maybe it’s just us getting better at handling these adhesive-packed devices, but this iPad feels surprisingly… easier to open? Could we be imagining it?

Step 4

– Getting through this much glue isn’t exactly our cup of tea, but hey, we press on… no backing down here!

– Luckily, just like before, the glass comes off smoothly, leaving the display behind—a nice surprise, and one we appreciate!

– After tackling all that adhesive, we’re pleased to see a Phillips screw—what a relief after last week’s tiny tri-points!

– This time, our Battery Blocker only fits into the battery terminal after a little snip-snip with scissors, but trust us, it’s worth it to ensure a safe LCD removal.

Tools Used
  1. Battery BlockeriPad 7 Teardown

Step 5

– Let’s compare this year’s 10.2″ digitizer panel (top) with last year’s 9.7″ version (bottom). Same design, but a bit more space in the new case!

– The battery is labeled A1484, rated for 32.9 Wh—yep, it’s the same battery we’ve seen for the past couple of years, even with the extra room in the larger case. We were hoping for a bit more after that big iPhone battery upgrade, but here we are!

– Take a look at that crisp 1.2-megapixel selfie camera. Honestly, who knew such clarity could fit into such a small package!

– The home button looks pretty much the same as last year. It’s not a huge upgrade, which might make screen swaps a bit trickier—just like last year’s model.

– Good news on the cable front! This year’s panel has simplified things a bit—fewer cables to worry about during the disassembly. Two of them are now thoughtfully overlapped, leaving you with one less potential headache. Nice touch!

Step 6

– Check out that new Smart Connector, all decked out in its adhesive glory!

– No moving parts here, so a Smart Connector replacement is likely not something you’ll need to stress about. But if you ever do, this Smart Connector is surprisingly easy to get to by iPad standards.

– Now, over on the logic board, we have these gooey antenna cable sockets. What’s the deal with this new goo?

– With cables out of the way, let’s bring the heat one last time to free this sticky logic board from its cozy home.

– Oh, sticky logic boards, why do you cling so? Every time we think of you, you make us feel a little queasy.

Step 7

– We have a solid guess about what’s inside here, but let’s take a closer look to confirm:

– Apple A10 Fusion APL1W24 SoC sitting on top of Micron D9WQC (MT53B384M64D4TP-062 XT:E) 3 GB LPDDR4 SDRAM (that’s half again as much RAM as last year’s model)

– SanDisk SDMRSEFJ2 032G 32 GB flash memory

– Broadcom BCM15900B0 touchscreen controller

– NXP Semiconductor 100VB27 NFC controller

– Cirrus Logic CS42L83A low power audio codec

– Apple 343S00314-A0 (PMIC) and Murata 339S00445 Wi-Fi/Bluetooth module

– Skyworks 850946, 203153033561852, and 13790697311912

Step 8

– Alright, here it is — the 10.2″ iPad 6 and iPad 7, stripped down and ready for inspection.

– This update is pretty chill! Just a bump in size, the addition of a Smart Connector, and an extra gig of RAM to keep things running smooth.

– The display and digitizer still keep their separate vibes, even with some Pro-level features thrown in, which we’re pretty happy to see sticking around.

Success!

🍪
Have a cookie! This site uses cookies to enhance your experience. Opt-Out Options.