Dell Inspiron n5050 Upper Case Replacement
Duration: 45 minutes
Steps: 9 Steps
Step 1

– Let’s get started by flipping your laptop over and taking a look at the bottom. You should see two locks – we’ll be working with those in this step.
Step 2

Sliding these locks will free up the battery for easy removal.
– Push those two locks apart like they’re having a sibling rivalry.
Step 3


It’s time to say goodbye to your laptop’s battery – completely remove it!
– Gently slide that battery out of your laptop like you’re unveiling a hidden treasure.
Step 4


After you release the first tab, carefully lift the keyboard to prevent it from locking back into place. As you work on releasing the remaining three tabs, keep the keyboard slightly lifted. It will hinge upwards along the bottom, making it easier to access the internal components. Remember to take your time and be gentle to avoid causing any damage.
– First, flip the laptop over and set it down with the screen facing you. Now, open it up like you’re ready to start the repair adventure.
– Next, grab your trusty spudger and gently press each of the four retaining tabs at the top of the keyboard, one by one. Take your time—patience is key!
Tools Used

Step 5


You can easily take out the optical drive without having to unplug that keyboard ribbon cable. How convenient is that?
– Carefully flip the data cable latch away from the cable using the flat side of your spudger. No rush, just a gentle move.
– Once the latch is out of the way, lift the cable up and out with ease.
– When putting the cable back, remember there are two little retainer wings on the sides. These wings should click into place at the bottom of the cable latch area to make sure everything is secure and properly inserted.
Tools Used
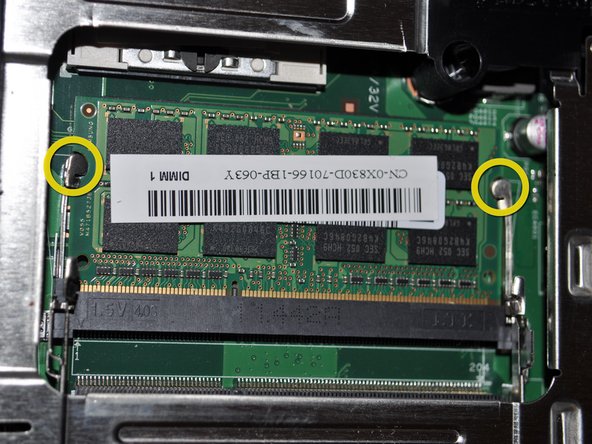
Step 6

– First, close the lid, then carefully flip your laptop so the bottom faces up, with the battery at the top. Ready to get inside?
– Now, grab your screwdriver and remove the 11 screws holding the upper case to the lower case. Keep them safe—you’ll need them in a bit!
Step 7

– Give your laptop a little flip and open that lid like a pro!
– Unscrew those two pesky screws on the upper case and let’s get this party started.
Step 8


– Gently remove the power cable like you’re giving it a little hug.
– Carefully take out the touchpad cable, treating it like a precious artifact.
– Lift that dark gray latch with a little finesse.
– Give the blue ribbon a little tug upwards, like it’s a fun surprise waiting for you.
– Once again, lift up on the dark gray latch, just to keep things moving.
– Pull that blue ribbon up again, because why not keep the adventure going?
Step 9

– To put your device back together, just follow these steps in reverse order—easy peasy!
– If you run into any trouble, you can always schedule a repair.
Success!