DIY Google Pixel 5 Loudspeaker Replacement Guide: Step-by-Step
Duration: 45 minutes
Steps: 43 Steps
A heads up from the team at Salvation Repair: we created this guide to help you fix your device, but we’re not affiliated with Google. Want to know more about our repair guides? Click here to learn more.
Before you start, make sure your battery is at 25% or less. This is an important safety precaution to avoid any accidents while you’re working on your phone.
Warning: be careful when disassembling your device to avoid damaging any components.
Hey there, tech-savvy friend! This easy-to-follow guide will walk you through replacing the loudspeaker on your Google Pixel 5, brought to you by the team at Salvation Repair. It’s a little like giving your phone a new set of vocal cords! Just remember to discharge your battery below 25% before you get started – safety first, always. And if you’re ever feeling unsure, you can always schedule a repair with us. We’re here to help! Just remember, if the battery is damaged, don’t try to use it again – that’s not cool. Get a new battery and keep the music flowing!
Step 1


The SIM card tray hangs out on the left side of your phone, just chilling near the bottom. Keep your eyes peeled for it!
– Grab your trusty SIM eject tool, a bit, or even a straightened paper clip and gently slide it into the SIM card tray hole.
– Give it a firm press to pop that SIM card tray out like a pro.
– Carefully pull out the SIM card tray and you’re all set!
Step 2

When using heat to loosen things up, remember that a hair dryer, heat gun, or hot plate can be your best friend – just be gentle and avoid overheating, as your phone’s display and internal battery are sensitive to high temperatures. If you need help, you can always schedule a repair
– Warm up an iOpener and place it on the bottom edge of the screen for about a minute. It’s like giving your phone a little warm hug!
Step 3


While the adhesive is taking its sweet time to loosen up, here are a few things to keep in mind:
Step 4


Alright, let’s get this party started! The next two steps are all about using the Anti-Clamp, a super-handy tool that makes opening your device a breeze. If you aren’t feeling the Anti-Clamp, skip down two steps and we’ll show you an alternative method.
If you’re curious about the Anti-Clamp and want a more in-depth guide, check out this guide. .
If your device is a little too slippery for the Anti-Clamp to hold onto, don’t sweat it! Just use some packing tape to give it some extra grip. Easy peasy!
– Gently tug the blue handle towards the hinge to switch off the opening mode.
– Place the suction cups close to the bottom edge of the screen—one on the front and the other on the back.
– Press down on the cups to create a strong suction where you need it.
Step 5


Take it easy and turn slowly – no more than half a turn at a time. Pause for a minute between turns and let the Anti-Clamp do its thing. If you need help, you can always schedule a repair
Make sure those suction cuppers stay in sync with each other. If they get out of whack, just loosen ’em up and get ’em back on track.
If the anti-clamp’s not cutting it, just add some more heat and give that handle a little spin in the right direction.
– Gently push the blue handle away from the hinge to kickstart the opening mode.
– Twist the handle clockwise until you notice those cups beginning to stretch.
– Hang tight for a minute to let the adhesive do its thing and create a gap for you.
– Once the Anti-Clamp has made a nice enough gap, slide in an opening pick under the screen and its bezel frame.
– Feel free to skip the next step.
Step 6


Got a screen that’s seen better days? Don’t worry, we’ve got you covered. If your screen is badly cracked, follow this guide to tape over the cracked screen. And if all else fails, you can try supergluing the suction cup to the broken screen – just be careful not to make things worse.
Depending on how old your device is, this step might be a bit tricky. If you’re having trouble, try applying some more heat and giving it another shot. And remember, if you need help, you can always schedule a repair with the experts at Salvation Repair.
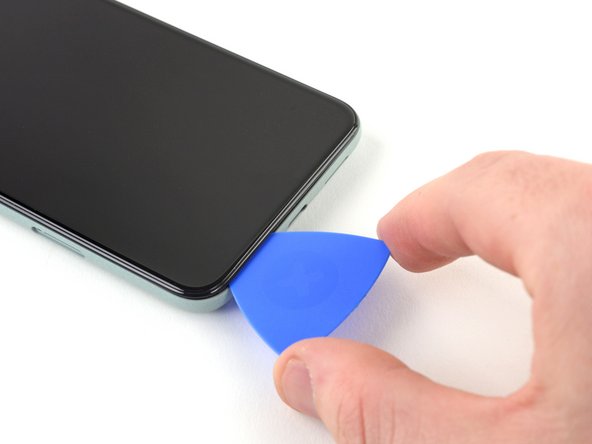
– Grab a suction cup and place it right near that warm edge of the screen.
– Give that suction cup a solid pull to open up a little gap.
– Slide the opening pick into that gap you’ve created.
Step 7


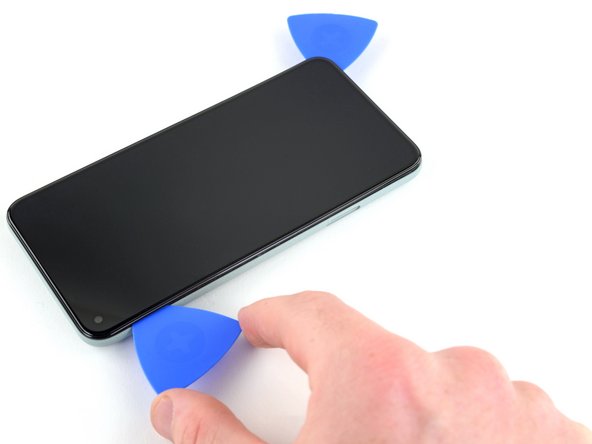
– Gently wiggle the opening pick back and forth at the bottom of the screen to break through the adhesive – it’s like cutting through sticky tape, but be careful not to push too hard.
– Leave the pick in place at the bottom right corner to keep the adhesive from sealing back up. If you need help, you can always schedule a repair
Step 8

– Let’s get this screen toasty! Warm up the left edge with a heated iOpener for about a minute.
Step 9


Keep your pick to a maximum of 1/4 inch (6 mm); going deeper might just send the screen’s flex cable into hiding along the middle of the left edge!
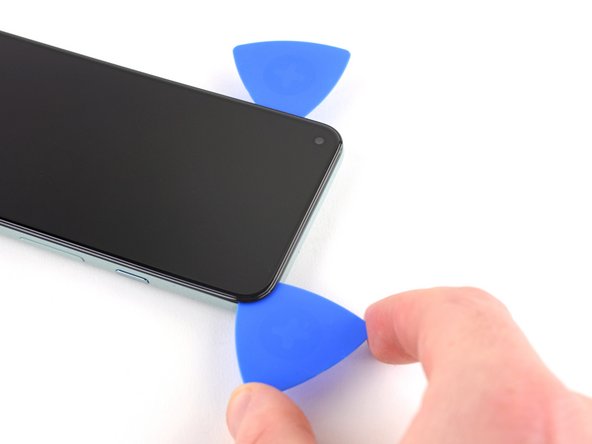
– Time to get this repair started – insert another opening pick into the bottom left corner of the screen, nice and easy.
– Now, gently slide the opening pick around the left corner, taking your time to get it just right.
– Keep sliding that pick up towards the front camera, using it to carefully slice through the adhesive on the left edge of the screen.
– Leave the pick in place for now – this will prevent the adhesive from re-sealing, making the rest of the repair a whole lot easier. If you need help, you can always schedule a repair
Step 10


If the adhesive is being stubborn, try warming it up with some heat for about a minute and then give slicing another shot. If you need help, you can always schedule a repair
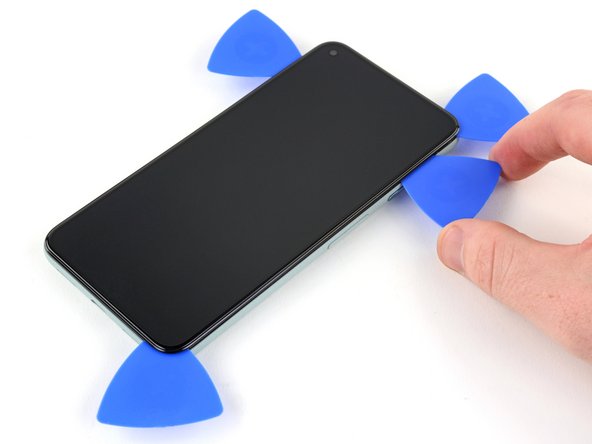
– Let’s get that screen popped open! Slide an opening pick into the top left corner of the screen.
– Now, gently slide the pick around the front camera and across the top edge of the phone.
– Almost there! Slide the pick to the top right corner of the phone and keep it in place.
Step 11


Feel free to run that opening pick around the edges once more to make sure all the adhesive is nicely sliced. It’s usually the thickest around those four corners, so give them a little extra love!
– Gently slide an opening pick into the bottom right corner of your screen. You’ve got this!
– Carefully glide that pick all the way up to the top right corner to cut through the last stubborn edge of adhesive. Keep it smooth!
Step 12


Keep the screen angle to a cool 90 degrees or less to avoid putting too much strain on that delicate screen flex cable. You’ve got this!
– Let’s start by using your opening pick to gently lift the screen’s left edge from the top corner. This will help to keep those pesky clips from snapping back down into the case.
– Now, lift up on the right side of the screen, just like opening a book! We’re almost there!
Step 13

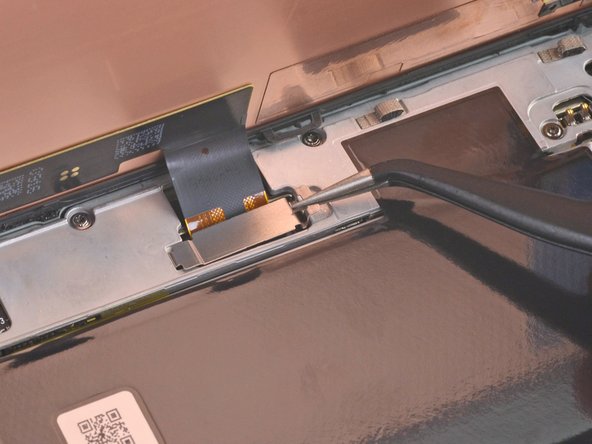
– Grab your trusty tweezers and give that screen connector cover a gentle squeeze. It’s holding the screen flex cable in place.
– Now, push that little clip towards the connector, like you’re giving it a high-five. This will unlatch it, and you’ll be one step closer to a working screen.
Tools Used

Step 14
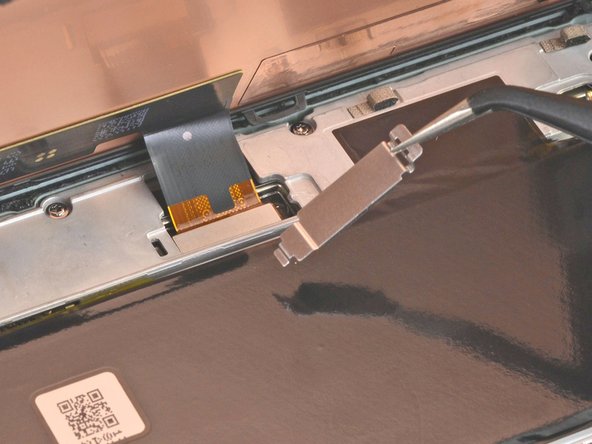

Hang onto this component – you’ll need it again when you’re putting everything back together.
– Go ahead and take off that screen connector cover. It’s time to uncover the magic inside!
Step 15
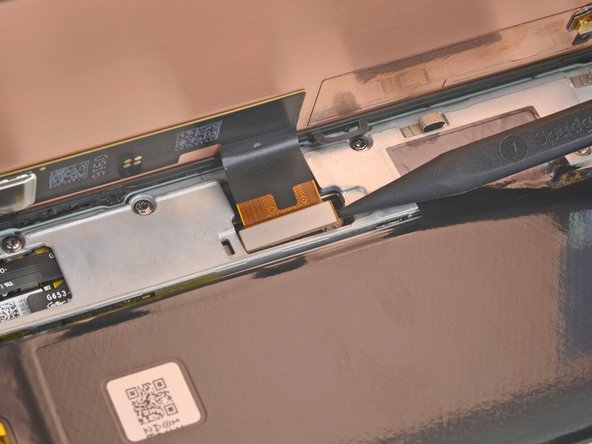

– Grab your trusty spudger and gently pry up to disconnect that screen flex cable. You’ve got this!
– When it’s time to re-attach, align those connectors just right. Press down on one side until you hear that satisfying click, then do the same on the other side. Remember, no pressing in the middle! If things get a bit wonky, the pins might bend, and we definitely don’t want that. If you need help, you can always schedule a repair.
Tools Used

Step 16


– Take the screen off.
– If you swapped the screen, double-check the camera hole and peel off any liners covering it.
– If your new screen’s display cable has tape holding it down, peel that tape off before installation.
– For custom-cut adhesive, follow this guide to apply the adhesive correctly.
– For reattaching the screen with Tesa tape, follow this guide.
– While booting up post-reassembly, the screen will automatically calibrate. Keep your hands off to avoid any touch issues.
Tools Used

Step 17


Careful with that battery, buddy! Don’t poke or bend it— a damaged battery might leak yucky chemicals or spark a fiery surprise. If you need help, you can always schedule a repair.
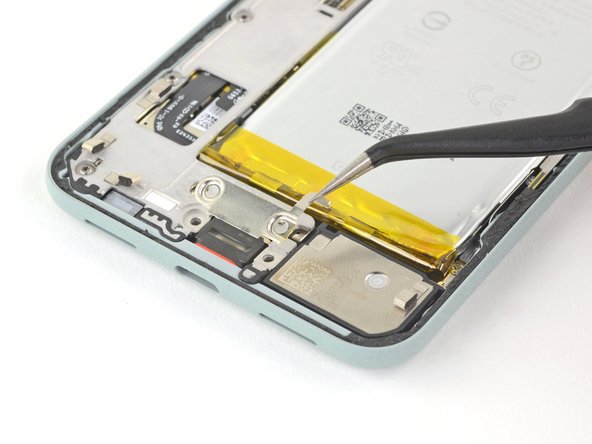
– Grab your trusty tweezers and gently lift that graphite tape until you can pinch it with your fingers.
– Now, go ahead and peel off the graphite tape like a pro!
Tools Used
Step 18


If you can keep that graphite pad in good shape, feel free to put it back on when you’re putting everything back together. You got this!
– Time to get up close and personal with that charging plate cover! Use tweezers to carefully peel off the graphite pad – it’s like a little sticker, but be gentle so you don’t damage anything underneath. If you need help, you can always schedule a repair
Tools Used
Step 19

As you tackle this repair, keep an eye on each screw and make sure it finds its way back to its original home.
– Grab your T3 Torx driver and give those two 4.6 mm screws securing the charging plate cover to the midframe a little spin! You’ll be taking them off, so don’t tighten them up! If you need help, you can always schedule a repair
Step 20

Don’t forget to hang on to this component so you can pop it back in when you’re putting everything together!
– Time to get started! Use tweezers to carefully remove the charging plate cover. If you need help, you can always schedule a repair
Tools Used
Step 21

– Grab your trusty T3 Torx driver and get ready to unscrew! You’ll want to take out those eight 4.6 mm-long screws that are keeping the midframe snug as a bug. Let’s do this!
Step 22


Heads up! When you take out the midframe, that spacer at the top might make a break for it. Keep it safe for the reassembly mission. For a visual guide, check out the pics in the motherboard replacement guide. If you need help, you can always schedule a repair
– Grab those tweezers and gently lift the right side of the midframe. You’re doing great!
– Now, go ahead and remove the midframe. Keep up the awesome work!
Tools Used
Step 23


– Now it’s time to disconnect the battery – use the pointed end of your trusty spudger to carefully pry the battery connector straight up from the motherboard. If you need help, you can always schedule a repair
Tools Used
Step 24

– Grab your trusty T3 Torx driver and carefully unscrew that 4.1 mm shouldered screw. You’ve got this!
Step 25

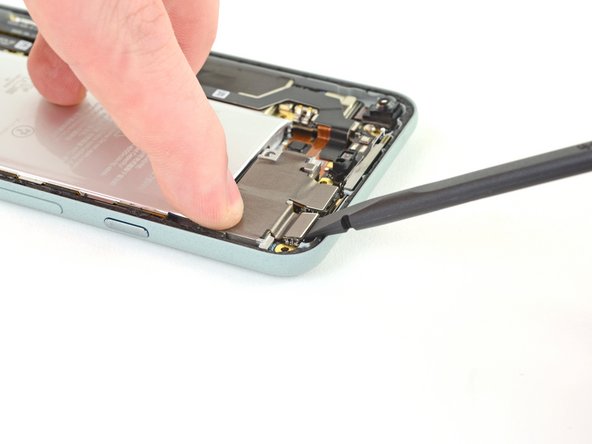

Gently press down on the rear camera assembly with your finger to keep the motherboard nice and straight. You’ve got this!
– Grab your trusty spudger and gently pry apart those two rear camera press connectors from the motherboard. You’ve got this!
Tools Used
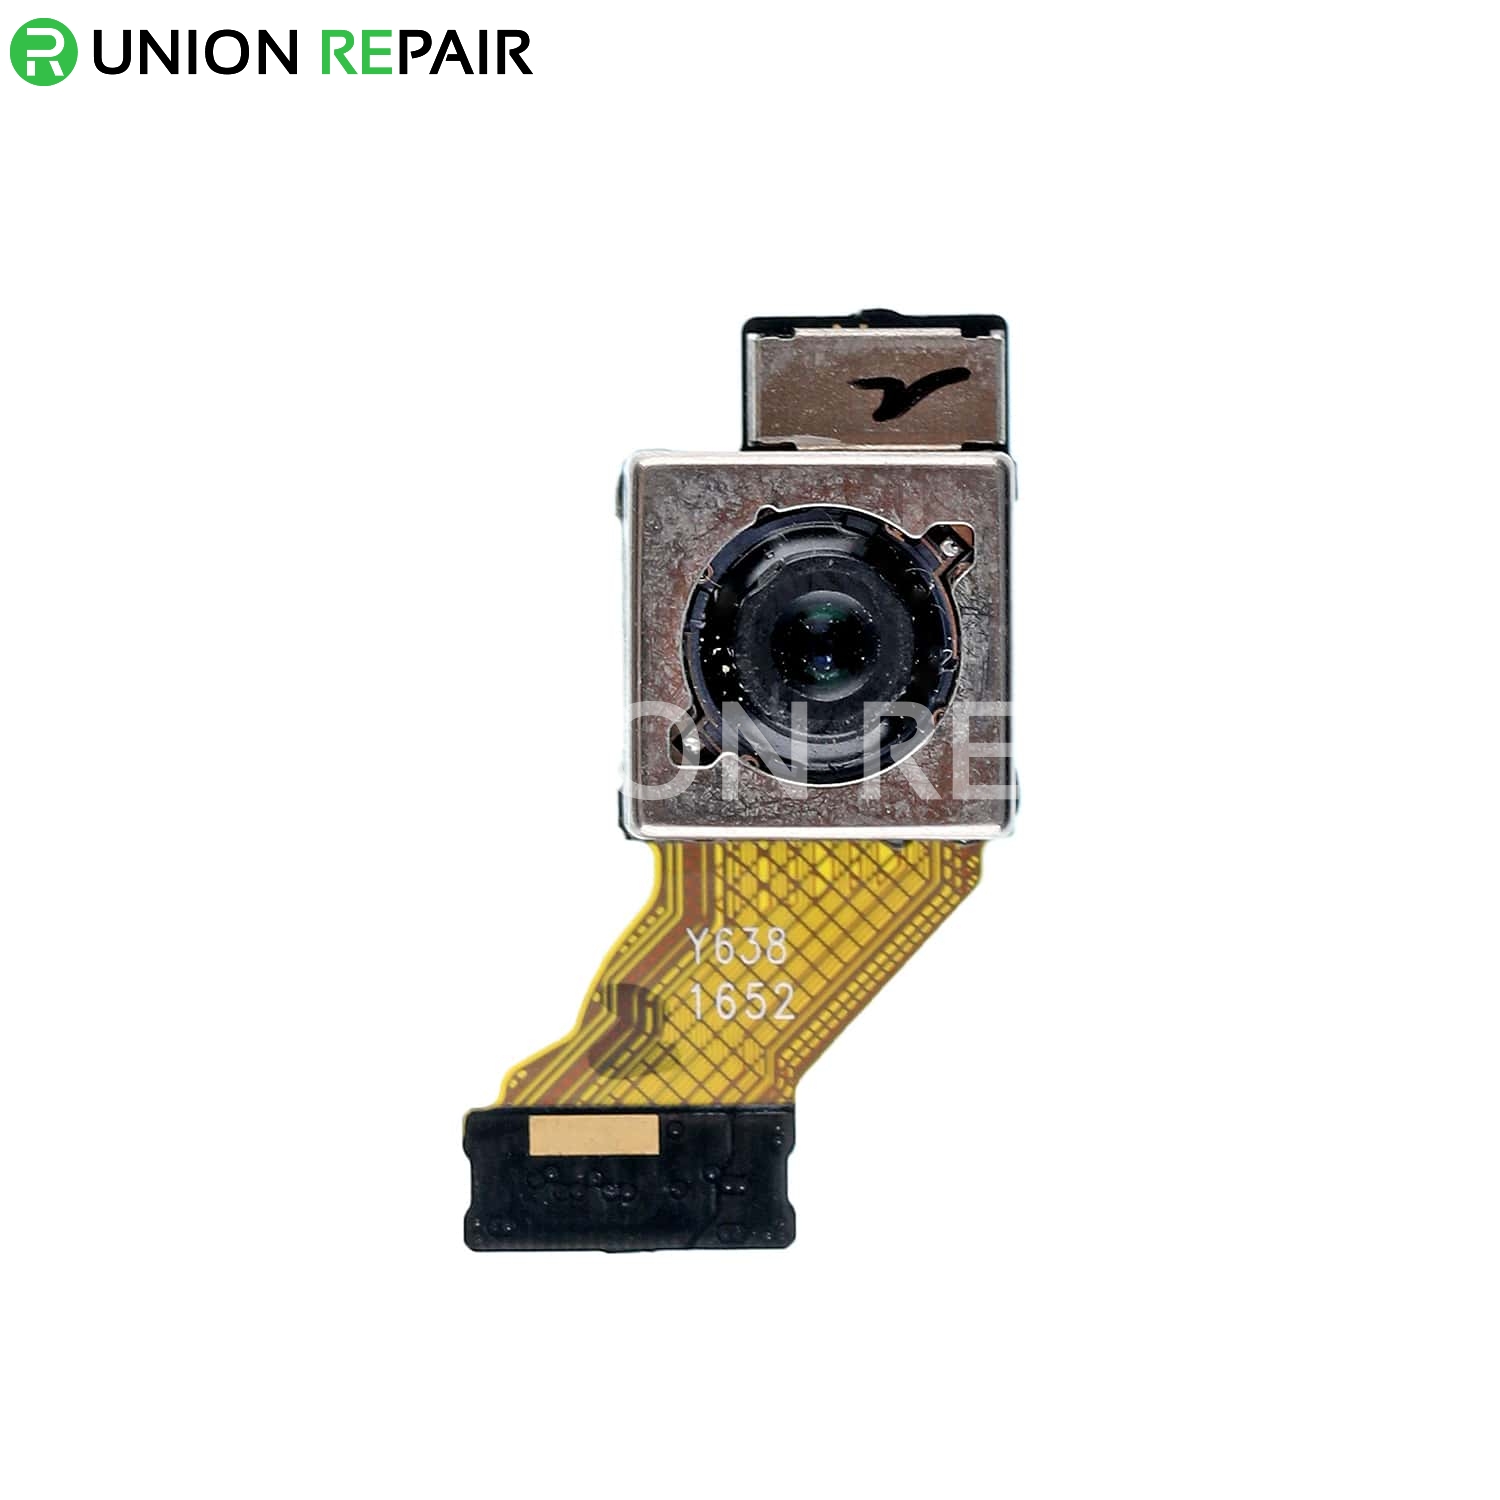
Step 26


– Grab those tweezers and gently lift the rear camera assembly out of its cozy little home!
– If your shiny new camera module comes with a plastic spacer, don’t forget to ditch that before it finds its way into your device.
– Give that lens a quick check—make sure it’s spotless and free of any dust or smudges before you pop in the camera assembly.
Tools Used