DIY Google Pixel 5a Battery Replacement Guide
Duration: 45 minutes
Steps: 29 Steps
This repair guide comes straight from the talented folks at Salvation Repair and isn’t officially backed by Google.
For your own safety, make sure to drain that battery below 25% before diving into your phone’s guts.
Hey there, tech enthusiast! This step-by-step guide, brought to you by the awesome folks at Salvation Repair, is all about taking the battery out or putting a new one in your Google Pixel 5a. Don’t forget to make sure that battery charge is below 25% before you start – safety first! If your battery looks like it might be bloated, be extra careful. For the best performance, once you’re done, go ahead and calibrate that new battery of yours. Happy repairing!
Step 1


First things first, give your device a break and power it down before diving into the repair. Safety first, right?
Now, you’re going to need to carefully lift the screen off the phone. Make sure to read the following notes closely to ensure a smooth operation.
Step 2

Depending on how strong the glue is holding your device together, you might need to heat it up a few times to loosen it up.
A hairdryer, heat gun, or even a hot plate can be used, but be careful not to get things too hot! Your phone’s screen and battery are sensitive to heat, so watch out. If you need help, you can always schedule a repair
– Time to get this repair started! Apply a heated iOpener to the right edge of the display for about a minute. This will help loosen the adhesive, making the next steps a breeze. If you need help, you can always schedule a repair
Tools Used

Step 3


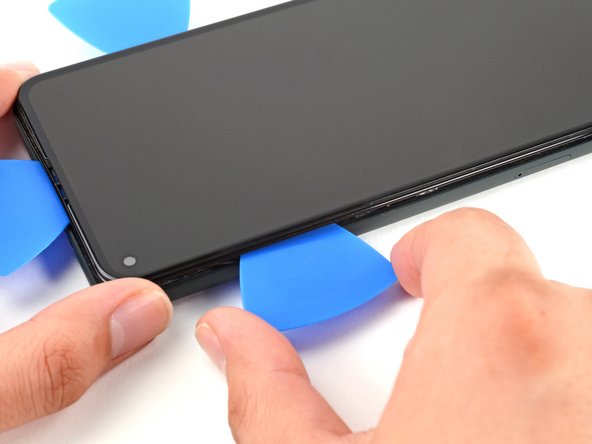
To remove the screen, we’re going to slip some handy opening picks in between those black clips that hold the bezel to the midframe. It’s like a little dance – we’re getting ready to pop it off! If you need help, you can always schedule a repair.
– Alright, let’s get this party started! Before we dive in, take a peek and see where’s the best place to make our entrance.
Step 4


If your screen is badly cracked, don’t worry – we’ve got a few tricks up our sleeve. Try covering it with clear packing tape to help the suction cup stick. If that doesn’t work, super strong tape can be a great alternative. And if all else fails, a little superglue can save the day and help the suction cup stay in place. If you need help, you can always schedule a repair
– Stick a suction cup near the right edge of the screen.
– Lift the suction cup with a steady grip until a small gap appears between the bezel and midframe.
Step 5


The bezel is attached to the midframe using plastic clips. To detach them, simply insert an opening pick along the seam at the designated points. If you need help, you can always schedule a repair
– Gently slide the tip of your opening pick into the bezel seam, about 4-5 cm from the bottom of your phone. You’re on the right track!
Step 6


– Now it’s time to get started – insert the tip of an opening pick into the bezel seam, about 3-4 cm from the top of the phone. Remember to take your time and be gentle, and if you need help, you can always schedule a repair
Step 7


If you’re finding this step a bit tricky, just slide that pick along the top right corner of your phone until you’ve created a nice little gap at the top for the opening pick to slip in.
– Gently slide the tip of your opening pick into the bezel seam at the top of the phone.
Step 8


If you’re having trouble with this step, don’t worry – just slide the pick along the bottom right corner of the phone until you’ve got enough of a gap at the bottom to fit the opening pick. If you need help, you can always schedule a repair
– Let’s get this party started! Gently slide the tip of your opening pick into the crack between the phone’s bezel and the bottom edge. It’s like a little dance, just be smooth about it.
Step 9


– Gently slide the tip of your trusty opening pick into the bezel seam on the left side of your phone, roughly 2 cm up from the bottom. Easy peasy!
Step 10

– Let’s get this party started! Slide the tip of your trusty opening pick into the seam of the bezel, about 3-4 cm below that front-facing camera. You got this!
Step 11


– Make sure to pop off all the clips. Use an opening pick to carefully cut through any leftover adhesive.
– Gently open the device from the right side, just like flipping through a book.
Step 12

Hey, remember where all those screws came from? Put ’em back in the same spot. Think of it like a puzzle, but with tiny metal pieces. 😉
– Grab your trusty T3 Torx driver and go ahead and unscrew that 4.6 mm-long screw holding the screen connector bracket in place. You’ve got this!
Step 13


– Time to get up close and personal with those tiny screen connector brackets! Use a trusty pair of tweezers to carefully remove them. If you need help, you can always schedule a repair
Tools Used

Step 14


– Use the tip of a spudger to carefully pry up and disconnect the screen flex cable. Think of it like gently persuading the cable to let go!
– To re-attach press connectors like this one, carefully align and press down on one side until it clicks into place, then repeat on the other side. Don’t press down on the middle, that could make the connector unhappy! If the connector is misaligned, the pins can bend, causing permanent damage. If you need help, you can always schedule a repair
Tools Used

Step 15

You better believe it, reinstalling that screen connector bracket is the move you gotta make! Don’t be shy now, time to get your fixin’ on and show that gadget who’s boss! If you need help, you can always schedule a repair.
– Alright, let’s get this screen out of here!
– Now, let’s put things back together!
– If you swapped out that screen, make sure the camera hole is nice and clear. Remove any pesky protective liners that might be hanging around.
– If you’re using a custom-cut adhesive, check out our handy guide on how to stick that screen back on like a pro.
– If you’re using Tesa tape to get that screen back in place, we’ve got a guide for that, too!
– After you put everything back together, your screen will go through a little calibration dance during boot-up. Just sit back and relax – don’t touch it! If you touch it, it might mess up the touch screen and you’ll be tapping away with no results. If you need help, you can always schedule a repair
Step 16

– Grab your trusty T3 Torx driver and let’s tackle those six screws holding the midframe to the motherboard!
– Remember, some of these screws are like little snowflakes—each one is unique in length! Keep them organized so you can put them back in their rightful spots.
– Four screws measuring 4.6 mm
– One screw measuring 4.0 mm
– One tiny screw measuring 2.0 mm
Step 17


– Let’s get this party started! Use the pointy end of your spudger to gently lift up the black plastic cover at the bottom left of your phone. It’s like giving it a little high five! If you need help, you can always schedule a repair.
Tools Used
Step 18


– Slide the pointed end of the spudger left until the plastic cover is completely separated from the midframe. You’re doing great!
– Now, gently remove the plastic cover from the midframe. You got this! If you need help, you can always schedule a repair
Tools Used
Step 19


– Grab a trusty pair of tweezers and gently lift the tape that’s hiding those two screws keeping the charging port bracket snug as a bug.
Tools Used
Step 20

– Time to get that midframe loose! Use a T3 Torx driver to remove the last four screws holding it in place to the motherboard:
– You’ll find three 4.6 mm screws
– And one 4.0 mm screw. If you need help, you can always schedule a repair
Step 21

Heads up! Be extra careful when working with the battery. Don’t go poking it with your tools, or it might get grumpy and leak some nasty stuff. Nobody wants a fire, right? If you need help, you can always schedule a repair.
– Time to get started! Use a spudger or a pair of tweezers to carefully peel back the tape that’s holding the charging port bracket in place on the speaker assembly. If you need help, you can always schedule a repair
Step 22


Handle with care – gripping the graphite sheet can be a bit tricky, so make sure not to accidentally puncture or damage the battery. If you need help, you can always schedule a repair
– Time to get up close and personal with that battery! Use a blunt pair of tweezers or your fingers to gently pry back the graphite sheet covering it. Remember to take your time and be careful. If you need help, you can always schedule a repair
Tools Used
Step 23


– Let’s get this midframe party started! Take your spudger, and gently slide the pointed end under the top right corner of the midframe. You’ll see a black plastic clip up there, holding it in place. Give that clip a little nudge with the spudger to free it. Now, pull the midframe down and use the spudger to pry it up. You’ve got this!
Tools Used


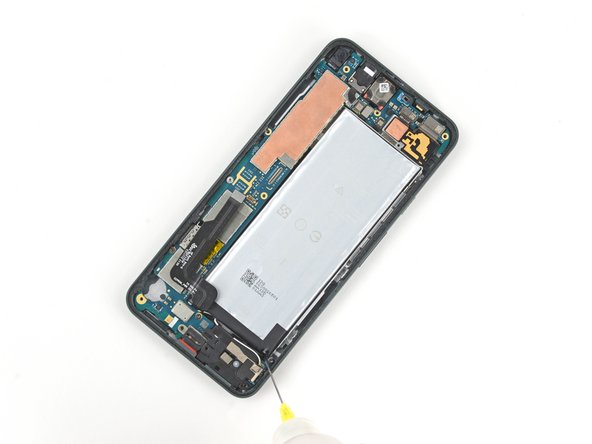
Step 25


– Whoa there, keep those lil’ plastic buddies safe and sound! They’re like the tiny, helpful elves that help hold your phone’s middle frame together. Don’t go losing them now! Once you’re all set, just pop ’em back in their favorite corners when you’re ready to puttin’ your gizmo back together. Need a hand? No worries, you can always schedule a repair!
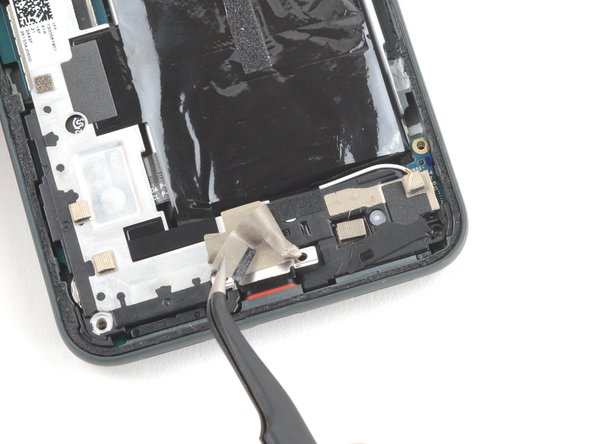
Step 26


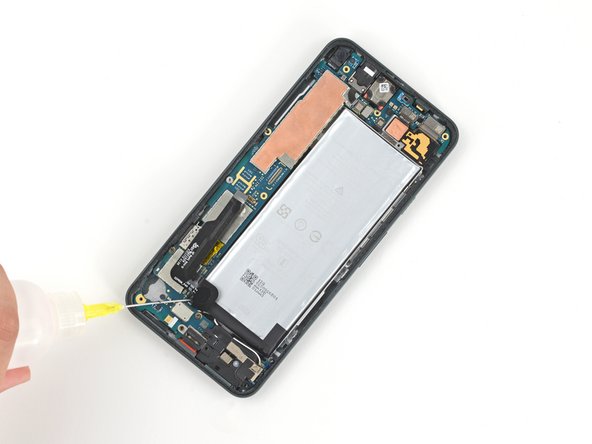
– Let’s get that battery disconnected! Use the flat end of a spudger to gently pry up on the battery connector. It’s like giving the connector a little high-five, but with a tool. If you need help, you can always schedule a repair
Tools Used