DIY Google Pixel 6a Earpiece Speaker Replacement Guide: Step-by-Step Repair Tutorial
Duration: 45 minutes
Steps: 41 Steps
Brace yourself for some seriously useful tips below. Don’t forget it’s always a good idea to discharge your battery below 25% before starting, and if you need any extra help, you can always schedule a repair!
Hey there, tech lover! This handy-dandy guide will help you swap out that earpiece speaker on your Google Pixel 6a. We’re here to make things fun, easy, and rewarding. First things first: let’s make sure that battery is chilled out (under 25%) before we start poking around. Safety first, right? If that battery is looking a little puffy, be careful, and if you need help, you can always schedule a repair. Heads up: This guide’s based on the Verizon GB62Z model with a 5G mmWave antenna. If yours is a different model, just skip the 5G mmWave antenna steps—the rest is all the same. Speaking of ‘all the same,’ you’ll need some replacement adhesive to make this thing stick. You’ve got this, champ!
Step 1


– Alright, let’s get started! First things first, make sure your phone is completely powered off. Unplug any cables that might be connected. You got this!
Step 2


– Time to get started! Insert a SIM eject tool, a trusty paper clip, or a specialized bit into the tiny hole on the SIM card tray.
– Gently push the SIM eject tool into the hole until the SIM card tray pops out – easy does it!
– Now, carefully remove the SIM card tray and you’re one step closer to getting your device up and running. If you need help, you can always schedule a repair
Step 3


Before diving into your repair adventure, keep these tips in mind:
Step 4


Get ready to make the opening process a whole lot easier with our trusty Anti-Clamp tool! If you’re not using it, no worries – just skip ahead three steps for an alternative method.
Got a cracked screen? No problem! Just cover it with some clear packing tape to help the suction cup stick.
Want the full lowdown on using the Anti-Clamp? Check out our guide for all the details.
If your phone’s surface is too slippery for the Anti-Clamp to get a grip, don’t stress – just add some tape to give it a bit more traction. And if you need help along the way, you can always schedule a repair with Salvation Repair.
– First, let’s get started by pulling the blue handle backwards to release the Anti-Clamp’s arms. This will give you the room you need to work on your phone.
– Next, slide the arms over the right edge of your phone – it’s like giving your phone a big hug.
– Now, position the suction cups near the middle of the right edge of the phone, one on the front and one on the back. This will help you get a good grip on your phone.
– Finally, squeeze the cups together to apply suction. If you need help or feel unsure at any point, you can always schedule a repair with Salvation Repair.
Step 5


– Give that blue handle a good pull forward to lock those arms in place!
– Now, twist that handle clockwise a full 360 degrees or until you see those cups starting to stretch out a bit.
– Keep an eye on those suction cups! They should be buddies, staying aligned. If they start to wander apart, just loosen them a tad and get those arms back on track.
Step 6


Hey, just go easy on those screws! Only give them a half turn at a time, and chill out for a minute in between. Let the screwdriver do its thing. You’ve got this! If you need help, you can always schedule a repair.
Feel free to use a hair dryer or heat gun, but watch out! Too much heat can be a party crasher for your display or internal battery, so handle with care.
If the Anti-Clamp isn’t doing its job and creating enough space, just give it a little extra heat and twist that handle clockwise for a half turn.
– Get your iOpener warmed up and thread it through the Anti-Clamp’s arms, positioning it along the right edge of your phone – easy peasy!
– Give the adhesive a minute to loosen up and create a gap – patience is a virtue, and it’ll be worth the wait!
– When the Anti-Clamp creates a big enough gap, slip an opening pick under the screen frame and you’re making progress!
– Go ahead and skip the next two steps – you’re getting closer to a fully repaired device, and if you need help, you can always schedule a repair
Tools Used

Step 7

You can also use a hair dryer, heat gun, or hot plate to warm things up a bit, but remember to keep a close eye on the temperature! Overheating can be a real bummer for your phone’s display and internal battery, which don’t take kindly to heat. If you need help, you can always schedule a repair.
– Let’s get started! Heat an iOpener and apply it to the right edge of the screen for about two minutes. If you need help, you can always schedule a repair
Tools Used
Step 8


Got a badly cracked display? Don’t worry, we’ve got a trick for you. Try covering it with clear packing tape to help the suction cup stick. If that doesn’t work, you can use some seriously strong tape instead. And if all else fails, a little superglue can save the day and help the suction cup stay put on that broken screen.
Having trouble with this step? Don’t sweat it – it can be a bit tough, especially with older phones. Just apply some extra heat to the edge and try again. If you’re still having trouble, remember that you can always schedule a repair with Salvation Repair.
– First, attach a suction cup to the screen, positioning it as close to the center of the right edge as you can.
– Next, pull up on the suction cup with a firm, steady force to create a gap between the bezel and the frame – you’re making progress!
– Now, take an opening pick and carefully insert it into the gap you just created. If you need help, you can always schedule a repair
Step 9


Don’t go overboard with the pick! Just a gentle 3.5mm deep to avoid any internal mishaps. 😉 If you need help, you can always schedule a repair.
– Keep that suction going and gently tilt the pick up to a pretty sharp angle – you’re making progress!
– Now, carefully nudge the pick in while keeping it at an angle, which should help you coax the opening pick into the bezel seam. If you need help, you can always schedule a repair
Step 10


– Gently slide the pick along the right edge to release the plastic clips that hold the bezel in place – you’re making great progress!
– Now, position the pick at the top-right edge, and get ready to move on to the next step. If you need help, you can always schedule a repair
Step 11


Keep it cool! Slide that pick in no more than 4mm to steer clear of any internal damage.
– Gently maneuver the opening pick around the top-right corner of your device to pop those clips loose.
– Once you’ve freed the clips, keep the pick in that sweet spot at the top-right corner to stop them from snapping back into place.
Step 12


When you’re working near the front camera, just insert the pick up to 3mm. Any deeper and you might give the lens a bad day. If you need help, you can always schedule a repair.
– Let’s get this party started! Insert a new opening pick into the gap you just made.
– Now, slide that pick along the top edge to release those clips. It’s like giving the device a little high-five!
Step 13


– Gently spin that opening pick around the top-left corner of your phone to pop those clips loose.
– Keep the opening pick nestled in the top-left corner to make sure those clips don’t snap back into place.
Step 14


Hey there! Just a friendly reminder to only slide that pick in up to 3 mm. We want to keep those internals safe and sound!
At this stage, the screen should be coming free from the frame. If you’re feeling any stubbornness around those edges, grab an opening pick to help pop any last clips loose. You’ve got this! If you need help, you can always schedule a repair.
– Alright, let’s get that opening pick in the gap you just made. You’ve got this!
– Now, slide that pick along the left edge to release those clips. Easy peasy!
– Keep going! Repeat that rotating and sliding action for the rest of the edge. You’re almost there!
Step 15


Hold up, cowboy! Don’t go yanking that screen out just yet. It’s still chillin’ with the frame, connected by a little flex cable.
Keep that screen nice and steady, amigo. Don’t twist it or pull it too far from the frame. We don’t wanna go messing up that flex cable, now do we?
Step 16


That display cable bracket is held down by some metal clips. Let’s get those out of the way!
– Grab those tweezers and give the bottom part of the bracket a gentle nudge upward to let that metal clip free!
– Time to say goodbye to the display cable bracket—remove it carefully.
– When you’re piecing things back together, remember to slide in the top side of the bracket first before pressing down on the bottom. If you skip this step, it might lead to a spark show and some logic board heartbreak!
Tools Used

Step 17


Take extra care with this step! We wouldn’t want you to accidentally bump those tiny components around the press connector. You’ve got this! If you need help, you can always schedule a repair.
– Let’s get started by carefully inserting the tip of an opening pick under the bottom right edge of the display cable press connector – you’ll find it right above the nearby screw hole.
– Gently pry up and disconnect the display cable press connector. Easy does it!
– To reattach press connectors like this one, align them carefully and press down on one side until you hear that satisfying click. Then, repeat on the other side. Remember, don’t press down on the middle, or you might end up bending those pins and causing permanent damage. If you’re not feeling confident, don’t worry – you can always schedule a repair with the pros at Salvation Repair.
Step 18


Don’t forget to pop that display cable bracket back in place!
– Time to say goodbye to the old screen!
– As you get ready to put everything back together:
– If you’ve swapped in a snazzy new screen, don’t forget to check the front-facing camera hole and sensor cutout. Remove any leftover liners that are hanging out.
– Peek at your old screen to see if the proximity sensor’s rubber gasket is playing hide and seek—it might be stuck on it. If it is, time for a little replacement!
– Now’s a great moment to give your phone a little test drive before sealing things up. Temporarily reconnect your screen, power it up, and make sure it’s behaving! Just remember to turn it off again before moving on to the next steps.
– Need to reattach that screen adhesive? Check out this handy guide.
– Installing a shiny new screen? Be sure to reference this guide to get your fingerprint sensor all calibrated and ready to roll.
Step 19


Be careful not to completely remove the tape – just gently pry away the bridge between the midframe and the top speaker. If you need help, you can always schedule a repair
– Grab your trusty tweezers and carefully peel back that silver tape linking the midframe and the top speaker. If you need help, you can always schedule a repair.
Tools Used
Step 20


– Grab your trusty tweezers and gently lift the tape that’s hiding the two screws on either side of the USB-C port. You’re doing great!
Tools Used
Step 21


– Grab your trusty T3 Torx screwdriver and let’s tackle those 16 screws holding the midframe in place:
– First up, we’ve got eight 4.3 mm screws ready to be unscrewed.
– Next, there are five 2.9 mm screws waiting for your attention.
– Don’t forget about the two 4.9 mm screws that need to come out too.
– And finally, there’s one last 4.6 mm screw to finish the job!
Tools Used

Step 22


– Time to get started! Insert a spudger between the top of the midframe and the frame, near the front camera – it’s a great first step in getting your device back up and running.
– Now, gently pry up with the spudger to release the top of the midframe from its clips. Remember, if you need help, you can always schedule a repair with the experts at Salvation Repair.
Tools Used


Step 24


Feeling a little pushback? No worries! That’s just the midframe getting cozy with the heat sink thanks to some thermal paste. It’s all part of the process, so keep at it! If you need help, you can always schedule a repair.
– Take off that midframe! You’re one step closer to victory. When you’re piecing everything back together, it’s a perfect chance to turn on your device and test out all the functions. Just a heads up: remember to completely power down your phone before diving back into the repair process. You’ve got this!
Step 25


– Let’s get our groove on and clean this bad boy! Use the flat end of a spudger to scrape off the thermal paste. Once it’s all wiped down, clean any remaining thermal paste with isopropyl alcohol and either a coffee filter or a lint-free cloth. Feelin’ fresh yet? You can do it! Now it’s time to tackle the midframe. Repeat the cleaning process for the thermal paste on the midframe. Finally, when reassembling, follow this guide schedule a repair to ensure your device is back to being your techy BFF. If you need help, you can always schedule a repair!
Tools Used


Step 27


Whoa, not a 5G mmWave antenna? No problem, just skip ahead and let’s keep this repair party rocking!
– Let’s get started! Use a T3 Torx screwdriver to carefully remove the 2.9 mm screw that’s holding the 5G mmWave antenna bracket in place. If you need help, you can always schedule a repair
Tools Used


Step 29


– Alright, let’s gently pop off that 5G mmWave antenna connector with a spudger. Just a little wiggle and it’ll come loose! If you need help, you can always schedule a repair.
Tools Used
Step 30


– Alright, time to free that 5G mmWave antenna! Use your trusty tweezers or your fingers to carefully remove it. If you’re feeling a little hesitant, you can always schedule a repair and let our experts handle it.
Tools Used
Step 31


– Time to give that ultrawide rear camera a little nudge! Use a spudger to carefully pry up and disconnect its connector.
– Now, it’s time to say goodbye to the ultrawide rear camera. Carefully remove it.
Tools Used
Step 32


– Time to get started! Use a spudger to carefully pry up and disconnect the wide rear camera’s press connector – don’t worry, it’s easier than it sounds!
– Now, simply remove the wide rear camera. If you need help, you can always schedule a repair
Tools Used
Step 33


– Grab your trusty spudger and gently wiggle the flat end underneath the volume and power button connector located in the top left corner of the motherboard. Give it a little lift—you’re doing great!
Tools Used
Step 34


– Grab your trusty T3 Torx screwdriver and gently twist out that 2.9 mm screw holding the motherboard in place. You’ve got this!
Tools Used
Step 35


– Let’s get that motherboard out! Slide a spudger between the top of the motherboard and the frame, near the front camera.
– Now, gently pry up to lift the motherboard until you can get a good grip on it. You’ve got this!
Tools Used
Step 36


– Now, give that motherboard a little lift! Gently tilt the top of it upwards to release those plastic clips holding it down.
– Go ahead and remove the motherboard. It’s ready to go!
Step 37

The earpiece speaker is gently stuck to the frame.
– Warm up that iOpener and place it on the top left corner of the phone’s back for a cozy two minutes.
Tools Used
Step 38
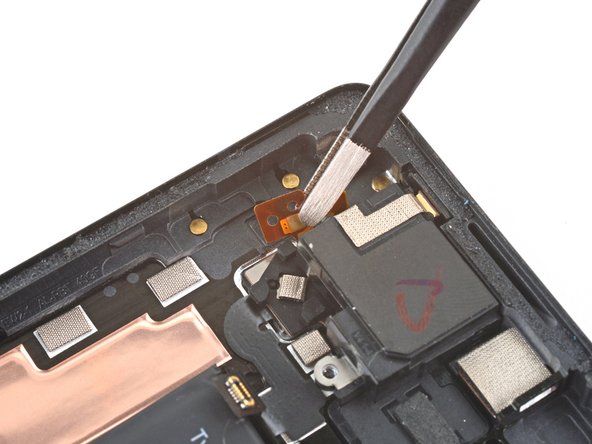

Be careful when handling the connector pad – grip the square part, not the cable itself. If you need help, you can always schedule a repair
– Grab the edge of the earpiece speaker connector with some trusty tweezers.
– Give those tweezers a little twist away from the frame to gently loosen the adhesive under the connector.
– When you put things back together, double-check that the connector is snugly slotted in its two little peg holes – that’ll make sure everything’s aligned just right.
– If you need help with any of this, you can always schedule a repair.
Tools Used


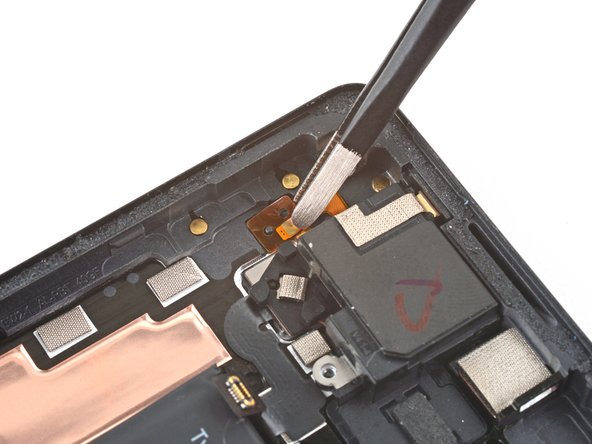
Step 40


– Carefully slide an opening pick between the frame and the earpiece speaker’s screw hole bracket – it’s like a little puzzle piece that needs to fit just right.
– Gently pry up with the pick to separate the earpiece speaker from the frame. Take your time and be patient, it’s a delicate step. If you need help, you can always schedule a repair
Step 41
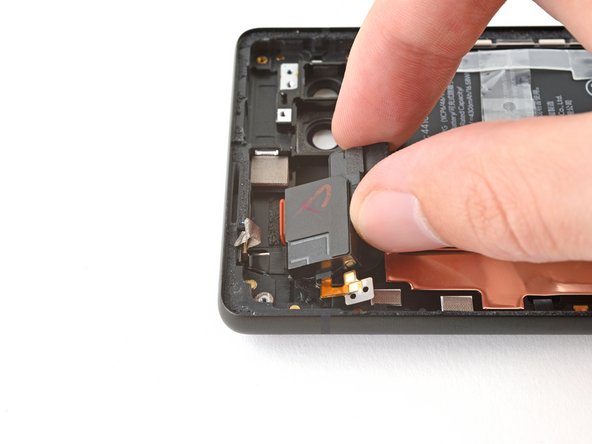

– Gently pull the earpiece speaker out of its slot in the frame using your fingers, and then remove it. If you need help, you can always schedule a repair
